This post has been sponsored by Sherwin Williams, opinions are 100% mine (but you probably knew that if you’ve been following along!)
When Sherwin Williams asked to provide the paint for a project, a printer/paper/ office storage unit instantly came to mind, my office area was in desperate need for more organization!

Thinking about color, I wanted something soft, yet wouldn’t get lost in the background.
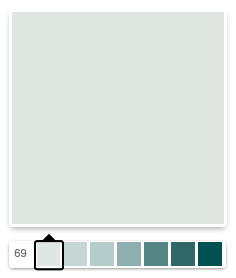
Sherwin Williams Glimmer SW 6476 a light, almost minty blue. I love love love the color, it has the perfect balance of soft intensity and subtleness.
Next, we gathered supplies, a mixture of re purposed supplies such as cabinet doors and chair legs and new materials such as, plywood and 1x3s.
A large part of the design build process is designing as you go (especially with something more complex) so this isn’t a formal tutorial, but a general guide line of how we did things. If I miss anything, feel free to ask!

The basic frame is constructed on 1x3s, with two cabinet doors for the sides, 1/8″ luan for the back and 3/8″ plywood for the bottom.

We used the legs that we cut off when we converted our counter height table/chairs to dining height. They are attached with gorilla glue and secured with two heavy duty cabinet anchors that tied into the side.

After sanding and wiping the dust off with a microfiber cloth, we were ready to prime!
We used my favorite primer, Sherwin Williams Premium Wall and Wood Primer
It goes on smoothly and adheres well to the surface, the top coat grabs on to the surface and brushes/rolls great!
I decided on a 6″ smooth foam roller. I find that on long straight surfaces it helps prevent brush/roller marks since there is so much area to cover, it helps you to move fast and catch any drips before they start to dry. Like brushing, the key is to apply thin coats and not over roll. The paint will self level when drying.

After the primer dried, we quickly sanded with a fine grit sandpaper, wiped off the dust with a microfiber cloth and started rolling on paint!

Sherwin Williams Pro Classic is a favorite for painting furniture because it goes on smoothly, it is a water based enamel paint which leaves a hard finish, perfect for higher traffic areas.

We installed the shelves, stationary on the sides and on tracks in the center. Look at all that storage! 🙂

Next we taped off a modified chevron design with 1″ painters tape inspired by this Serena and Lily rug. We started with the angle in the center, going to the corner of the door and used a small piece of 1″ tape to space the next line. For the center section we cut the edge with an Xacto knife and simply pushed the tape down. We didn’t paint the inner edge of the recessed panel, which saved time taping and it looks better (at least I think so 🙂 Total taping time took about 2 hours.


We then removed the tape, lots of concentration going on here! I guess it makes sense because those inner edges were tricky to get without digging your nail into the paint!

David then tied two 1x10s together underneath with supports that could attach to the base with screws. We filled the center seam with wood filler, it took two applications to get smooth.

We repeated the steps for priming and painting, attached the hardware and we were done!

I moved the lamps from the sofa table, love how they frame the painting! I am also reworking the gallery wall (more on that later)

I picked up these little knobs from Antropologie on clearance, I wanted something subtle that wouldn’t compete with the paint.

I made a tray out of thin poplar and 1/8″ luan on the bottom with a yellow trellis fabric that I found at Joann Fabrics. I also picked up the white urchin from the Nate Berkus line at Target.


I also love it at night time with the lamps on!

This has been our most time intensive project to date, but well worth it! I love the storage and two tone paint!
Come back tomorrow to see what the inside looks like!
Love it!!! The pattern is so subtle yet fun!
Hi Megan! Thanks so much! I was going for subtle, so glad you think so!
What an incredibly beautiful piece. I love the subtlety of the painting and it's overall aesthetic. You should both be very proud of your amazing accomplishment! Just lovely…..
Thanks Suzy! It took longer than anticipated, but worth it!
another incredible project! beautiful! thanks for the all the details on the process. you always give the best information!
Thank you Dierdra! I was worried that I didn't have enough details, glad that it still made sense! 🙂
This is so stunningly beautiful! You guys did such an amazing job and the colors are right down my alley. I just bought the urchin a couple of days ago too but in gold 😉
LOVE your blog.
Love that urchin! and I also love love the colors 🙂
That looks SO good! Such a soft, yet major statement piece!
Thanks so much Sarah!! If i could sum up what I was going for I would say a soft statement piece, so glad that it translated 🙂
The paint treatment is so gorgeous. Love the way your painting looks above it too!
Thanks Jennifer!! It's been so long since I've painted, glad to get back into it!
Wow!!! Amazing!!! You did a fascinating job! The end product is perfect!!!
Claudia
You two are so meticulous – your work is incredible!
Those who build together, stay together. It is awe inspiring to see such a massive project come together the way you envisioned it. You're probably not going to move for a while now so you can enjoy that right where it is. Looking forward to your office after pictures.
Love,
Shalagh
Love how you styled this gorgeous piece too, nice job 🙂
absolutely beautiful. good job you guys!!
Wow, spectacular results. SOOOOO worth the effort… it looks awesome!!!!!
It came out great! So cute all pulled together with the lamps and your painting. Love it!
I just stumbled upon your new site and your pieces are amazing. You are super talented, and I love all the DIY projects. I am a new follower.
Hi Ali! Thanks so much for following along!
love it!