• Home
  • About
  • Services
  • Shop
    • Bloglovin
    • Email
    • Facebook
    • Instagram
    • Pinterest
    • Twitter

Dorsey Designs

DIY and Interiors by Sarah + David

  • Home Tour
  • DIY TUTORIALS
  • friday favorites
  • design + build
  • art

get the latest straight to your inbox

Chinoiserie Inspired Bamboo Nightstands

This week, we finished our bamboo project … nightstands! Ever since we made the grasscloth + nailhead feature wall, I’ve wanted simple, open nightstands that wouldn’t hide too much of the nailhead.

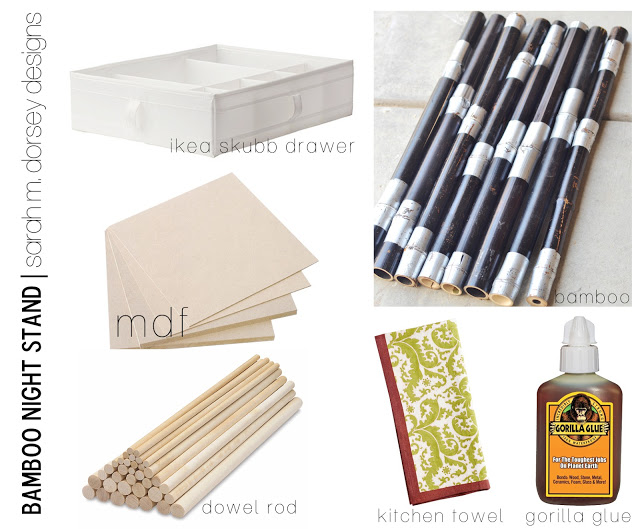
I’ve been playing around with a few options, but once I found the Skubb drawer at Ikea and thick bamboo on clearance at a local craft store, I was excited to get started! The plan included, a simple top that was built to fit around the drawer with bamboo legs for the base.

This project is a perfect example of how David and I work together … he loved the idea of a box built to fit a fabric drawer, but the bamboo legs, not so much. I saw the bamboo and instantly thought they’d be perfect for legs (painted of course…) because they’re different from standard lumber, add detail and cheap! David saw them and recognized that hollow = more difficult to attach and work with. 
David wasn’t sure, but as usual, he was up to the challenge! We made our way to checkout … $10 total for both nightstand bases!
Lets get started! 
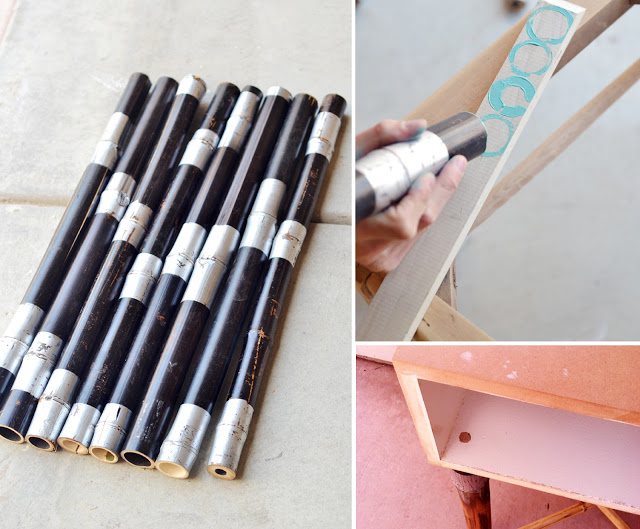
First, below are the basic materials that we used to make the nightstands. Read on to see how we did it! 
After drawing up a plan, we made a box to fit around the drawer out of MDF. Prior to assembling the box we painted the inside while it was easy to access. 

First, we worked on the bamboo. We looked at the sections before we cut and for the most part, they were pretty straight. Prior to attaching them, we rotated them so that it would look as straight as possible.

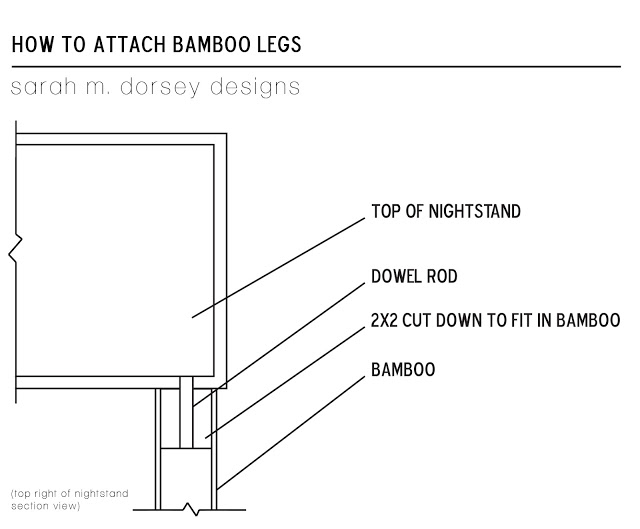
Since they were hollow, we would need to put something inside so that the legs could securely attach to the top. After a little trial and error, we came up with cutting an insert out of a 2×2. Since all of the bamboo is different, we dipped the ends in paint as a guide and then cut it out with the jigsaw.
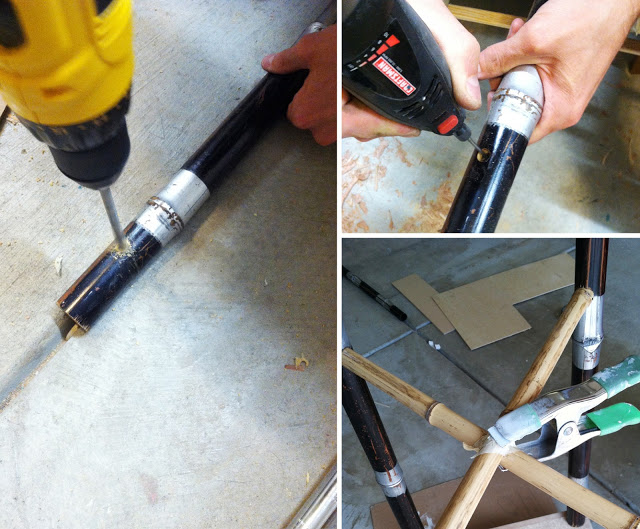
We then drilled through the 2×2 to insert a dowel rod (long enough to fit through the MDF as well). Prior to installing the dowel rod we put Gorilla Glue on the rod so that it would be extra strong. 
Then we inserted the entire piece into the bamboo leg using Gorilla Glue again. Finally, we inserted the leg into the top, using, you guessed it, Gorilla Glue. We decided to use Gorilla Glue because it is strong and expands into crevices once dry. 
I also drew a little diagram cutting through the nightstand to help explain. 
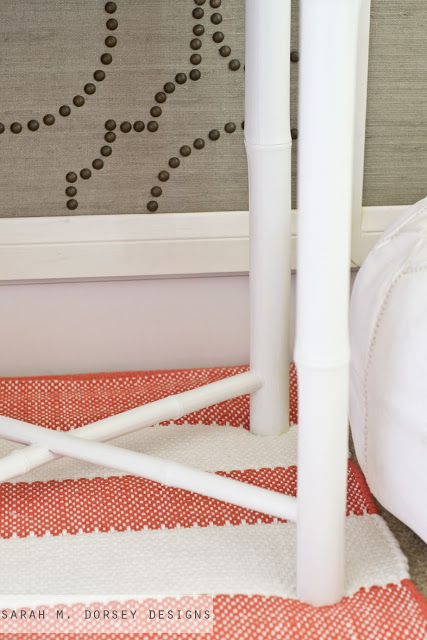
For the X on the bottom, we measured, and marked where they would go. Drilled a large hole, and then widened it to fit the curve of the bamboo with a cutting attachment on the dremel. The top piece of the X sits in the bottom, so we cut the bottom piece a little so it would sit. Finally, we used more Gorilla Glue to secure it. We used clamps throughout, so that it would bond tightly.
Since we were using something organic, a lot of pieces had to be custom fit to the shape of the bamboo.  Those steps could have been eliminated if we used pre cut lumber. Clearly we like to challenge ourselves … sometimes yes, but actually we didn’t know it would require this much customization when we started. I’m so glad that it turned out like I had envisioned in the end!
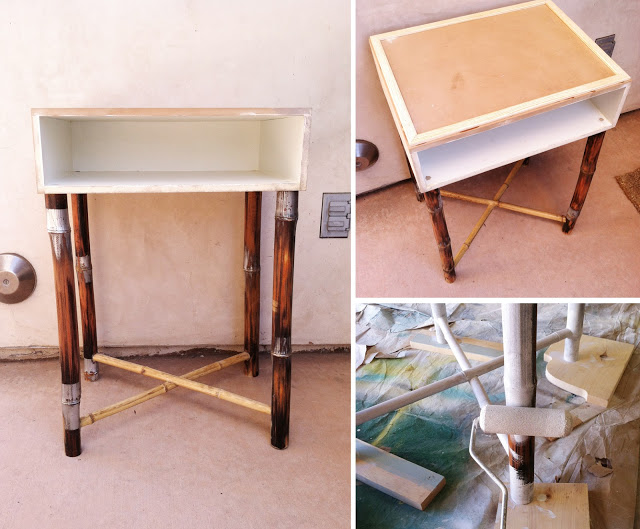
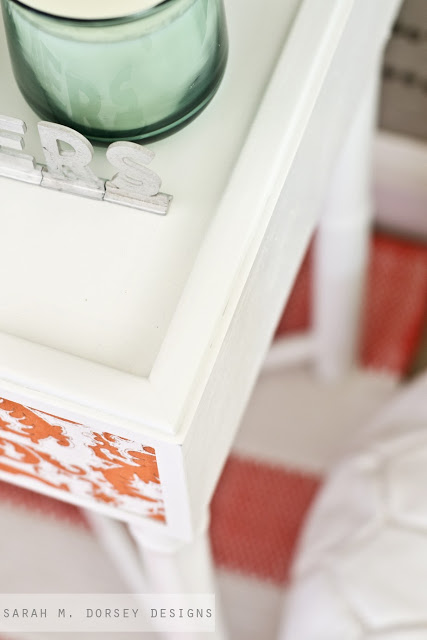
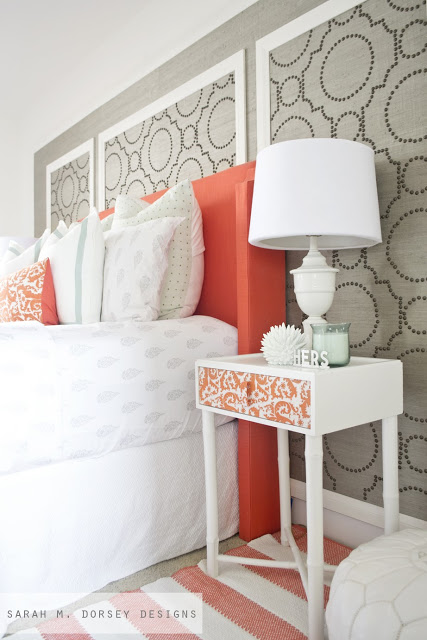
After it was built, I thought it looked a little skimpy/cheap at the top … We used a little left over molding (cut at 45s and attached it with Epoxy) to add a little extra dimension and visual weight on top. Plus it’s perfect so that things don’t roll off of it! 
Prior to painting, we filled any cracks in the bamboo with wood filler and once dry, sanded. 
I primed it with Zinsser Cover Stain (two coats) and finished it with Sherwin Williams Pro Classic, Alabaster (two coats). 
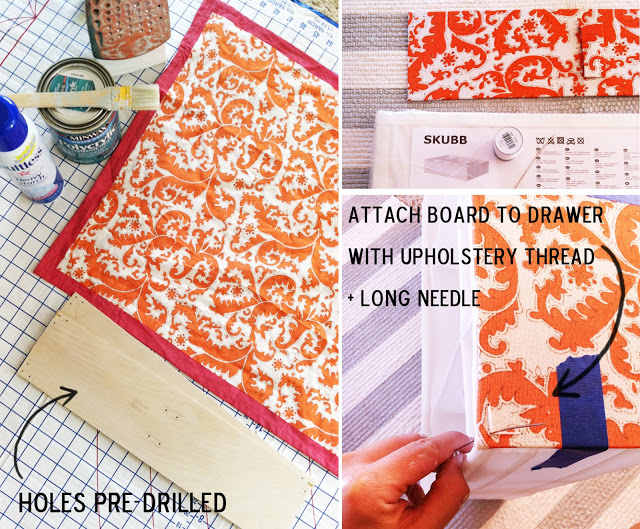
Now onto my favorite part – the drawers! We used the Skubb drawer from Ikea with a fabric wrapped 1/8″ piece of luan. First we measured and drilled where we wanted the panel to attach to the drawer. I wrapped it like the Rast dresser. Then I cut and sewed a loop on the front for the pull, and went through the pre-drilled holes with upholstery thread and a long needle (about 4 times per section). 

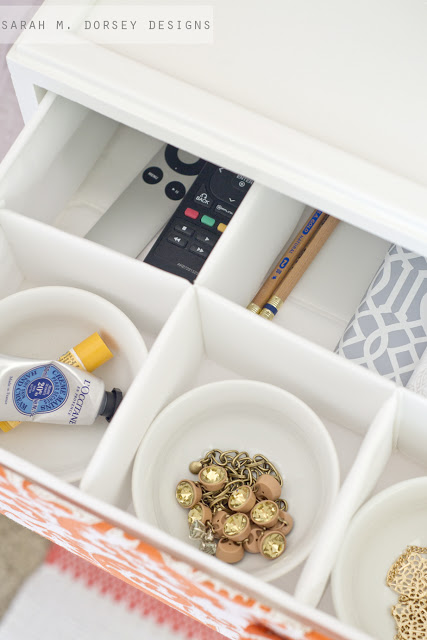
We decided to make the drawer fit snuggly so that it wouldn’t fall out easily. I LOVE the organization that’s included! It took about 30 seconds to put together too – since the organization is sewn into place. Also, it’s soft on the bottom, so I don’t have to worry about it scuffing the paint.

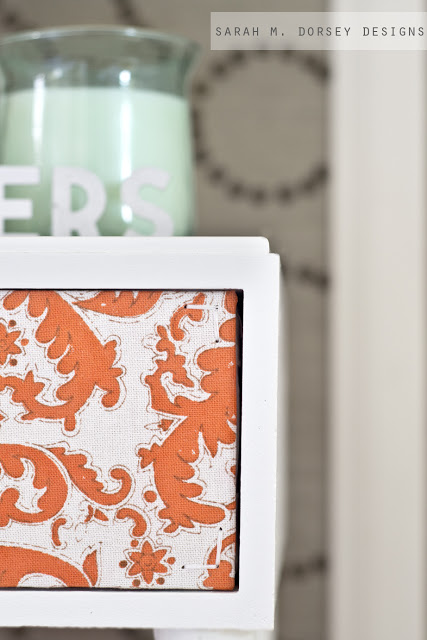
You can see the detail of the attached panel a little better in the photo below. 
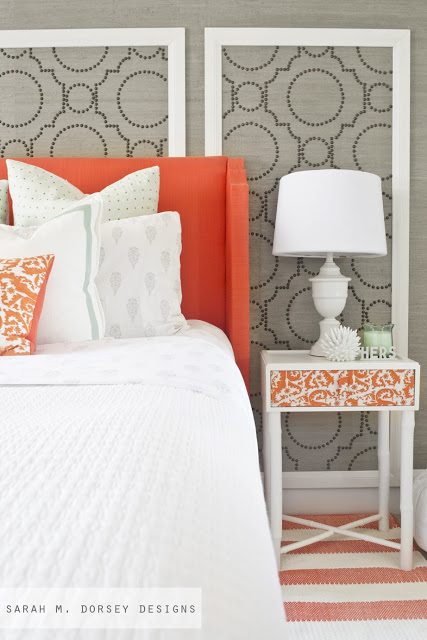
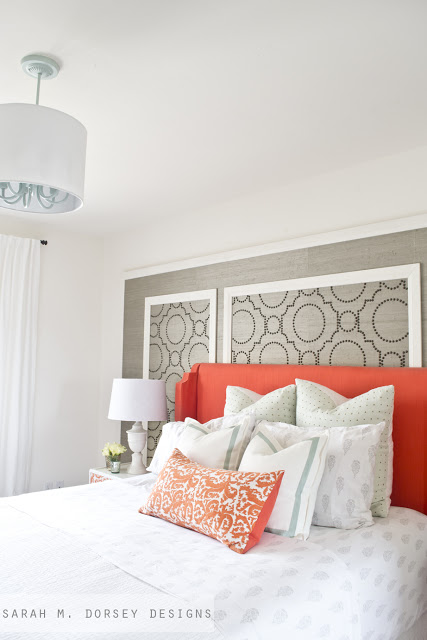
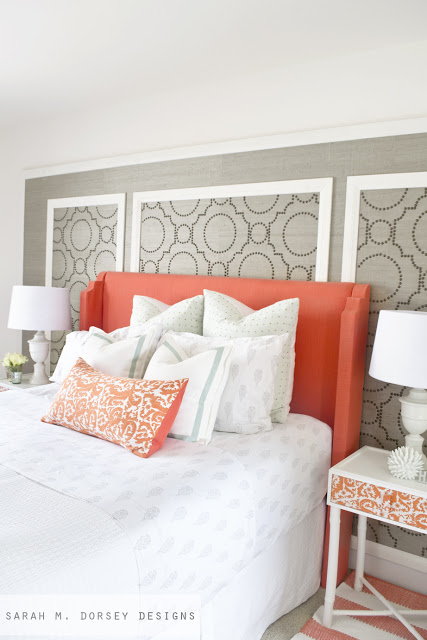
A few week’s ago we installed the guest room chandelier in our room. I love the soft light that it puts off. 
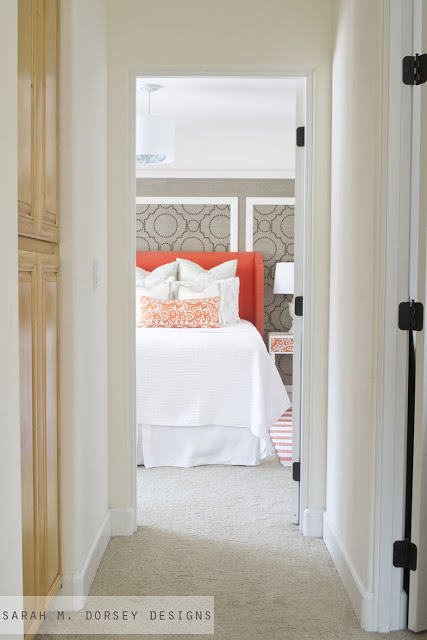
This the best straight on shot I can get since it’s tight in front of the bed … maybe I’ll get a wide angle lens soon (any suggestions for a Nikon?) 
Love the added detail that the molding adds. I think it really helps to dress up the MDF. 
I picked up a candle from Target’s fabulous selection (so many great one’s to choose from!) Target is SO good recently! 

We could also put a basket on the bottom if we need extra storage, but for now we’re good! Also, to hide the lamp wire, I used painter’s tape to secure it on the back and then run it down the far leg. I’ve also seen a few tables using little 3M wire hooks too.

I swapped the organic chevron duvet for a lighter weight white coverlet for the summer (from TJ Maxx).

Cost Breakdown + Sources:

MDF: Habitat ReStore (left over from open shelving unit)
Bamboo: Beverly’s (local craft store) $3 for each 8′ pole (3 total), .50 small bamboo (2 total)
Zinsser Cover Stain Primer: Home Depot
Sherwin William Pro Classic Paint Alabaster
Skubb Storage Drawers: Ikea, $8 each
Fabric: World Market kitchen towel $4
Coral Striped Runner: Target

I had the paint and glue on hand so the total cost of the new parts was $30 or $15 each!

This is the last project for the bedroom, since we started redoing it in March, so I’ll be giving a little tour of the projects soon!
Bedroom// design + build// DIY TUTORIALS// Uncategorized// Uncategorized29 Comments

Subscribe

get the latest straight to your inbox

« My To Do List + a Free Download
Today I’m at Brittany Makes + Weekend Recap »

Comments

  1. Cassie @ Primitive & Proper says

    July 11, 2013 at 11:14 am

    you are my hero. that is awesome!

    Reply
    • Sarah says

      July 12, 2013 at 1:42 am

      ha! 🙂 Thanks Cassie!!

      Reply
  2. Julia Konya says

    July 11, 2013 at 11:26 am

    Bamboo is so hard to work with. You knocked this one out and it looks amazing again. I would love these tables for my bedroom 😉

    Reply
    • Sarah says

      July 12, 2013 at 1:41 am

      Agreed, bamboo is one of the harder things that we've worked with … probably an easier project next, ha! 🙂

      Reply
  3. Kristin@bliss-athome.com says

    July 11, 2013 at 11:54 am

    I just love them! Love the details, the drawers, the bamboo…all of it! Beautiful! I have been hunting for bamboo to use to reface a dresser but am having no luck! I'm going to have to keep searching…xo Kristin

    Reply
    • Sarah says

      July 12, 2013 at 1:40 am

      Thanks so much Kristin! 🙂 There is more of the smaller .50 bamboo, let me know if you want me to pick some up for you! (not sure about shipping price, but I could check …)

      Reply
  4. Elizabeth @ The Little Black Door says

    July 11, 2013 at 12:41 pm

    This might just be one of my favorite projects yet. Love it!

    Reply
    • Sarah says

      July 12, 2013 at 1:38 am

      Thanks so much Elizabeth! Definitely one of my favorites too!!:)

      Reply
  5. Mrs. DeVore says

    July 11, 2013 at 1:36 pm

    LOVE these! They turned out so great, so creative!

    Reply
    • Sarah says

      July 12, 2013 at 1:38 am

      Thanks SO much Bethany!! 🙂

      Reply
  6. Emily U says

    July 11, 2013 at 3:27 pm

    Totally agree about Target! Every time i go in there lately i think "Target is Killing it!"

    Reply
    • Sarah says

      July 12, 2013 at 1:37 am

      Yes! Target is killing it recently! (and my bank account, ha!)

      Reply
  7. Tiffany B. says

    July 11, 2013 at 4:12 pm

    These are so great! I think that if you really wanted them to be super fancy you could get a custom piece of glass cut from lowes and insert it between the molding on top. That way it would be flush (no more rolling prevention though) but it would sort of glimmer from a distance.

    Reply
    • Sarah says

      July 12, 2013 at 1:34 am

      Hi Tiffany! Glass on top would be a great idea, a little extra glamor is always good!!

      Reply
  8. Kelly @ View Along the Way says

    July 11, 2013 at 6:04 pm

    This is SO SO impressive, Sarah! I love the whole piece and that amazing bedroom. You are so talented!

    Reply
    • Sarah says

      July 12, 2013 at 1:33 am

      Hi Kelly! Thanks SO much!! 🙂 The design came together quickly for the bedroom, but it's definitely my favorite room in the house right now!

      Reply
  9. Lisa @ Cozy Condo Living says

    July 11, 2013 at 6:47 pm

    Wow! I'm impressed. I would snatch up those tables in a hot second if they were in a store. It's great that your husband is willing to go with your vision even when he's not sure.

    Reply
    • Sarah says

      July 12, 2013 at 1:32 am

      Hi Lisa! Thank so much!! 🙂 David is always willing to go along with my crazy plans! #grateful

      Reply
  10. Sarah {Lacquer and Linen} says

    July 11, 2013 at 7:06 pm

    This is just stunning Sarah!! Using a drawer and then finding some bamboo to make the legs is so inventive. I just love how it turned out. Pinning now!

    Reply
    • Sarah says

      July 12, 2013 at 1:31 am

      Hi Sarah! Thanks SO much!! 🙂

      Reply
  11. Lisa Marie Wells says

    July 11, 2013 at 11:03 pm

    What a cute little night stand! Love it!! Also adore the white striped pillows! where did you find them?
    ~Lisa

    Reply
    • Sarah says

      July 12, 2013 at 1:28 am

      Hi Lisa! I DIYd the pillows, check out this post for more info (around the close ups of the pillows) http://sarahmdorseydesigns.blogspot.com/2013/06/diy-coral-upholstered-headboard-with.html The white with the mint border is an Ikea sham with a painted border.

      Reply
  12. Gwen, The Makerista says

    July 12, 2013 at 3:29 am

    gosh, you kill it every time! what a team you are!

    Reply
  13. amykristinteriors says

    July 12, 2013 at 5:19 am

    You guys are so very talented and I admire how hard core DIYers you are! I also love the color palette – very fresh and unique.

    Reply
  14. Jennifer@The Chronicles of Home says

    July 12, 2013 at 11:32 am

    What a cool idea! You and that David are so darned clever 🙂

    Reply
  15. Unknown says

    July 12, 2013 at 7:29 pm

    Sarah, it turned out great. I thought of you when I saw this really cool sea horse made out of branches. I thought of all your extra driftwood. I tried to copy and paste it, but, i couldn't. If you go to my Pinterest page and look at coastal crafts it's there. I think you will really like and could do it. I want to try it, but they didn't give step by step directions. I think it's just glued. Let me know if you like it.
    Erin

    Reply
  16. homefornowblog says

    July 15, 2013 at 4:27 am

    Fabulous. That is all.

    Reply
  17. Anneke at This, That and Life says

    July 15, 2013 at 4:27 pm

    I absolutely love bamboo and the look of the entire room is incredible. You've done an amazing job!

    Reply
  18. Hena Tayeb says

    July 16, 2013 at 8:45 pm

    that seriously looks amazing.. and not just the night stand.. everything about the room is gorgeous.

    Reply

Leave a Reply Cancel reply

Your email address will not be published. Required fields are marked *

Contact Me

sarahmdorseydesigns{@}gmail{.}com

Stay Updated!

Get all the latest goods straight to your inbox!

This error message is only visible to WordPress admins

Error: No connected account.

Please go to the Instagram Feed settings page to connect an account.

Must Reads

Custom Peg Board + DIY Circle Art | FrogTape

Custom Peg Board + DIY Circle Art | FrogTape

Main Level Refresh with The Home Depot

Main Level Refresh with The Home Depot

Sponsor

2016 Daily Simplified Planner

Popular Projects

How to Embellish Simple White Draperies for Less

How to Embellish Simple White Draperies for Less

April 19, 2013 By Sarah 14 Comments

DIY Headboard Complete!

DIY Headboard Complete!

April 11, 2012 By Sarah 164 Comments

How to lenghten your cafe rod for $1

How to lenghten your cafe rod for $1

March 20, 2012 By Sarah 2 Comments

Plain Rattan Chair to Chinese Chippendale Chair

Plain Rattan Chair to Chinese Chippendale Chair

April 9, 2015 By Sarah 55 Comments

Eames Chairs FINISHED (finally + for now)

Eames Chairs FINISHED (finally + for now)

July 8, 2013 By Sarah 20 Comments

  • DIY TUTORIALS
    • design + build
    • furniture redo
    • diy in 1 hour or less
  • free printable
  • friday favorites

Disclosure

Occasionally, affiliate links are used when they are available. I do earn a small commission when items are purchased using those links. As always, I only link to things that I truly love. I also link to items that I love when an affiliate link is not available. Thanks so much!

  • Home
  • About
  • Services
  • Shop

Copyright © 2025 Dorsey Designs

MENU
  • Home
  • About
  • Services
  • Shop