• Home
  • About
  • Services
  • Shop
    • Bloglovin
    • Email
    • Facebook
    • Instagram
    • Pinterest
    • Twitter

Dorsey Designs

DIY and Interiors by Sarah + David

  • Home Tour
  • DIY TUTORIALS
  • friday favorites
  • design + build
  • art

get the latest straight to your inbox

Chopped!

No, not the show on the Food Network … my table!

I finished stenciling the desk/table yesterday and I am loving the bright addition to our office/living room (floorplan to come shortly!)

We started with a counter height table

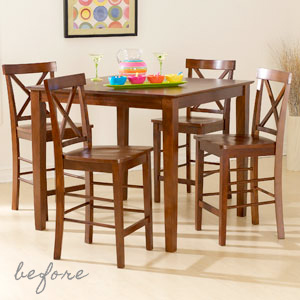
and cut off 6″ so it would be a standard dining table height

David said that it would be difficult, ok IMPOSSIBLE to get a straight cut (kinda important so that everything ends up the right height) with the jigsaw so we decided to add a chop saw to our power tool arsenal …

David has wanted one of these bad boys for a long time … and with a lot of projects coming up, this will save a lot of time and energy for years to come!

We removed the legs from the table, measured 6″ and chopped the legs off 🙂

David cut all the table legs and chairs down (after taking them apart), while I sanded, primed and painted.

After I lightly sanded (directions say that you don’t need to, but I thought it would still be a good idea). I primed with Zinsser 1-2-3 – the coverage wasn’t great but it did dry without brush marks which is a plus in my book!

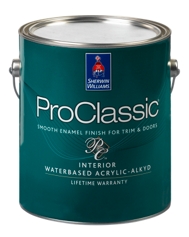
I gave it two coats of SW ProClassic Mega Greige in semi-gloss with XIM extender.

Primer and paint were rolled on with a foam roller (the key to no roller marks is to not over roll!)

I copied an image of the fabric used for the draperies in the room, decided on sizing and layout in Photoshop (ended up looking very close to the fabric layout) 

The image above is divided in three even sections (accounting for the center table leaf). It was designed so that the pattern would line up with or without the leaf.

I printed one on two pieces of 8.5×11, and taped them together.

On top of a self healing mat, the paper and stencil film were taped down and the pattern was cut out with an X-Acto knife (center was made white in Photoshop to save ink when printing because we were only cutting the outside)
X-Acto knifes allow detail cutting because the blade (no. 11) is slightly flexible.
We left a few guide lines with vinyl art tape and marked the center lines on the stencil for lining it up – this was much easier to layout than my trellis stencil because the pattern is not overlapping
The key to getting clean lines is having very little paint on the brush (I dip a stencil brush in paint and dab off extra on a paper towel – I then painted with light sweeping motions to mimic the Ikat pattern (pulling away from the stencil line)
About an hour or two later I was done! 
SW anew gray was used for the ikat 
love the repetition of the draperies which were made shortly before I started my blog, so no formal post, but I cut bands of ivory linen and Duralee Kalah and sewed them together (pretty easy 🙂
You may be wondering why I refer to this as a desk/table … our desk is converted to a dining table when needed, which isn’t too often – good thing because that computer is heavy!
The leaf was painted so that the pattern would line up when it was used
 and a glimpse of a project I was working on this morning – an adorable Westie 🙂 
I’ll be showing pictures of the whole table once the chairs are finished, but first I am off Indianapolis to attend the Delta Faucet 2012 Blogger Event!
It sounds like it is going to be a really fun event – I am looking forward to seeing some of Delta’s new products and meeting the people of Delta and other bloggers!!

TDC Before and After

DIY TUTORIALS// office// Stencil// Uncategorized// Uncategorized9 Comments

Subscribe

get the latest straight to your inbox

« I finally caved …
Delta Faucet blogger event »

Comments

  1. Katie of At Home When Im With You says

    June 26, 2012 at 3:40 pm

    That looks so good! It must have been time consuming to cut out all those little details of the Ikat- but totally worth it! I am so jealous of your power tool arsenal.
    -Katie
    Athomewhenimwithyou.blogspot.com

    Reply
    • Sarah says

      June 26, 2012 at 9:23 pm

      Hi Katie! Thank you! The stencil was actually very easy to cut out (took maybe 30 min)! We are loving the new saw!!

      Reply
  2. Sheila @SZInteriors says

    June 28, 2012 at 3:45 am

    Wow, this looks very cool. What a great idea!

    Reply
  3. Anonymous says

    July 8, 2012 at 11:01 pm

    Is that table + chairs from JC Penney ~ 5 years ago? I think I have the exact set and am so sick of it. I am inspired by what you've done to them!!

    Reply
    • Sarah says

      July 9, 2012 at 12:30 am

      Thank you! The table is from Boscov's about 5 years ago (I think it is similar to JC Penney, so they probably carry some of the same products) I was so glad to see the dark color go!

      Reply
  4. Jenna B says

    November 10, 2012 at 3:20 am

    Hey Sarah, I'm wondering where you got the 'stencil film' I'd love to try this myself.

    Reply
    • Sarah says

      November 10, 2012 at 3:56 am

      I found mine at michaels in the glass department, I think it was actually for stained glass. Hope that helps! 🙂

      Reply
  5. Teresa Stephens Harvey says

    June 18, 2013 at 8:55 pm

    Love it! Would you sell a copy of the stencil print file? Would love to make my own with the re-sizing all figured out! Please.

    Reply
    • Sarah says

      June 18, 2013 at 9:01 pm

      Hi Teresa, I could sell a similar file to print and cut out yourself or if you would like a cut stencil I could do that for you in a 12×12. Feel free to email me at sarah.m.dorsey@gmail dot com

      Thanks! sarah

      Reply

Leave a Reply Cancel reply

Your email address will not be published. Required fields are marked *

Contact Me

sarahmdorseydesigns{@}gmail{.}com

Stay Updated!

Get all the latest goods straight to your inbox!

This error message is only visible to WordPress admins

Error: No connected account.

Please go to the Instagram Feed settings page to connect an account.

Must Reads

Custom Peg Board + DIY Circle Art | FrogTape

Custom Peg Board + DIY Circle Art | FrogTape

Main Level Refresh with The Home Depot

Main Level Refresh with The Home Depot

Sponsor

2016 Daily Simplified Planner

Popular Projects

DIY Christmas Gift: Framed Prints

DIY Christmas Gift: Framed Prints

December 24, 2012 By Sarah 2 Comments

Black and White Stripe Chair

Black and White Stripe Chair

January 23, 2014 By Sarah 30 Comments

Panel Paintings to Chalkboard | Contributing Post at Infarrantly Creative

Panel Paintings to Chalkboard | Contributing Post at Infarrantly Creative

December 19, 2013 By Sarah 13 Comments

Art Progress for Above the Headboard

Art Progress for Above the Headboard

May 4, 2012 By Sarah 2 Comments

DIY Wood Veneer Art | Tutorial

DIY Wood Veneer Art | Tutorial

February 7, 2018 By Sarah Leave a Comment

  • DIY TUTORIALS
    • design + build
    • furniture redo
    • diy in 1 hour or less
  • free printable
  • friday favorites

Disclosure

Occasionally, affiliate links are used when they are available. I do earn a small commission when items are purchased using those links. As always, I only link to things that I truly love. I also link to items that I love when an affiliate link is not available. Thanks so much!

  • Home
  • About
  • Services
  • Shop

Copyright © 2025 Dorsey Designs

MENU
  • Home
  • About
  • Services
  • Shop