• Home
  • About
  • Services
  • Shop
    • Bloglovin
    • Email
    • Facebook
    • Instagram
    • Pinterest
    • Twitter

Dorsey Designs

DIY and Interiors by Sarah + David

  • Home Tour
  • DIY TUTORIALS
  • friday favorites
  • design + build
  • art

get the latest straight to your inbox

DIY Anthro Inspired Tassel Throw | Tutorial

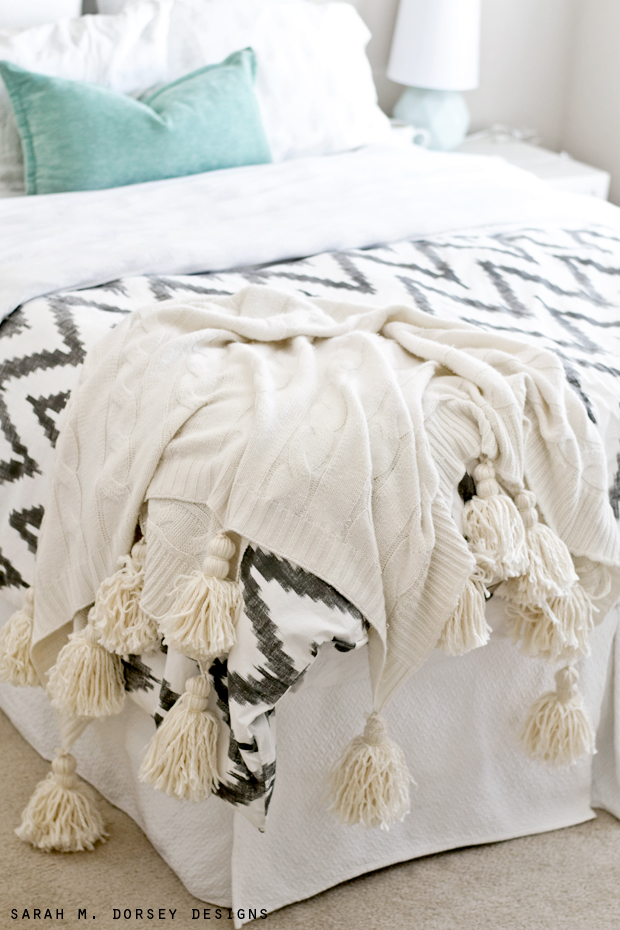
Hey!! Today, I’m sharing a DIY Anthro inspired tassel throw!

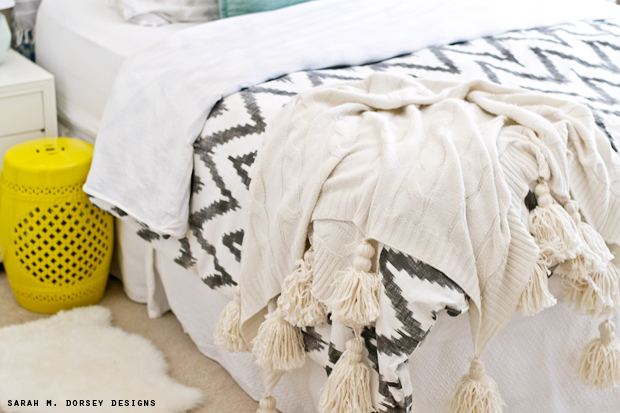
I’m working on finishing up our TN bedroom (though it will look a good bit different from this sneak peek). I first saw this amazing Anthro throw in A Storied Style and I Heart Organizing’s bedroom/office reveal (SO good!!) and fell in love. This throw seriously makes the photo!

After seeing the $128 price tag, I decided to try a DIY version. Using a pre-made throw makes this project super easy since the tassels are SO simple. Read on to see how to make your own! 

To get started, you will need:
5 ounces of chunky yarn (qty 4) I made 14 large tassels and used about 3.25 packages of yarn
Thinner yarn (qty 1) (optional, you can sub the thicker yarn) 
Throw (mine is from Target, a few years ago) 
Scissors 
Piece of cardboard 
Large needle or chopstick – something pointy to push the yarn through the blanket
First, cut a piece of cardboard based on desired tassel length (mine is 6″ long). Wrap the yarn till it’s thick (thickness shown in second photo below). Try to keep the yarn vertical verse criss crossing the yarn. Tip: tuck the first piece of yarn under the first few folds to keep it from floating around

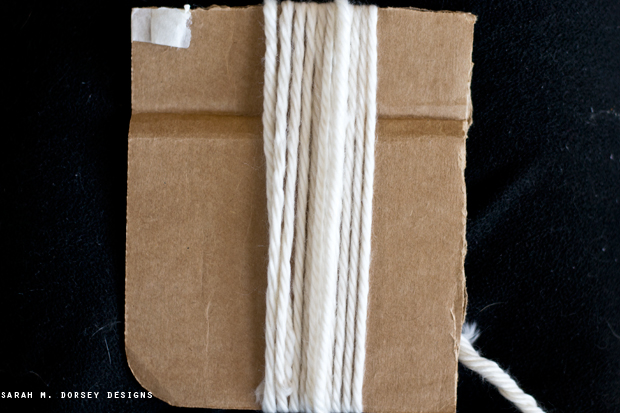
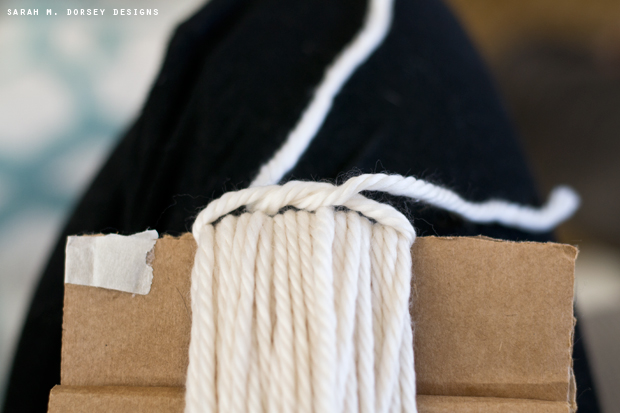
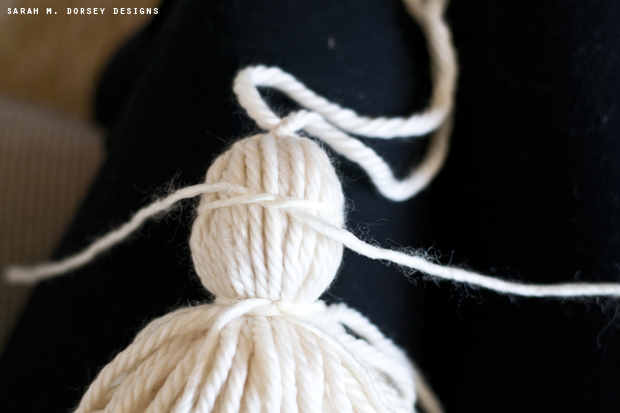
Cut a long piece of yarn (about 1′) and tightly tie a double knot on one end at the top (try to center it as much as possible)

Next, on the end where the knot was tied, secure the tassel –  cut a piece of yarn, about 1′ (I tied it 1″ and 2″ down from the top and used thinner yarn). I found it easiest to tie the bottom section first (about 2″ down). Getting the knot tight (which is important!) is tricky if you’re doing it yourself – to make it easy, tie it once (don’t worry about making it tight at first).

Then, flip the tassel over and tie it once. Repeat (about 4 or 5 times), it will gradually tighten and hold itself. Once it holds itself – tie a double knot. 

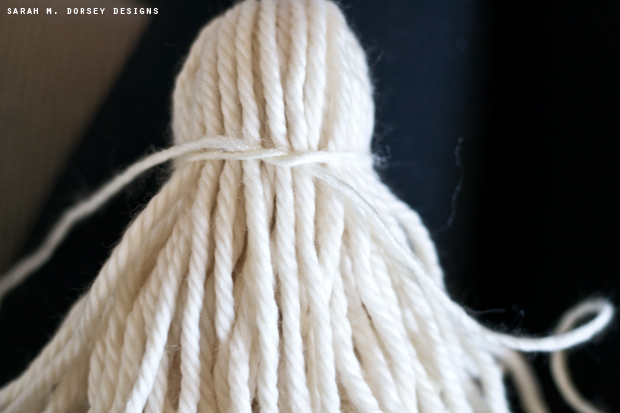
Repeat for the top section.

Then, cut the bottom loops. Pull a few pieces tight with the scissors and then trim. Pulling it tight will make the ends fairly even. If needed, trim the ends to even it up. 

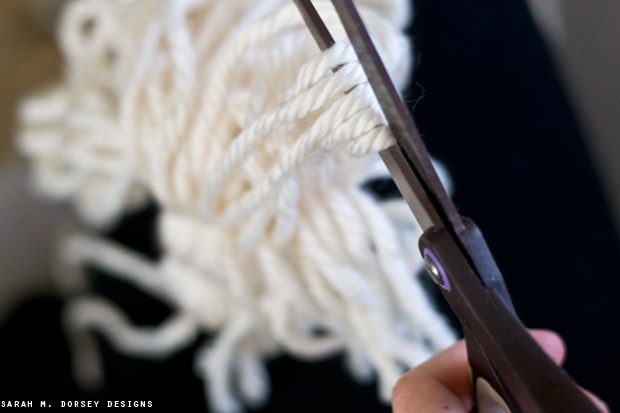
Repeat for all your tassels, I made 14 for my throw.

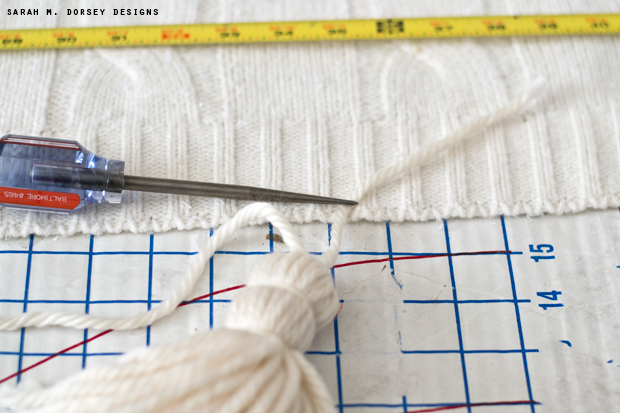
Apply tassels to all the corners and then use a tape measure to center on the lengths. I didn’t have a needle large enough for the yarn, so I used an awl (used for marking metal) (a chopstick would work well too) to push the yarn through the throw. I simply twisted the thread tight (so the awl would catch it) and then pushed it through. Then I tied it with a few knots.

I wanted my yarn to be a little looser – since I couldn’t find any, I unraveled a few pieces of yarn for a more casual look. I simply did that by reverse twisting the yarn and running my finger through it.

Isn’t amazing how a few tassels can completely change a throw!? I love it!!

Making tassels is seriously SO simple – you can easily knock this project out in one evening while catching up on your favorite shows! I hope you’ll give it a try!

DIY TUTORIALS// Uncategorized// Uncategorized27 Comments

Subscribe

get the latest straight to your inbox

« Recap + Plans
Friday Five | 1.9.15 »

Comments

  1. marty (A Stroll Thru Life) says

    January 7, 2015 at 1:55 pm

    I love this. Great tutorial on the tassels too.

    Reply
    • Sarah says

      January 7, 2015 at 10:59 pm

      Thanks Marty!! 🙂

      Reply
  2. Cassie @ Primitive & Proper says

    January 7, 2015 at 2:43 pm

    i love anything with chunky yarn tassels or pom poms! love it!

    Reply
    • Sarah says

      January 7, 2015 at 10:59 pm

      Thanks Cassie!! Me too!! 🙂

      Reply
  3. Amber Tysl says

    January 7, 2015 at 4:23 pm

    Love.Love.Love. This is so smart and absolutely beautiful!

    Reply
    • Sarah says

      January 7, 2015 at 11:00 pm

      Thanks Amber! 🙂

      Reply
  4. Lily L-M says

    January 7, 2015 at 5:24 pm

    So clever and cute! thanks for sharing!

    x Lily
    http://whilemyboyfriendsaway.blogspot.com/

    Reply
    • Sarah says

      January 7, 2015 at 11:00 pm

      Thanks Lily! You're welcome!! 🙂

      Reply
  5. Julia Konya says

    January 7, 2015 at 6:10 pm

    So so pretty and the photos are just stunning

    Reply
    • Sarah says

      January 7, 2015 at 11:00 pm

      Thanks Julia!! 🙂

      Reply
  6. Jennifer @ Dimples and Tangles says

    January 7, 2015 at 8:05 pm

    Love this Sarah! Now… what do I have that needs tassels?

    Reply
    • Sarah says

      January 7, 2015 at 11:01 pm

      Tassels makes everything better!! 🙂 Thanks Jennifer!

      Reply
  7. Jennifer@The Chronicles of Home says

    January 7, 2015 at 8:38 pm

    What an excellent idea! Love how this came out. I agree with Jennifer above…racking my brain for tassel projects now 🙂

    Reply
    • Sarah says

      January 7, 2015 at 11:01 pm

      Thanks Jen! 🙂 Tassels on everything!!

      Reply
  8. Beth of designPOST Interiors says

    January 7, 2015 at 9:08 pm

    Tassels instantly make everything better!

    Reply
    • Sarah says

      January 7, 2015 at 11:01 pm

      They do!! 🙂

      Reply
  9. Mekenzie @ interiorsbykenz.com says

    January 7, 2015 at 10:10 pm

    What a fantastic hack! I want to snuggle up in that throw so much!

    Reply
    • Sarah says

      January 7, 2015 at 11:01 pm

      Somehow the tassels do make it cozier! I think because it's a good bit heavier now 🙂

      Reply
  10. Kristin@bliss-athome.com says

    January 8, 2015 at 12:10 am

    Looks fab Sarah! I have been meaning to do that to mine forever and never got around to it. You just reminded me 🙂 xoxo

    Reply
  11. Karen @ a house full of sunshine says

    January 8, 2015 at 12:27 am

    So gorgeous!! I loved that room reveal also – such a clever way to get the same look!

    Reply
  12. alison says

    January 8, 2015 at 1:53 am

    Genius!!!! I definitely want to try this out!

    Reply
  13. For My Love Of says

    January 8, 2015 at 3:15 am

    So textural and cozy! I'll have to put tassel making on the list of things I need to try in 2015. They're such a cool pop of whimsy and texture.

    Reply
  14. Allyson [Mimosas in the Morning] says

    January 8, 2015 at 6:25 pm

    SO in love with this! Going to try it this weekend!

    Reply
  15. Erica Sooter says

    January 8, 2015 at 11:51 pm

    Oh my goodness I just absolutely LOVE this! Pinning!

    Reply
  16. Bethany DeVore says

    January 12, 2015 at 12:59 pm

    That looks so cool Sarah! I love it!

    Reply
  17. Aliese Martinez says

    March 14, 2015 at 4:08 am

    But where is that comforter from? I'm in looove

    Reply
    • Sarah says

      March 14, 2015 at 12:01 pm

      West elm! 🙂

      Reply

Leave a Reply Cancel reply

Your email address will not be published. Required fields are marked *

Contact Me

sarahmdorseydesigns{@}gmail{.}com

Stay Updated!

Get all the latest goods straight to your inbox!

This error message is only visible to WordPress admins

Error: No feed found.

Please go to the Instagram Feed settings page to create a feed.

Must Reads

Custom Peg Board + DIY Circle Art | FrogTape

Custom Peg Board + DIY Circle Art | FrogTape

Main Level Refresh with The Home Depot

Main Level Refresh with The Home Depot

Sponsor

2016 Daily Simplified Planner

Popular Projects

MBR TV Wall Trellis Stencil Update

MBR TV Wall Trellis Stencil Update

March 29, 2012 By Sarah Leave a Comment

DIY Wood Veneer Art | Tutorial

DIY Wood Veneer Art | Tutorial

February 7, 2018 By Sarah Leave a Comment

MBR Headboard Update

MBR Headboard Update

April 10, 2012 By Sarah 2 Comments

Rattan Chair Makeover

Rattan Chair Makeover

April 14, 2014 By Sarah 13 Comments

Dining Room Update | Chippendale Chairs + Renter Friendly Accent Wall

Dining Room Update | Chippendale Chairs + Renter Friendly Accent Wall

March 12, 2015 By Sarah 16 Comments

  • DIY TUTORIALS
    • design + build
    • furniture redo
    • diy in 1 hour or less
  • free printable
  • friday favorites

Disclosure

Occasionally, affiliate links are used when they are available. I do earn a small commission when items are purchased using those links. As always, I only link to things that I truly love. I also link to items that I love when an affiliate link is not available. Thanks so much!

  • Home
  • About
  • Services
  • Shop

Copyright © 2026 Dorsey Designs

MENU
  • Home
  • About
  • Services
  • Shop