• Home
  • About
  • Services
  • Shop
    • Bloglovin
    • Email
    • Facebook
    • Instagram
    • Pinterest
    • Twitter

Dorsey Designs

DIY and Interiors by Sarah + David

  • Home Tour
  • DIY TUTORIALS
  • friday favorites
  • design + build
  • art

get the latest straight to your inbox

From Fluorescent Diffuser to Statement Pendant

Today I wanted to share with you the full tutorial on the statement pendant that we made for Creating with the Stars! Now that the contest is over, I can share it here too! 
—  
Walking through Habitat ReStore I spotted a few egg crate diffusers – you know those grates that cover fluorescent lights in basements across the country. It’s the last lighting fixture I would consider for a project, but once I got around my thoughts of drop ceilings, I began thinking how neat it would be to use the grid to create any square geometric shape that I wanted. At $2 each, what could I lose?

Browsing Pinterest I found this amazing light, Lolita – Shine by SHO and fell in love with the arms. It’s lines are simple, but make a big impact! Perfect for a statement piece!

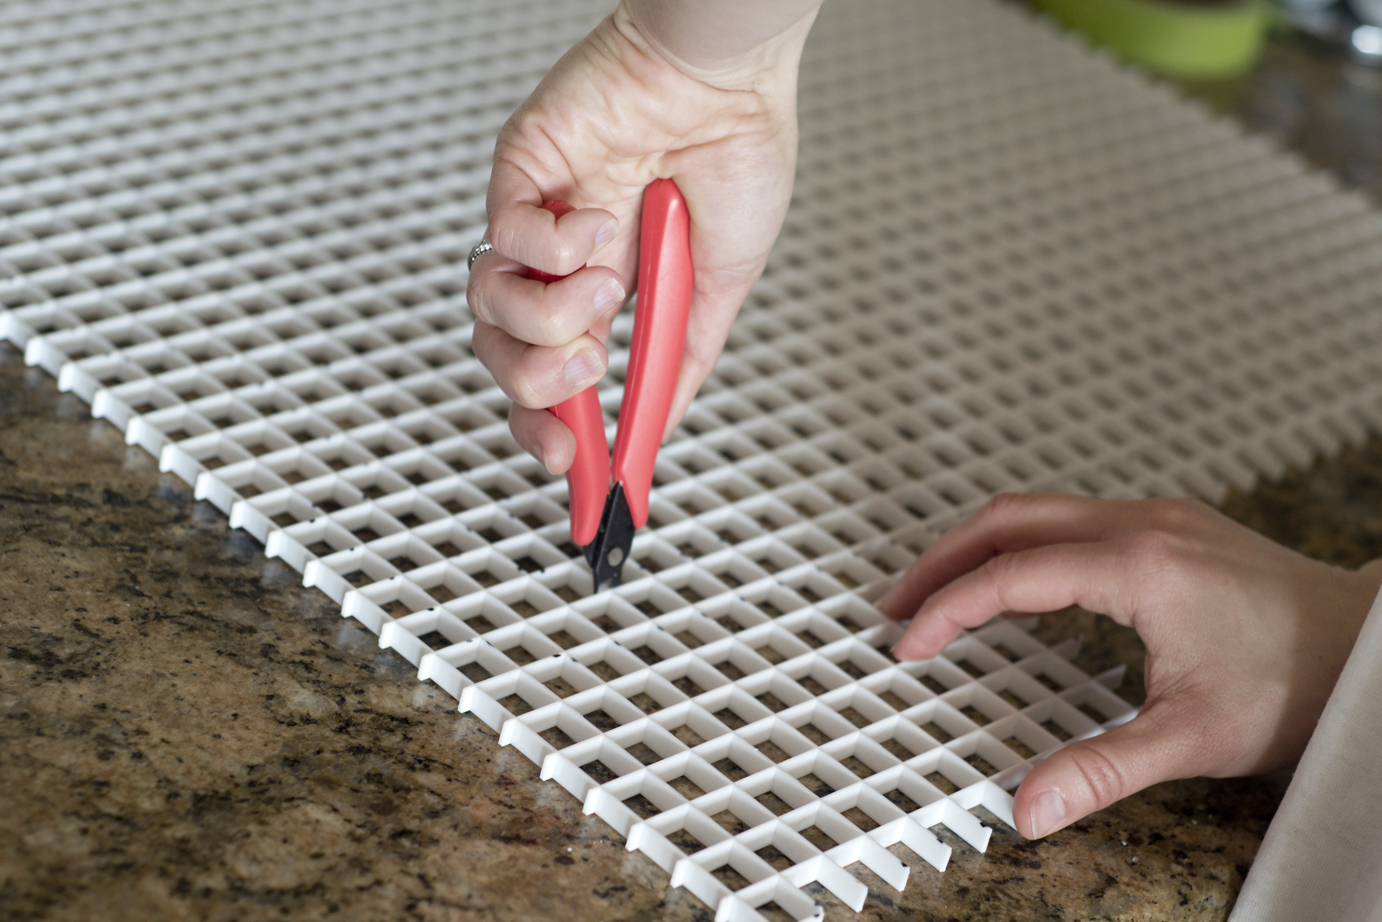
Once we decided on the shape, we measured and marked the edges with a permanent marker. The egg crate diffuser was cut into the shape of the arms with small clippers (clipping as close to the edge as possible).

Next we taped the bottom with painters tape and filled with plaster of paris (mixing it on the thinner side so that it would level itself at the top). You want it as level as possible to reduce sanding. Any excess was leveled off with a spackle knife.

Once firm, they were placed in the sun to fully cure (I ended up letting it sit overnight)

Then excess was sanded off. Some of the squares fell out during sanding, so I used a little craft glue to get them back in place. Then I patched the imperfections with drywall spackle and sanded again once dry. This part was pretty messy – so I was definitely glad to be done with sanding!

We wanted a simple fixture so that it wouldn’t compete with the arms. Looking through thrift shops, all we could find were ones with curves (very ’80s) we needed something more mid-century modern. So we ended up building our own electrical housing out of old chandelier parts, PVC, and brass tubing.

Here’s how we did it:

Honestly, this wasn’t the easiest task, but definitely doable. It required modifying (mostly cutting holes in the PVC) so that all the parts would fit snugly. 
To assemble all of the pieces we used Gorilla Glue Epoxy 
We followed the directions by mixing equal parts of the resin and the hardener (in small batches so it wouldn’t harden too fast). This stuff worked SO well! It set up fairly quickly and was SUPER strong! 

All parts were lightly sanded to remove any gloss, and dust was removed with a microfiber cloth. Then it was primed, and painted with Sherwin William Rivulet (2 coats).

We finished it off with 2 coats of Krylon Lacquer to give it a super glossy finish.

Turning off the electricity first, we installed the light and held our breath as we flipped the switch.

Success! It works!

We also installed trim and painted 8″ stripes on the ceiling to frame the fixture. 

and a gallery wall with a few fun prints, paintings, and some fabric mixed in! 
I love this fun addition to our office area!
Here’s the price breakdown:
(2) Fluorescent diffusers: $4 (Habitat ReStore) 
Plaster of Paris: $5 (with coupon at Michaels)
Gorilla Glue Epoxy: $5
Chandelier: $5 (Habitat ReStore)  
PVC parts: ~$3 (Home Depot) 
Brass parts: ~$10 (Ace Hardware) 
Total = $32
Not bad for a statement piece! So next time you see a plastic diffuser don’t just pass it by, think about what you can create with it! 
—
And here’s a peak of what I’m working on … yep, I changed my mind! My DIY Schumacher Zimba draperies are going charcoal! 
Hopefully finished pics Friday or Monday!

design + build// lamps// office// Uncategorized// Uncategorized25 Comments

Subscribe

get the latest straight to your inbox

« And the Winners are …
Bye Google Reader + Alternatives »

Comments

  1. Shalagh Hogan says

    April 11, 2013 at 6:04 pm

    I don't think I'd be the only one to sat WOW, your diy brain thinks way out of the box in the most magical and inventively can-do kinda ways Sarah. Your possibilities for transformation know-how could baffle even the most accomplished DIYers. Kudos Girl!

    Reply
    • Sarah says

      April 12, 2013 at 8:31 pm

      Thanks Shalagh! Hope you're doing well! 🙂

      Reply
  2. Jenny T says

    April 11, 2013 at 7:51 pm

    I love this! Definitely going to mark this one so I can attempt to make it too. Thanks for sharing!

    Reply
    • Sarah says

      April 12, 2013 at 8:30 pm

      Hi Jenny, Thanks so much! Let me know if you try it! 🙂

      Reply
  3. Caitlin @ Desert Domicile says

    April 11, 2013 at 8:51 pm

    Your light looks so great! I can't see pricing on the inspiration piece but I'm sure you saved a ton of money DIYing one of your own 🙂

    Reply
    • Sarah says

      April 12, 2013 at 8:30 pm

      Hi Caitlin! Thanks so much! 🙂 I don't know the exact price, but I'm sure it is up there!

      Reply
  4. Stephanie @ Sandpaper & Glue says

    April 11, 2013 at 10:45 pm

    What an awesomely creative project- I'm so glad you won! 🙂

    Reply
    • Sarah says

      April 12, 2013 at 8:29 pm

      Thanks so much Stephanie! 🙂

      Reply
  5. Lindsay Redd says

    April 12, 2013 at 3:18 am

    Love love love! Seriously blown away! What did you paint it with? Is it an airbrush? Fascinating!

    Reply
    • Sarah says

      April 12, 2013 at 8:28 pm

      Hi Lindsay, Thanks so much! We used our airbrush (http://www.iwata-medea.com/products/iwata-airbrushes/eclipse/hp-bcs/)

      We love it for smaller projects!

      Reply
  6. Jane says

    April 12, 2013 at 4:16 am

    Wow, that is an Amazing light! Thanks for sharing the tutorial too 😉

    Reply
    • Sarah says

      April 12, 2013 at 8:28 pm

      Thanks Jane! 🙂

      Reply
  7. Erin says

    April 13, 2013 at 12:26 am

    Wow. This is a truly inspiring design and an insanely creative use of material. I love your work and seeing what you com up with.

    Reply
  8. Amy says

    April 15, 2013 at 6:03 pm

    Seriously AMAZING! I just love everything about this, the colors, shapes, etc. And I love how you framed it on the ceiling. I would love something exactly like this!!

    Reply
  9. Jo Murray says

    May 7, 2013 at 4:39 pm

    What type of paint do you use? Oil or latex? I bought an old brass chandelier that I want to paint but I'm not loving any of the spray paint colors out there. We have a spray gun, that was given to us, but have never used it to paint metal.

    Reply
    • Sarah says

      May 7, 2013 at 5:18 pm

      We used latex (just a tester from Sherwin Williams). Oil based should work well too. I'd recommend researching the spray gun to see if oil or water would work best. Good luck! Let me know how it goes 🙂

      Reply
  10. Lesli at My Old Country House says

    June 6, 2013 at 1:23 pm

    Sarah, I am a bit of a tough customer, as I am such a HUGE DIY-er myself but you have completely blown my socks off and inspired me like crazy!!!! Congrats on being such a talented gal…I adore your home…and I am new follower!

    Reply
  11. Melissa Arnold says

    July 3, 2013 at 6:09 am

    Sarah, Just found your blog and am blown away! Love this light fixture. Can you tell me how you attached your pieces that you made from the egg crate grid? I would love to make this for my office but I'm not clear on exactly how it is all put together. I also love your painted DIY glass pane mirror…that is so high end and gorgeous. i agree with Lesli, I'm a hard sell too and you amaze me…and that's impressive. You have a very talented eye.

    Reply
  12. Mindy Schaper says

    July 10, 2013 at 8:02 pm

    Wow. I don't know how you think of such things. Awesome.

    Reply
  13. Nine Red says

    August 6, 2013 at 10:43 pm

    I love this! What spray gun do I spy there in the photos? It's a nice size!

    Reply
  14. Eva (http://buildhousehome.blogspot.com.au/) says

    August 30, 2014 at 11:51 am

    You are super creative! Feeling very inspired

    Reply
  15. Ali says

    August 5, 2015 at 4:40 pm

    So Cute! Can I just pay you to make one for me?

    Reply
  16. Unknown says

    October 20, 2015 at 9:25 pm

    Looks amazing! Could you share which paint colors you used for the ceiling/stripes? Thanks

    Reply
    • Sarah says

      October 21, 2015 at 1:19 am

      Thanks! SW Big Chill

      Reply
  17. Kim Brown says

    July 25, 2017 at 3:22 am

    I'm in love with this light. Did you make a template for cutting the shape out of the grid? My husband and I want to make this light but are unsure of how to cut the shape out of the grid. Any help you could give us would truly be appreciated.
    Thank you.

    Reply

Leave a Reply Cancel reply

Your email address will not be published. Required fields are marked *

Contact Me

sarahmdorseydesigns{@}gmail{.}com

Stay Updated!

Get all the latest goods straight to your inbox!

This error message is only visible to WordPress admins

Error: No connected account.

Please go to the Instagram Feed settings page to connect an account.

Must Reads

Custom Peg Board + DIY Circle Art | FrogTape

Custom Peg Board + DIY Circle Art | FrogTape

Main Level Refresh with The Home Depot

Main Level Refresh with The Home Depot

Sponsor

2016 Daily Simplified Planner

Popular Projects

Bookcase Renovation

Bookcase Renovation

March 5, 2012 By Sarah 6 Comments

Anthropologie Inspired Drapery Update

Anthropologie Inspired Drapery Update

March 16, 2012 By Sarah Leave a Comment

pivoting door to hide electronics!

pivoting door to hide electronics!

July 23, 2012 By Sarah 2 Comments

Asymmetrical Starburst | Tutorial

Asymmetrical Starburst | Tutorial

July 6, 2015 By Sarah 3 Comments

Dyeing an Upholstered Eames Shell Chair

Dyeing an Upholstered Eames Shell Chair

September 16, 2013 By Sarah 28 Comments

  • DIY TUTORIALS
    • design + build
    • furniture redo
    • diy in 1 hour or less
  • free printable
  • friday favorites

Disclosure

Occasionally, affiliate links are used when they are available. I do earn a small commission when items are purchased using those links. As always, I only link to things that I truly love. I also link to items that I love when an affiliate link is not available. Thanks so much!

  • Home
  • About
  • Services
  • Shop

Copyright © 2025 Dorsey Designs

MENU
  • Home
  • About
  • Services
  • Shop