• Home
  • About
  • Services
  • Shop
    • Bloglovin
    • Email
    • Facebook
    • Instagram
    • Pinterest
    • Twitter

Dorsey Designs

DIY and Interiors by Sarah + David

  • Home Tour
  • DIY TUTORIALS
  • friday favorites
  • design + build
  • art

get the latest straight to your inbox

Lucite Framed Vintage Scarf

One of my favorite projects of our TN bedroom, was also the easiest! I’ve seen a few DIY lucite frames around, like Honey & Fitz and The Hunted Interior!

We referred mainly to Honey & Fitz tutorial, so please refer to that for the full how to. I’ll be sharing a few details here, that we found helpful as we worked.

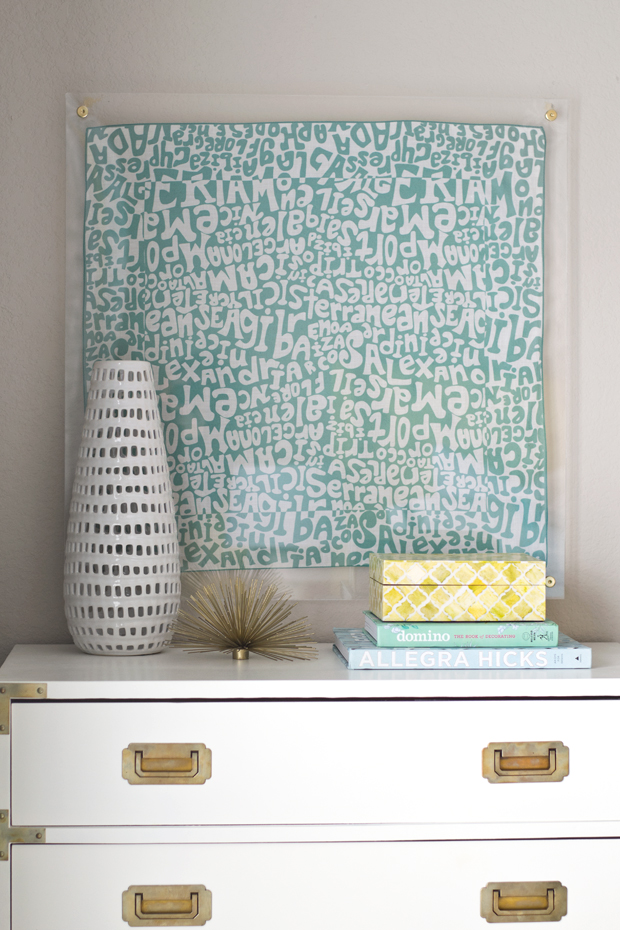
Like Dina, we got our acrylic cut at Lowes (just be sure that it is cut properly before leaving .. they had to re cut mine) I think this is the size we got, it was simply cut in half, so we had two 24×24 pieces.

Our scarf is a vintage Vera scarf – ebay and etsy have tons, so have fun browsing! Just be mindful that the size will work with the acrylic sizes at Lowes/Home Depot, etc. I liked at least a 2″ border.

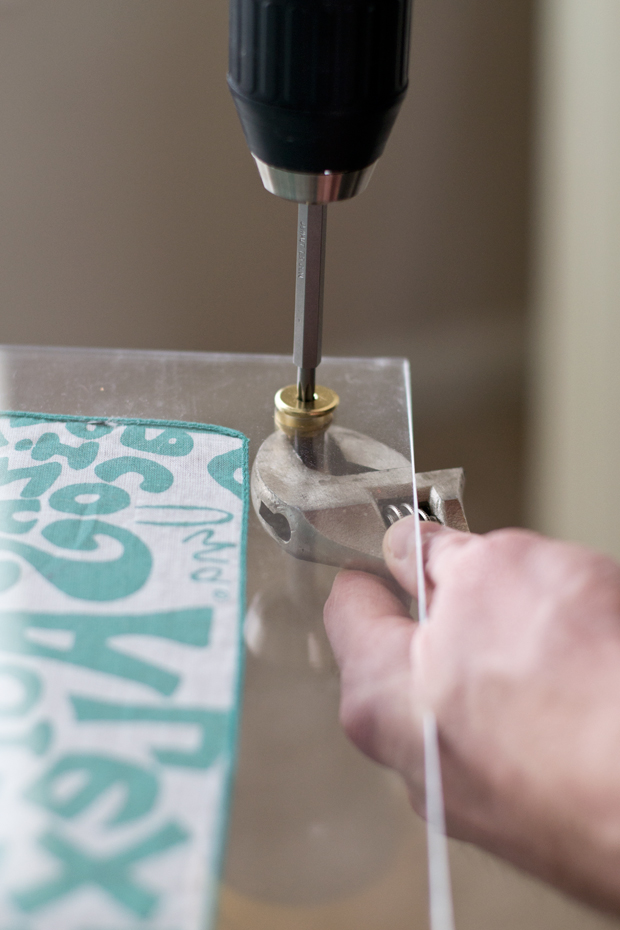
Our frame is attached on all 4 corners. To create the holes through the acrylic for the hardware, we gently drilled in REVERSE into a scrap wood block. This slowly melts the fragile acrylic versus drilling forward which is a lot rougher.  It helps prevent the acrylic from breaking. Sorry no pic! Let me know if you have any questions!

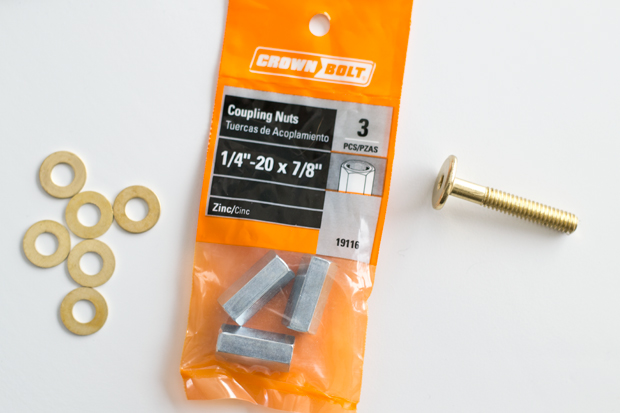
Acrylic mounts are very pricey, so we came up with with a few parts that would give a similar look. All were found at Home Depot. I originally wanted all brass parts (and spent a lot of time looking in store in and online :/) but I couldn’t find anything that would give the same look for less. So I ended up just spraying the coupling nuts gold.

We placed the a washer on the bolt, threaded it through the hole, another washer and then the coupling nut.

We did cut the bolt (with the Dremel tool) so there was about 1/4″ of the coupling nut open.

We then used small screws (that would fit inside the coupling nut), measured and mounted it to the wall. We just did this on the top two nuts, since that was a lot easier to measure. So the bottom two are just for looks. 

I love love love how it turned out!

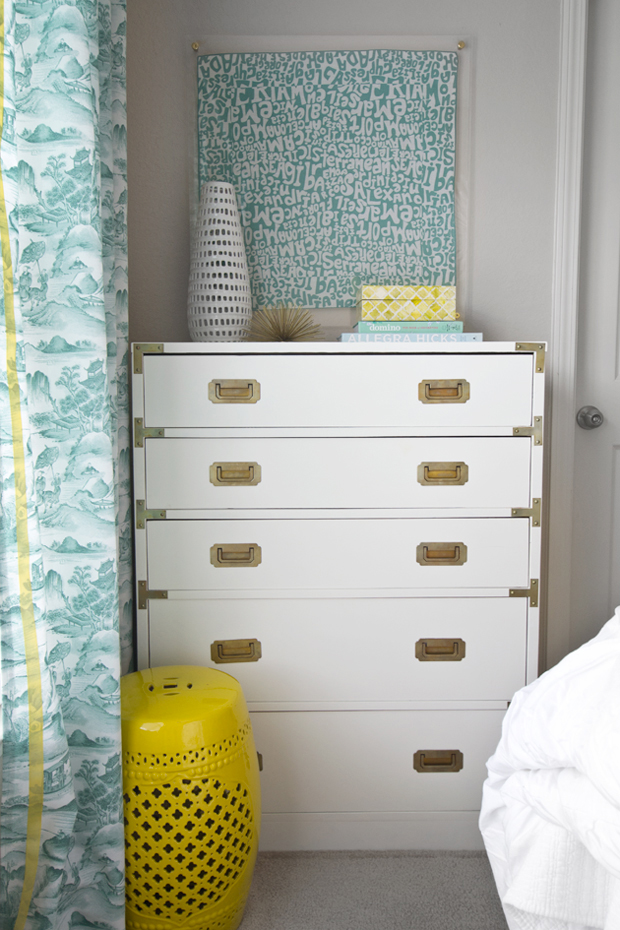
Campaign dresser here

Stay tuned for more DIYs from this space soon!

Bedroom// DIY TUTORIALS// Uncategorized// Uncategorized11 Comments

Subscribe

get the latest straight to your inbox

« Renter Friendly Grasscloth Closet Doors | Tutorial
Friday Five | 07.03.15 »

Comments

  1. Cassie @ Primitive & Proper says

    July 1, 2015 at 11:24 am

    oh i love how that looks! the frame is awesome!

    Reply
  2. Kristin@bliss-athome.com says

    July 1, 2015 at 12:27 pm

    Looks good Sarah 🙂 I always love this frame idea. xo

    Reply
  3. Kirby Jane says

    July 1, 2015 at 2:50 pm

    OMG- I have a vintage British bobby/policeman scarf that I love and have no idea what do to with. I love this idea!

    Reply
  4. {Hi Sugarplum!} says

    July 1, 2015 at 4:47 pm

    I'm just crazy about those!! I will have one in my house…somewhere!!!

    Reply
  5. Crystal Atkins says

    July 1, 2015 at 4:54 pm

    I must find a corner to do this in my house!

    Reply
  6. jana bek design says

    July 1, 2015 at 8:54 pm

    I love that you used coupling nuts! Such a clever alternative, the scarf is too cute too!

    Reply
  7. Julia Konya says

    July 2, 2015 at 11:48 am

    I've been wanting to do something like this ever since seeing the one that Jana Bek did too. Yours looks so amazing!

    Reply
  8. Brynne Delerson says

    July 4, 2015 at 5:05 pm

    So gorgeous!I love that scarf!

    Reply
  9. theanatomyofdesign.com says

    July 14, 2015 at 3:01 pm

    beautiful! I love how soft it is. I have several framed scarves and love seeing how others hang them as well!

    Reply
  10. vivi says

    December 10, 2017 at 6:09 pm

    Can you clarify how you actually mounted the pieces to the wall?

    Reply
    • Sarah says

      December 10, 2017 at 6:38 pm

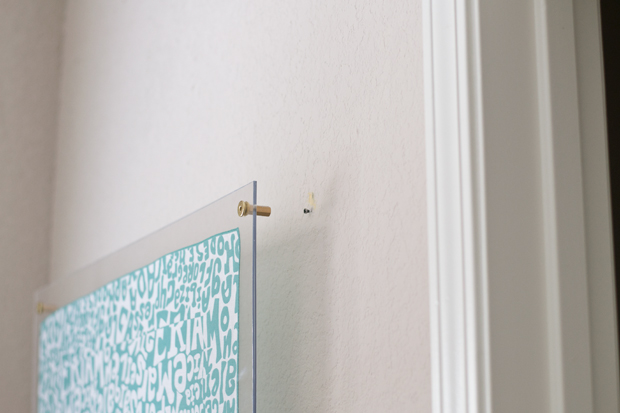
      The bolt is open and just slide over a screw

      Reply

Leave a Reply Cancel reply

Your email address will not be published. Required fields are marked *

Contact Me

sarahmdorseydesigns{@}gmail{.}com

Stay Updated!

Get all the latest goods straight to your inbox!

This error message is only visible to WordPress admins

Error: No connected account.

Please go to the Instagram Feed settings page to connect an account.

Must Reads

Custom Peg Board + DIY Circle Art | FrogTape

Custom Peg Board + DIY Circle Art | FrogTape

Main Level Refresh with The Home Depot

Main Level Refresh with The Home Depot

Sponsor

2016 Daily Simplified Planner

Popular Projects

New Prints Insprired by the Gallery Wall

New Prints Insprired by the Gallery Wall

July 24, 2012 By Sarah 2 Comments

Large Scale Banana Leaf Prints | DIY

Large Scale Banana Leaf Prints | DIY

April 28, 2015 By Sarah 29 Comments

New Prints in the Shop!

New Prints in the Shop!

September 27, 2012 By Sarah 1 Comment

Grasscloth Mat + Succulent Prints + Walls Republic

Grasscloth Mat + Succulent Prints + Walls Republic

February 25, 2015 By Sarah 20 Comments

aluminum LARGE marquee letter

aluminum LARGE marquee letter

May 19, 2014 By Sarah 9 Comments

  • DIY TUTORIALS
    • design + build
    • furniture redo
    • diy in 1 hour or less
  • free printable
  • friday favorites

Disclosure

Occasionally, affiliate links are used when they are available. I do earn a small commission when items are purchased using those links. As always, I only link to things that I truly love. I also link to items that I love when an affiliate link is not available. Thanks so much!

  • Home
  • About
  • Services
  • Shop

Copyright © 2025 Dorsey Designs

MENU
  • Home
  • About
  • Services
  • Shop