
The tufted ottoman is complete!
I’ve been wanting one of these for a long time …
So I figured I would try to make my own version, and picked up some tips from here, here, and here
All provided great insight and tips when making mine!
I originally bought a coffee table to use as the base, but decided to craigslist it and make my own because:
1. it was cheaper
2. I could make it the exact size I wanted
3. I could choose the table legs

We started with a 30″x30″ 1/2″ piece of plywood and cut 1x4s for the frame


Stained 9″ table legs with Minwax water based stain – applied with a foam brush and wiped the excess off with a rag

Holes were measured and drilled for the tufting
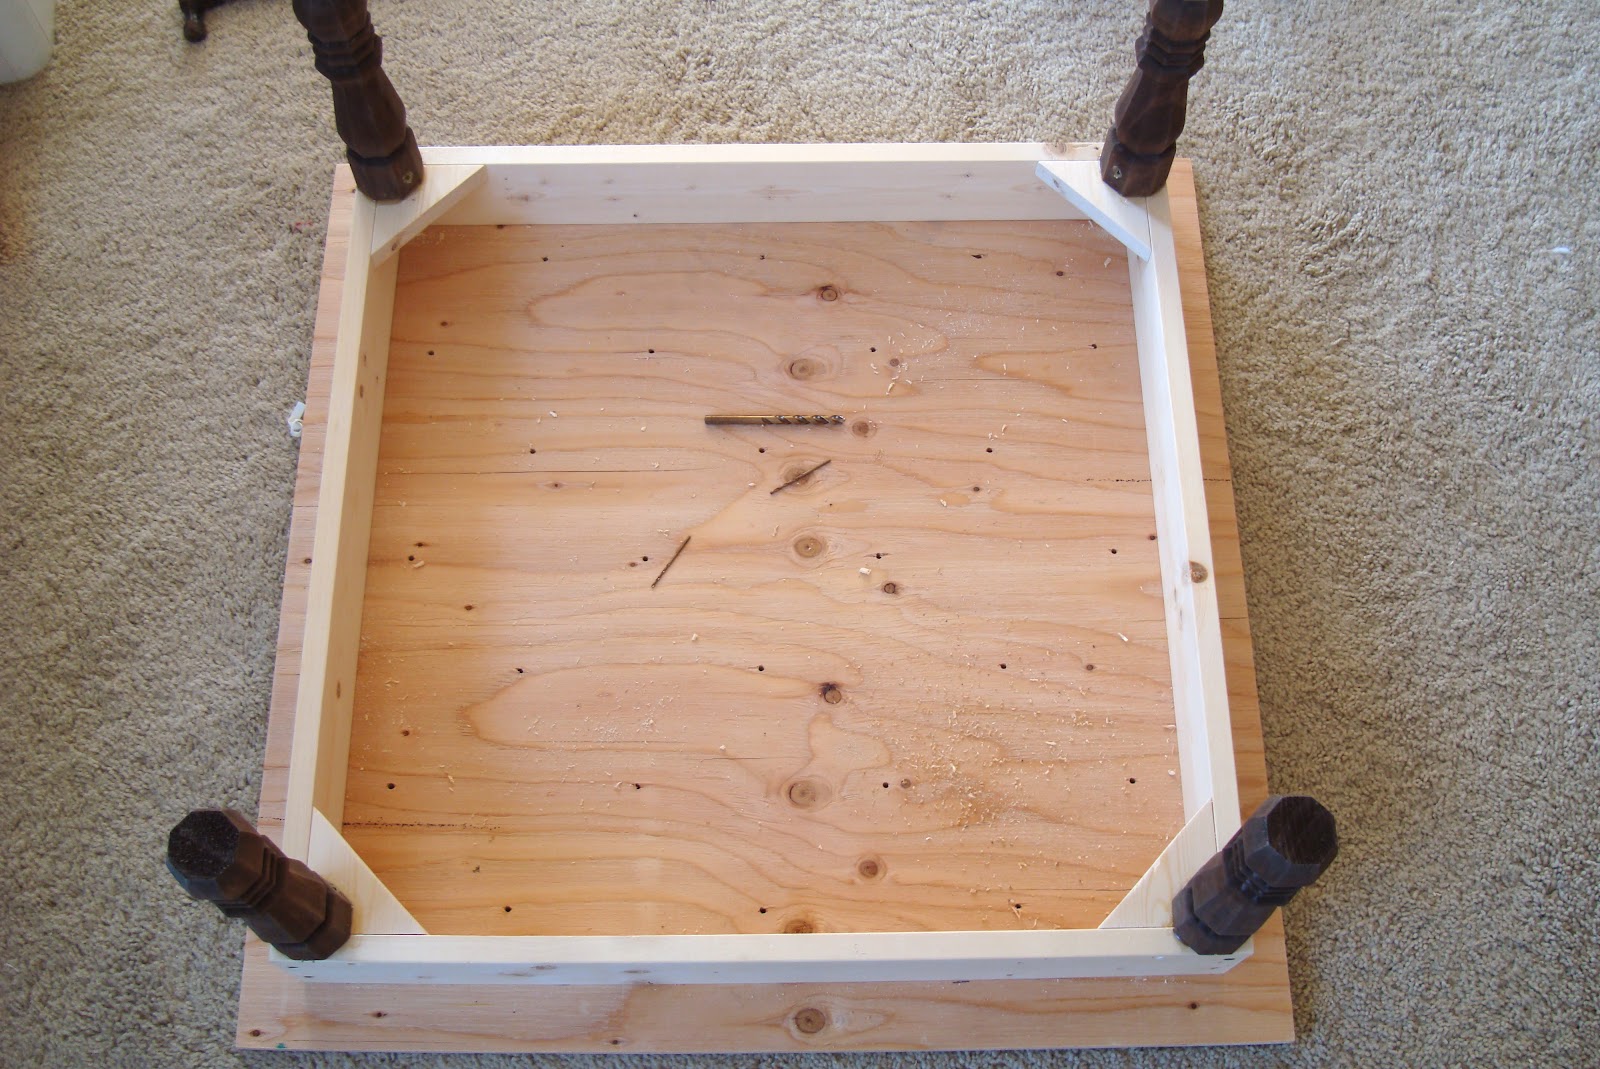
Pieces were assembled and attached with screws – table legs were attached using screws and for added strength, gorilla glue was used to connect the leg to the table

Foam was purchased pre-cut from www.buyfoam.com – which was pretty affordable compared to Joanns.
** Update: Since then, I’ve also found 3″ foam camping pads at Home Depot for $20 (great price!)
From top to bottom I used – 1″ 28×28, 1″ 30×30, and 1/2″ 46×46 foam (46×46 is not in above photo)
Making the bottom piece of foam slightly smaller helped to make the corners round on the finished product. The 46×46 piece was cut large enough to wrap around the whole piece.
We applied spray adhesive to attach foam to avoid sliding during tufting

We stapled the foam, cut off the excess on the corners and edges – Next we put a layer of batting and then the fabric – medium weight light gray linen from fabric.com

Made buttons from a kit purchased at Joann Fabrics – used heavy duty thread doubled up and a long needle
To make sure the buttons went in straight, David poked through the foam with the end of a meat thermometer (weird huh?) it was pointy but not enough to poke through the fabric
Starting from the middle – the needle was guided through the hole

I pushed from the top

While David pulled and stapled from underneath – this would have been very hard with one person!

Between each button the fabric was pulled tight to get rid of any wrinkles

1x4s were cut and wrapped in batting and fabric and then stapled

It is a little hard to see from this picture, but the top fabric and batting were pulled tight behind the side pieces – which were attached with screws while tightly held in place – fabric was stapled underneath and excess was cut off
Since we don’t have one of these for 45 degree cuts

The corners weren’t very pretty

Batting was wrapped in fabric and attached to the corners with nail head trim
and the finished product!


I don’t have the whole price broken out, but it was a lot cheaper than ones I’ve seen in stores and I the size is perfect for my living room.
We really enjoyed working on this project! I hope you like it as much as I do!
Great tute + beautiful ottoman!
Thank you! Let me know if you try it!
Thanks for the great tutorial. I have been wanting one of these ottomans. Yous is beautiful.
Thanks Lisa!! Let me know if you try it – I'd love to see pics!
Beautiful work..thanks for sharing!
What a great tutorial! One question – where did you get the table legs?
Thank you Amanda! Table legs are from Home Depot
I bought all my material today for this ottoman! I can't wait to start on it! 🙂 thanks for posting!
Great! Let me know how it goes and if you have any questions 🙂
Beautiful! I am SO making this. When I do, I'll link back to your tutorial!
-Colleen (www.58waterstreet.blogspot.com)
Really beautiful job!
I'm here from CG, and I'm thrilled to find your blog! Such a great tutorial, and fabulous finished ottoman. You are very inspiring. * I would really like to know where the aqua tray is from–I LOVE it!!
Thanks for stopping by and for your sweet comment!! The tray is from Joann fabrics (last season) so sadly they probably don't have anymore
I have a coffee table in my garage that I got a couple months ago to do this exact thing! Thanks for the tutorial!!
Hi, I am new to your blog and am following your tutorial here. I'm wondering how big your upholstery buttons are? Thanks!!
Hi Page! The buttons are 7/8" 🙂
Can you tell me more about how you attached the legs? We are having trouble with that part. Thanks!
I would recommend looking at my dresser post where I also attached legs (see link below) it explains it a little better. In addition to those directions you can also add gorilla glue prior to screwing the leg on for added strength.
http://sarahmdorseydesigns.blogspot.com/2012/06/coral-dresser-for-guest-bedroom.html
Hope this helps!
Sarah
Hi Sarah,
I have a question. I absolutely LOVE your diy ottoman and am going to attempt it!! I'm a little confused about the 1x4s you covered in fabric. Are those IN ADDITION to the other 1x4s you used for the frame or are they the same ones? Also – how many inches are the 1x4s? Thanks so much! I'm not sure how to make sure I see your reply. Any way you could email me? ChelseaJo@ArtfulBalanceHolistic.com
Thanks again! It's so lovely!
Chelsea
Hi Chelsea, thanks so much!:) It is two 1x4s thick. The first row creates the frame for the legs and top. Then 1x4s were wrapped in batting and fabric and attached from behind to the existing 1×4. This makes nice edges and adds strength. (I'll also send a copy to your email)
Great! That's what I assumed. Thanks so much for the quick response! How long are the 1x4s? Are the ones that you covered in batting/fabric the same length as the ones used for the frame? I'm guessing the length would be close to 26" for all 8 1x4s so the 30×30 plywood hangs over?
They will be a little bigger than the 1x4s underneath. I would recommend building your frame and then measuring the outer 1x4s to fit around the frame. Two of mine were 27.5" and the other two were 26". Hope that makes sense, let me know if it doesn't!
Gotcha!! Thanks a bunch!! 😀
We did it!! Not sure if you'll be able to see this pic I posted on my FB, but I wanted to share…
https://sphotos-a.xx.fbcdn.net/hphotos-ash4/431584_10100795698860568_252428367_n.jpg
I love that you used a print!! I'm thinking of selling mine and making one with a print 🙂
How much did this project cost overall?
It was about $90 … here is the post with the breakdown: http://sarahmdorseydesigns.blogspot.com/2012/03/diy-tufted-ottoman-price-breakdown.html
Also, since then, I've found foam cheap at my Home Depot $20 for 3" thick camping pad
What is the measurement of the space between the buttons and rows?
The buttons are about 8" apart each way
How many yards of fabric did you need?
It took about 1.5 yards for the top and the sides took about .5 a yard
I'm a little confused about the corners. Is it just batting folded with fabric on top, stapled with nailheads on the ends?
It is a rectangle of batting wrapped with fabric – ends were folded on the backside and I used a little heat n bond on the backside to hold the fabric in place. We held in place and then secured the ends with nailhead (no staples were used)
Hi! Great post. I was wondering if you could link the camping foam you have found? I searched on Home Depot's website, but couldn't find anything.
Thanks!
Tristan
Hi Tristan! Here is a link: http://www.homedepot.com/p/t/203243566?productId=203243566&storeId=10051&langId=-1&catalogId=10053&cm_sp=BazVoice-_-RLP-_-203243566-_-x#.UT3gQhlXKHk
For some reason it is under carpet pad (it is 3" thick) … it was near the carpet section at my home depot. It does look like it is only sold in store. Good luck! 🙂
You have inspired me to do this!!! Thank you so much for the great tutorial! We do have a miter saw, so hopefully our corners will be as intended 🙂
Thanks for the heads up on the home depot foam pad. I just used it and finished mine yesterday! Super satisfied and it! Heads up to anyone having a hard time getting the buttons on: use an upholstery needle it will save you time and a lot of pain.
This is awesome! I am little confused how you got a hole from the top of the ottoman through the wood when stapling the buttons on the back?
We drilled through the plywood first, after placing the foam, batting and fabric, we ran the upholstery thread through the button and used a long needle to pull the thread through the pre-drilled hole and then pulled tight and stapled several times on the back of the plywood to secure.
Sarah you have definitely inspired me to take this on! I have looked EVERYWHERE for the perfect ottoman for our living room and keep coming up short, literally! You make it look like not only can it be done at home and on a budget, but look like it actually came from a $tore! I am so impressed with your tutorial and I will definitely link back and let you know how mine works out!! Wish me luck!! Thanks again!
Love it! Well done 🙂
Thank you so much for this article; love the precise directions. Your ottoman is beautiful and the attention to detail is fantastic. Great job!