• Home
  • About
  • Services
  • Shop
    • Bloglovin
    • Email
    • Facebook
    • Instagram
    • Pinterest
    • Twitter

Dorsey Designs

DIY and Interiors by Sarah + David

  • Home Tour
  • DIY TUTORIALS
  • friday favorites
  • design + build
  • art

get the latest straight to your inbox

Modernized Brass Chandelier + MBR Progress

Hey! I hope you had a great weekend! We moved back into our master bedroom – still a lot to do, but here’s where I’m at.

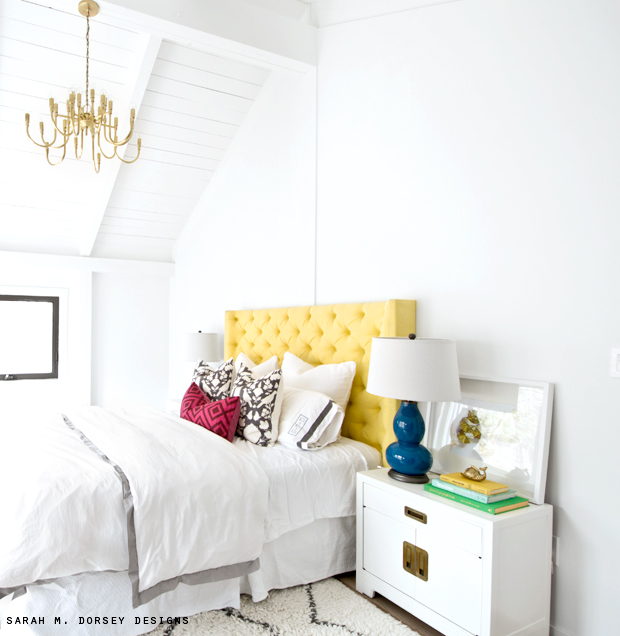
I love everything in the room, but not together, so I’ll definitely be adding and subtracting. But, this year, I’d love to show more progress shots, so hopefully that’s ok 🙂

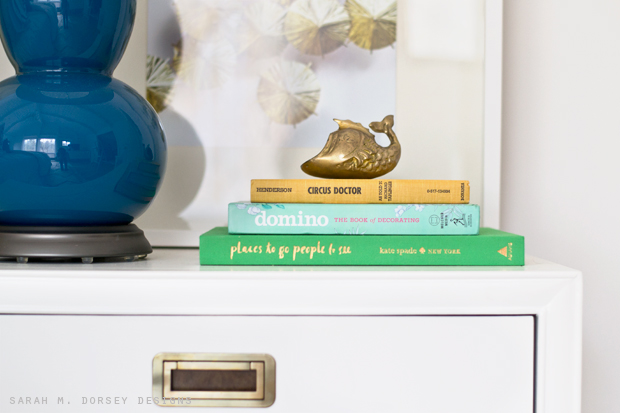
I inherited several books from my Grandfather – he was a large animal veterinarian, so Circus Doctor is fitting. We have a few built ins planned – I can’t wait to get the rest of the books out of storage!

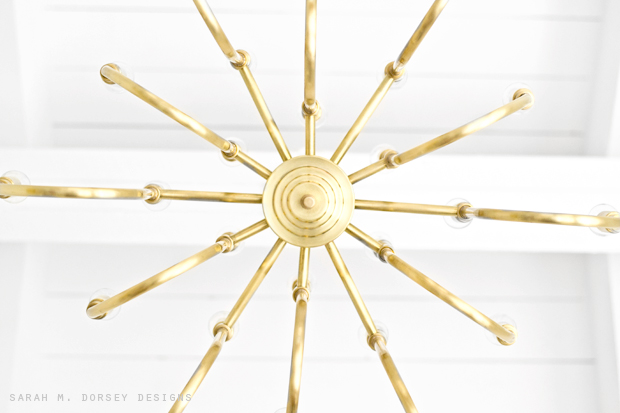
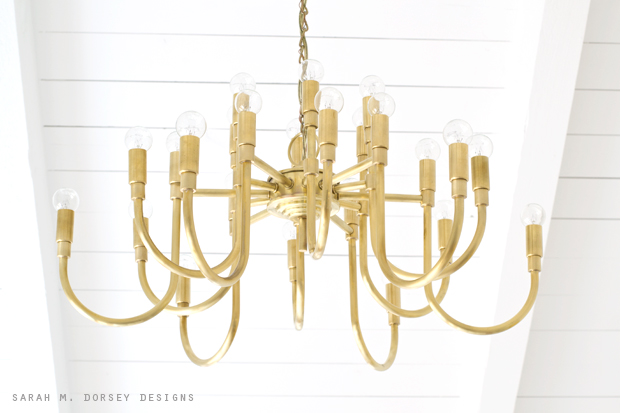
The other week – we also finished our chandelier!

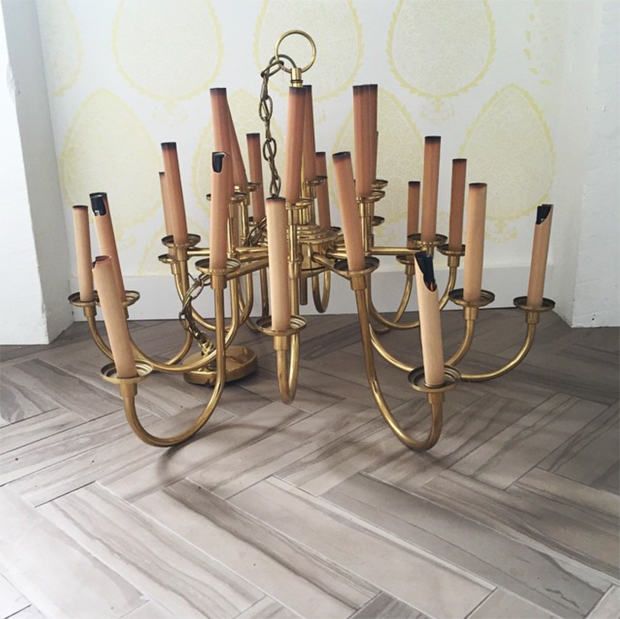
Here’s the before – you can see the sleeves needed to be replaced – they were broken and discolored.

We bought new (shorter) sockets and brass covers – removed the shiny lacquer with a fine synthetic steel wool and nail polish remover – so now it’s a matte brass.

It’s pretty true to the original, just modernized.

Sources 🙂

souk rug (currently on sale!) // turquoise lamps (chose from 150 colors)  // toss pillows // duvet // nightstands // umbrella art 

Hope you have a great week – make it AMAZING! 🙂

Bedroom// light// Uncategorized// Uncategorized17 Comments

Subscribe

get the latest straight to your inbox

« 2 Things on Friday
My Favorite Pillows From Etsy »

Comments

  1. Shannon Harmon says

    January 18, 2016 at 2:15 pm

    I have that EXACT same light! Can you share where you got the new shorter brass covers? I'd love to update mine!

    Reply
  2. InMyOwnStyle says

    January 18, 2016 at 2:36 pm

    You have such a great eye! This looks better to me than anything you could buy new for two reasons…it has a family history behind it and it is a Sarah M. Dorsey original now. 🙂

    Reply
  3. Cassie @ Primitive & Proper says

    January 18, 2016 at 3:00 pm

    oh it looks SOOOOOOOO good! love love love!

    Reply
  4. Janet says

    January 18, 2016 at 4:55 pm

    I'll enjoy seeing more progress reports… because no one I know does a whole room make over in a weekend. It's a process, a little at a time. So, I love when designers share the thought process behind their decisions. Thanks for the nail polish remover tip, now I know how to update my brass lamp (stamped 1982). Love the shape, the finish needs some work.

    Reply
  5. Julia Konya says

    January 18, 2016 at 5:38 pm

    Your spaces just always put a smile of happiness on my face. Love it

    Reply
  6. Jana Bek says

    January 18, 2016 at 6:21 pm

    This chandelier is fabulous Sarah & you're room is beautiful – can't wait to follow along on your updates! X j

    Reply
  7. Sarah Krouse - {Home-ology} modern vintage says

    January 18, 2016 at 9:30 pm

    Adore the chandelier!

    Reply
  8. Jennifer@The Chronicles of Home says

    January 19, 2016 at 11:55 am

    The chandelier turned out so fabulous! The finish on it is gorgeous. I would never have known to use that steel wool and nail polish remover process. Brilliant. I LOVE the nightstand, don't remember that from before. What a beautiful piece.

    Reply
  9. Cassie says

    January 19, 2016 at 6:09 pm

    Great tip on the nail polish remover. When do we get a tutorial on your fabulous yellow headboard? I've been waiting months since you revealed it. 🙂

    Reply
  10. Gwen, The Makerista says

    January 19, 2016 at 8:19 pm

    I love it, Sarah! Such a great update and I'm sure that took a lot of work, you did a wonderful job!

    Reply
  11. Yvonne says

    January 19, 2016 at 9:37 pm

    I would especially love to see some process shots or a tutorial for how you redid the finish on the brass chandelier. It looks fabulous!

    Reply
  12. Claire Brody says

    January 19, 2016 at 9:44 pm

    That shot is stunning Sarah!! You are so talented.

    Reply
  13. Whitney Shortt says

    January 19, 2016 at 10:06 pm

    I love your yellow headboard and the chandelier looks amazing!

    Reply
  14. Jennifer @ Dimples and Tangles says

    January 21, 2016 at 5:04 pm

    That chandelier is just TOO good, Sarah! Love the new socket covers and how you stripped off the shiny. I'll have to try that!

    Reply
  15. Karen @ Year of Serendipity says

    January 21, 2016 at 11:59 pm

    Oh my goodness, I LOVE that chandelier!

    Reply
  16. Diane Bélanger says

    January 26, 2016 at 6:14 pm

    Love everything. When will we get the headboard tutorial? Can't wait. Freat work.

    Reply
  17. Brandi Bradley says

    February 19, 2016 at 7:51 am

    Wow! You worked some real magic on that chandelier! It is a nice touch to your brilliant bedroom. I have been thinking of adding a new light source to my bedroom. Thank you for the inspiration your post has provided! Now, I am off to find a chandelier I can restore!

    Brandi Bradley @ Rotax Metals

    Reply

Leave a Reply Cancel reply

Your email address will not be published. Required fields are marked *

Contact Me

sarahmdorseydesigns{@}gmail{.}com

Stay Updated!

Get all the latest goods straight to your inbox!

This error message is only visible to WordPress admins

Error: No connected account.

Please go to the Instagram Feed settings page to connect an account.

Must Reads

Custom Peg Board + DIY Circle Art | FrogTape

Custom Peg Board + DIY Circle Art | FrogTape

Main Level Refresh with The Home Depot

Main Level Refresh with The Home Depot

Sponsor

2016 Daily Simplified Planner

Popular Projects

Art Progress for Above the Headboard

Art Progress for Above the Headboard

May 4, 2012 By Sarah 2 Comments

Dyeing an Upholstered Eames Shell Chair

Dyeing an Upholstered Eames Shell Chair

September 16, 2013 By Sarah 28 Comments

Dining Room Update | Chippendale Chairs + Renter Friendly Accent Wall

Dining Room Update | Chippendale Chairs + Renter Friendly Accent Wall

March 12, 2015 By Sarah 16 Comments

DIY Belgrave Headboard with Ikat Fabric for the Guest Bedroom

DIY Belgrave Headboard with Ikat Fabric for the Guest Bedroom

June 12, 2012 By Sarah 32 Comments

Panel Paintings to Chalkboard | Contributing Post at Infarrantly Creative

Panel Paintings to Chalkboard | Contributing Post at Infarrantly Creative

December 19, 2013 By Sarah 13 Comments

  • DIY TUTORIALS
    • design + build
    • furniture redo
    • diy in 1 hour or less
  • free printable
  • friday favorites

Disclosure

Occasionally, affiliate links are used when they are available. I do earn a small commission when items are purchased using those links. As always, I only link to things that I truly love. I also link to items that I love when an affiliate link is not available. Thanks so much!

  • Home
  • About
  • Services
  • Shop

Copyright © 2025 Dorsey Designs

MENU
  • Home
  • About
  • Services
  • Shop