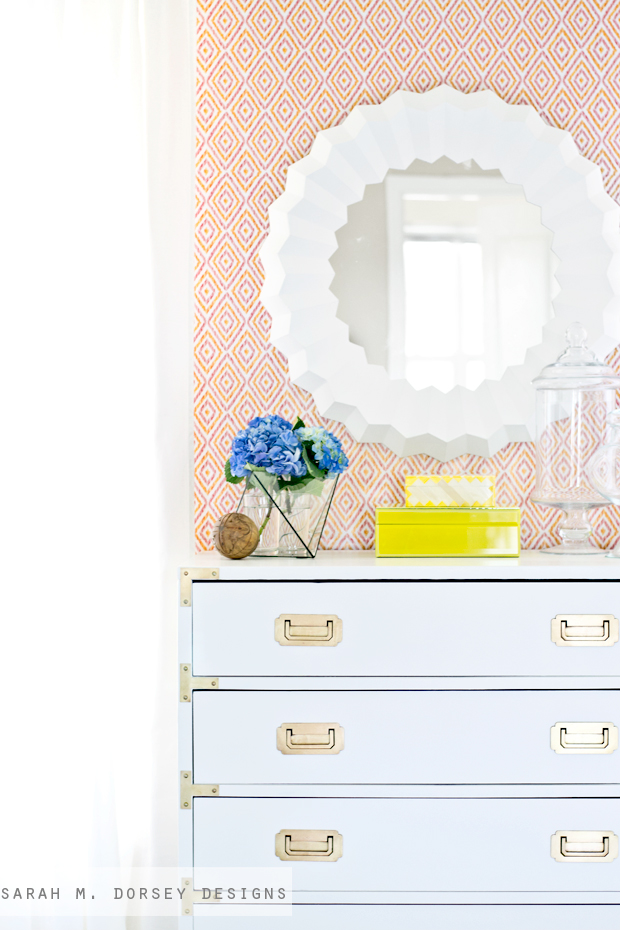
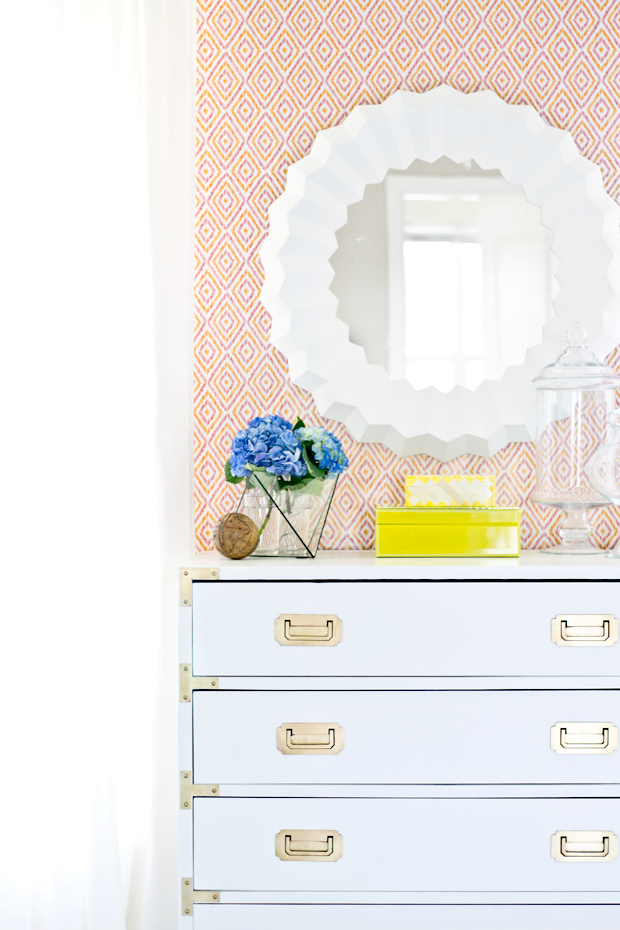
Today I’m sharing how we made a Serena & Lily inspired mirror, modeled after this. The original is around $600 and ours is $15-$20 (depending what materials you have on hand). With a little effort and affordable materials we were able to get our own custom 3D mirror!
It was a little time consuming, but most of it was done in the evening while we were watching a little t.v., much better than working in the garage!
This isn’t a full tutorial, due the complexity of calculating the angles and the measurements for the jig, if anyone is interested in the details of the template and jig, let me know and I’ll try to get that info.
Here’s our process!
Materials + Tools:
32″x40″ mat board (like what you’d use in a photo frame, mine is about 1/16″ thick)
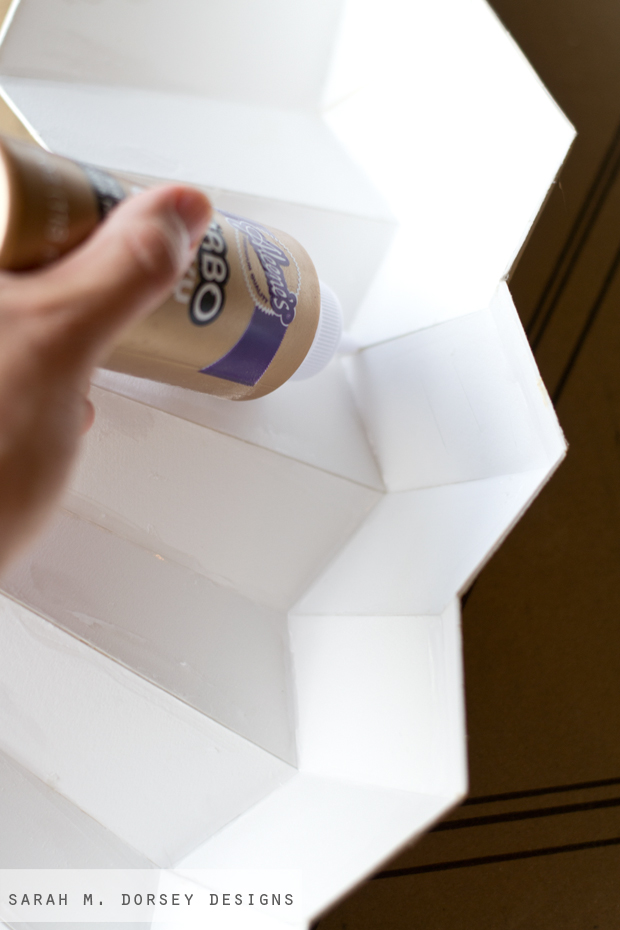
Quick grab craft glue (we like Aleene’s fast grab or turbo tacky)
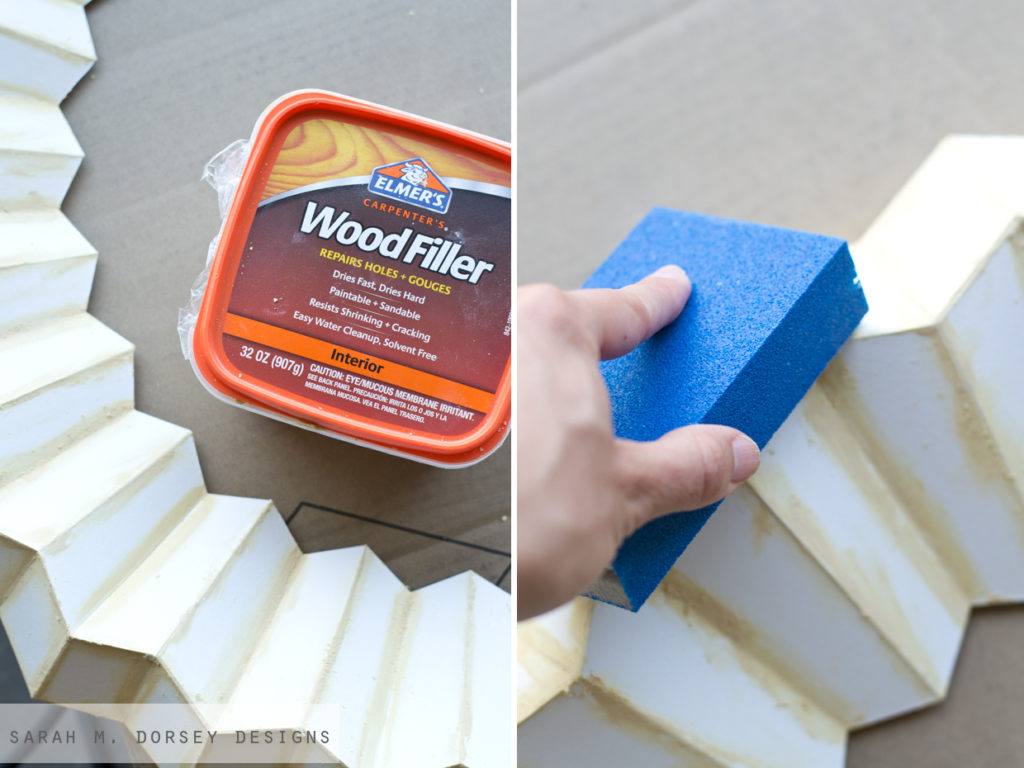
Wood filler
Half sheet (2’x4′) 1/4″ plywood
Mirror Adhesive
18.5″ round mirror ($8 cut at a local glass shop)
Fine foam sanding block
Painters tape
Xacto knife / Metal ruler with cork backing / cutting mat
Jigsaw
Hanging hardware (D rings, wire)
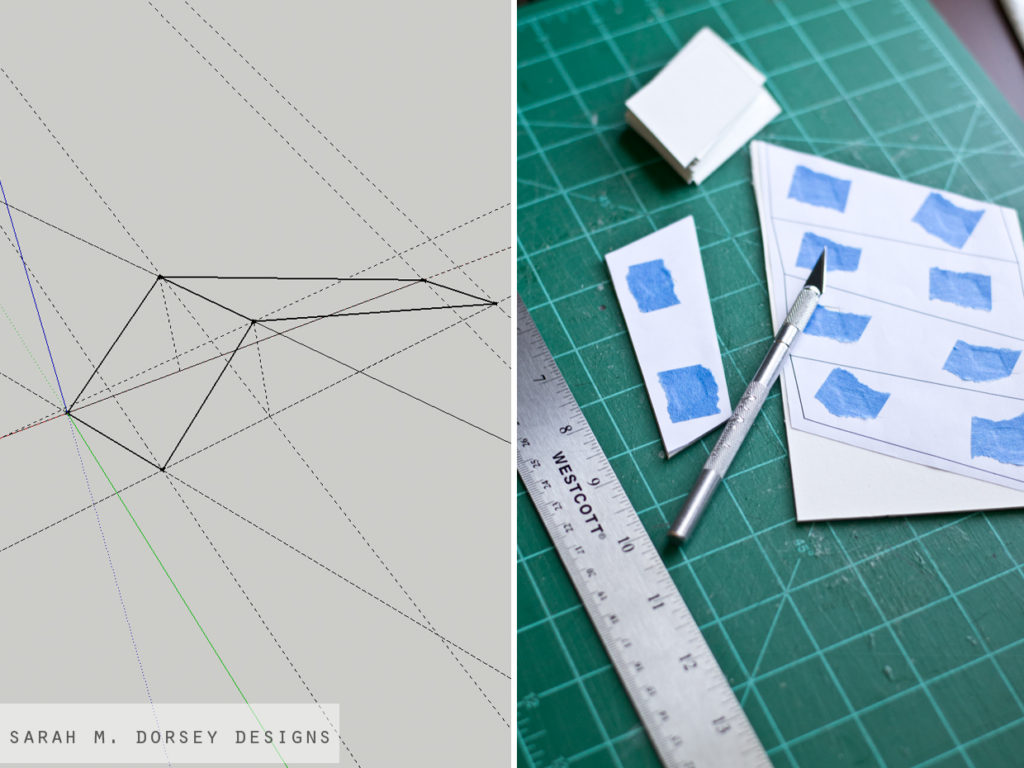
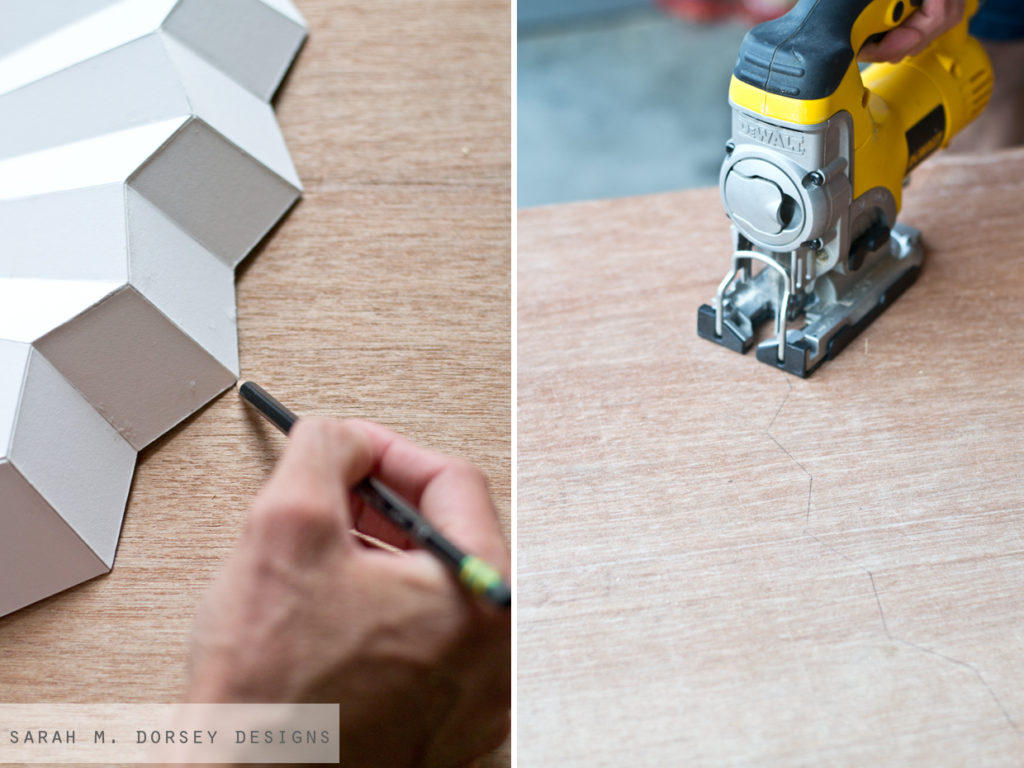
1. First, David calculated the angles in a 3D program, SketchUp. This was tricky and required a little trial and error to get just right.
Then we printed the pieces out on 8.5×11 paper and started cutting out the mat board. We decided not to attach the template to the mat board with spray adhesive so that we could flip the pieces and not worry about stickiness, torn mat board, etc. Instead, we cut small holes through the template and attached it with painters tape.
Cutting mat board takes a little getting used to – you want to keep the cuts as straight and even as possible. (David and I both have lots of practice from countless projects in college!) I got a request for tips on cutting, here’s what works for us: First, the blade is very sharp, always handle with care (don’t leave it on the floor, make sure it doesn’t roll off the table, etc.) You’ll need, self healing cutting mat, xacto knife (no. 11 blades) and a metal cork backed ruler (cork for anti slip). Line up your ruler (I typically use my ruler to protect the side that I’m using, so if I mess up, the part that I’m using doesn’t get damaged. **Always make sure that you fingers holding the ruler are clear of the edge prior to cutting, yep that happened one night when I was tired** Grip the handle close to the blade (gives your extra control, just don’t get too close to the blade), hold the knife straight, low and fairly horizontal with the cutting mat (this post shows my hand position), drag the heal of your hand on the cutting mat – you want to think about moving your hand verse putting all the pressure on the blade. It typically takes me about 3 passes to get through the mat board, repeat till it’s fully cut, don’t pull it apart. Finally, you want to keep your blades pretty sharp – I buy my blades in a 100-pack from Amazon, if you use the Xacto knife a lot this is the way to go since the smaller packs are expensive!
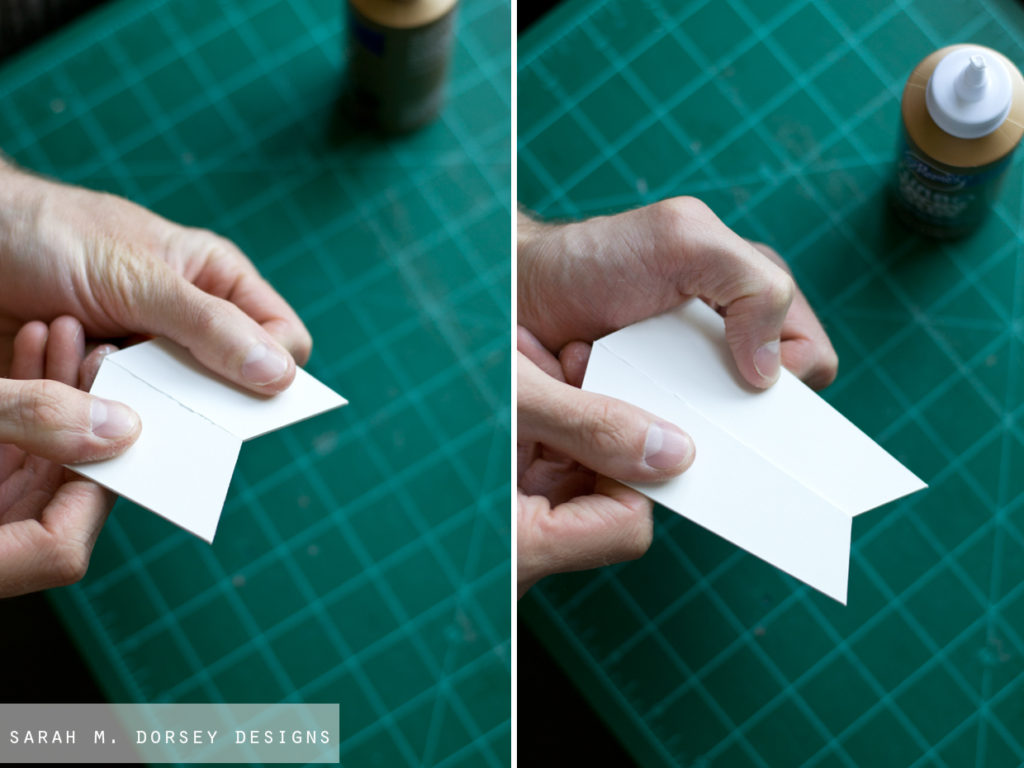
2. As I cut, David glued (this helped speed it up!) Each section of the face has two smaller and two longer pieces. The centers were glued individually. You want a fast grab glue so that you aren’t holding it forever!
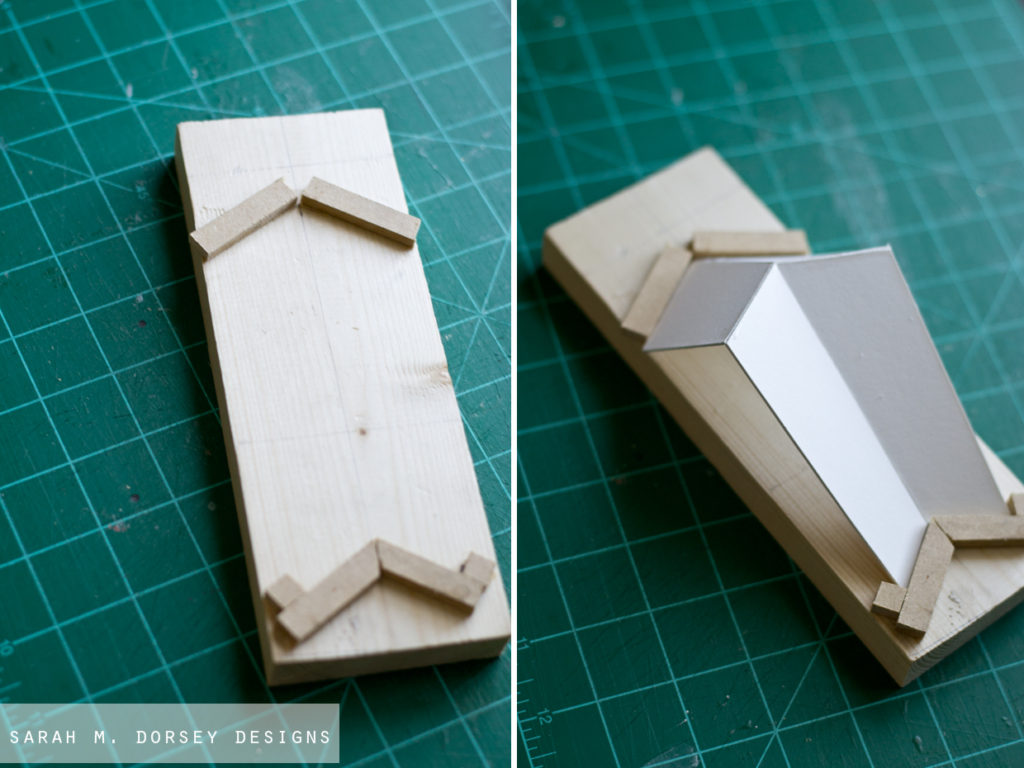
3. Then we placed it in a jig that we made so that each piece would be consistent. The jig was made using measurements from the SketchUp model.
4. Once it was fairly firm, we glued the sections together. We used painters tape as we went to stabilize the joints.

5. Once the circle was constructed and dry, we flipped it over and reinforced the seams with more glue, pushing it into the crevices. It’s on the back side, so the glue can be messy.
6. Then we centered it on a 2’x4′ piece of 1/8″ plywood, traced the outline, and cut it out with the jigsaw.
7. After building the face, we needed to cut mat board to go around the edges. David measured for the height (including the plywood frame) and started with a quick paper mock up to verify the dimensions. We then cut and glued the edge pieces around the frame.

8. Then, we applied wood filler into all the crevices. **Important: You want to apply the wood filler as thin as possible (smoothing it as you go), this will reduce sanding later. The mat board sands well, but since you have to hand sand, it’s easier to apply a second thin coat later if needed, you want it to be as smooth as possible. Using a fine grit foam sanding block helps to evenly sand all of the faces and joints.
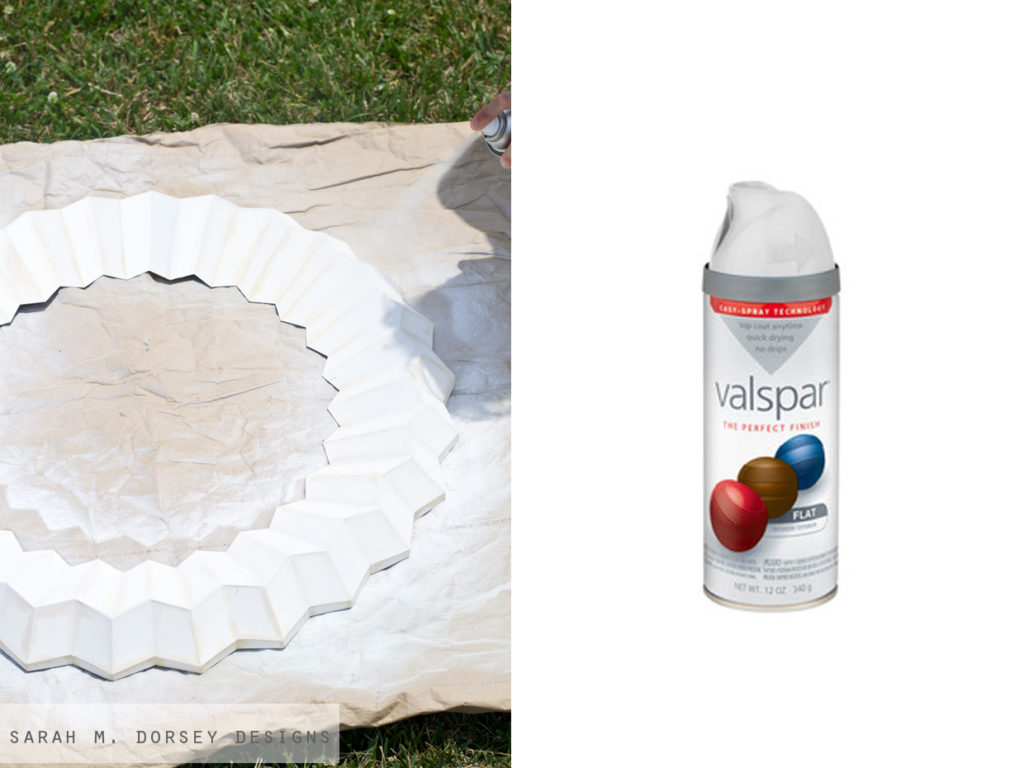
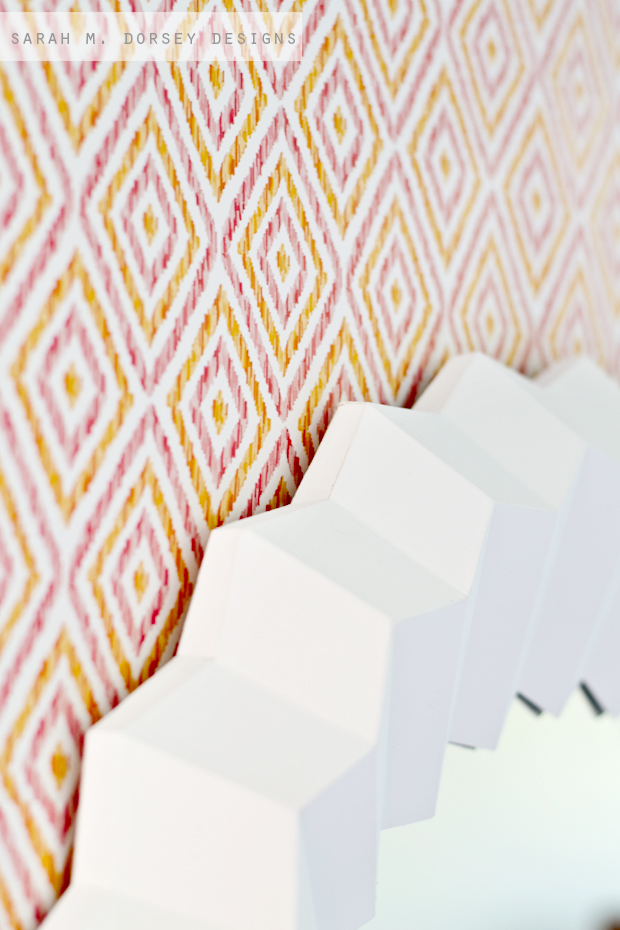
9. Once we sanded, we removed all the dust with a micro fiber cloth and then painted. First we used a glossy paint, but it showed every imperfection, so we sanded it a little and applied three thin coats of Valspar flat white spray paint.
10. We tested the pre-cut plywood backing (our mirror was a little larger than 2’x’4′ plywood, so there was a little gap on two sides, not a big deal since it’s on the back. We needed to trim ours slightly, so we did that with the jigsaw.
Then, we centered a 18.5″ mirror (cut at a local glass shop for $8) and attached the mirror with mirror adhesive, and weighed it down overnight with a semi heavy object (like three bricks) with cardboard in between to protect the mirror.
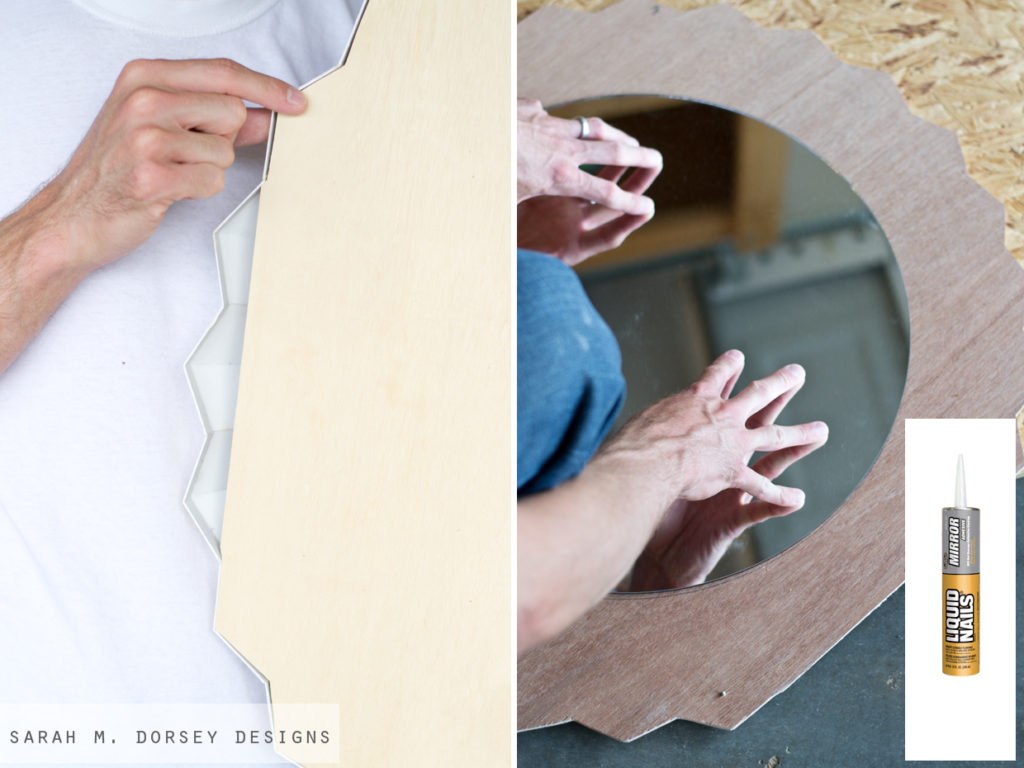
11. Then we attached the frame to the mirror. We applied glue around the edge, placed the frame on top and let it set. Then, we flipped it over and placed a few layers of glue to fill in all the gaps (letting it dry in between coats)

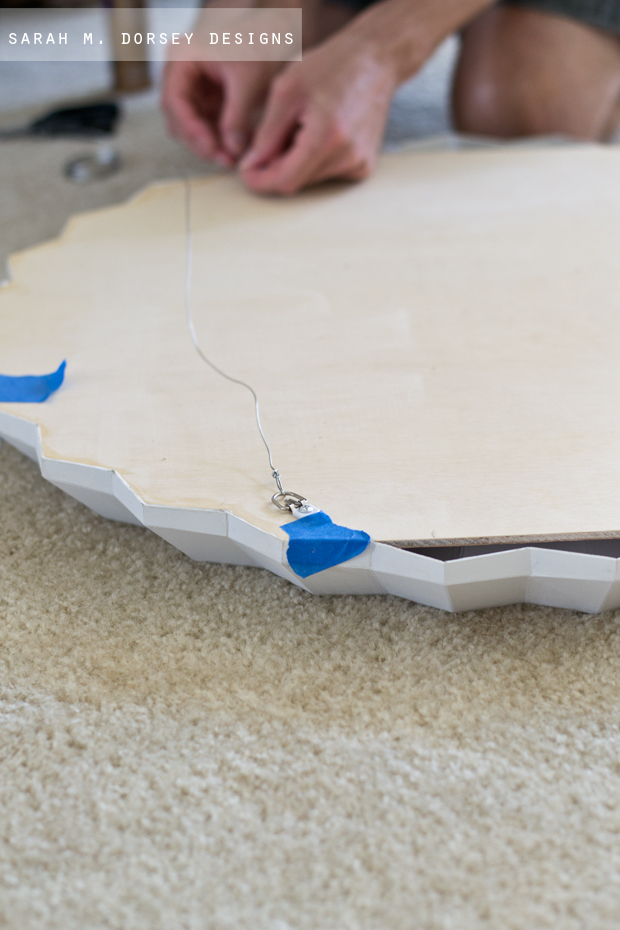
12. Finally, we attached a wire on the back to hang it.
You may be wondering about the durability. Prior to painting, someone who will remain nameless .. but over 6′ tall, stepped on it .. we both freaked out, but it only cracked on one seam, so a little glue fixed it as good as new. For what it is (thick paper) it is surprisingly durable! I would still recommend handling with care prior to hanging!
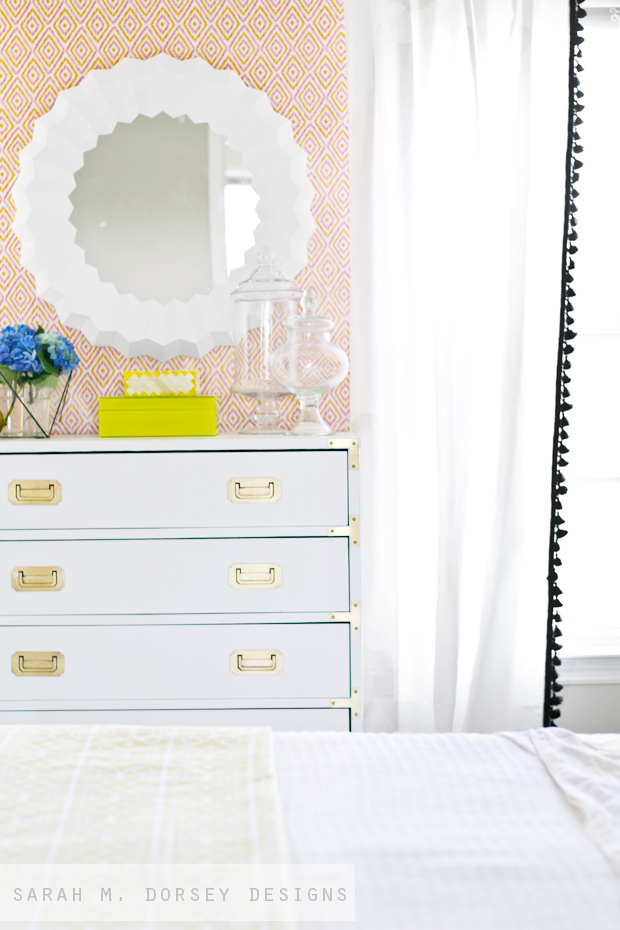
The wall covering is Cynthia Rowley wrapping paper from Home Goods attached with double sided tape. Love the pop of color and pattern – and a perfect temporary solution!
The glass jars and boxes are also from Home Goods – perfect for holding jewelry, scarves, and other accessories.
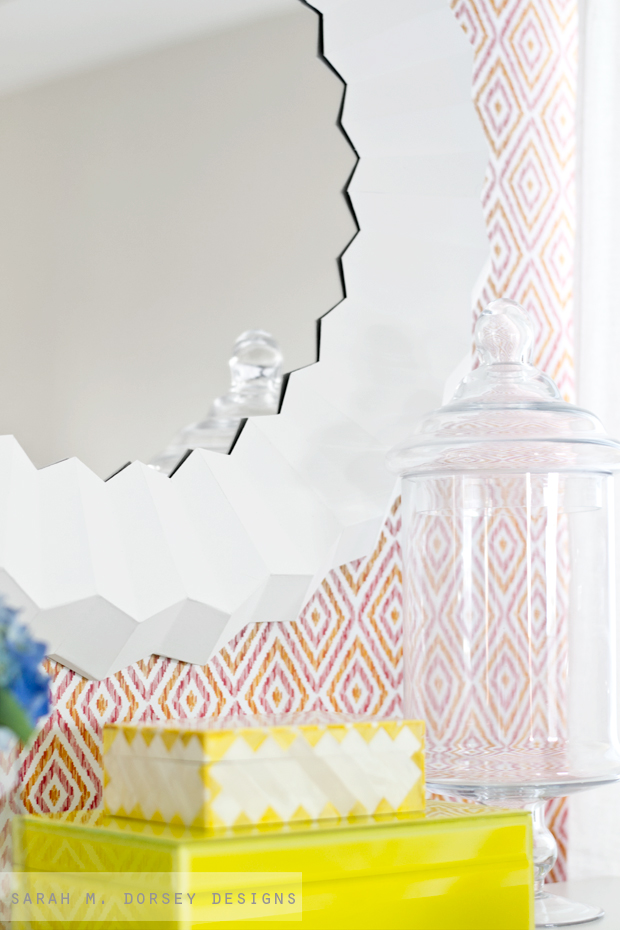
The Hydrangea is from Trader Joes (I love their flower selection!)
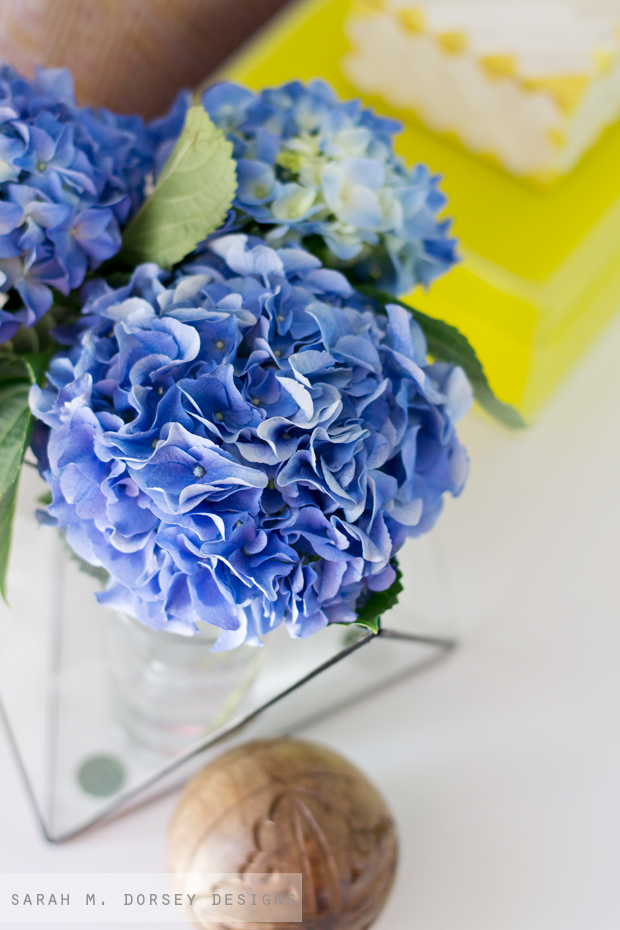
and the triangle glass display box was found at a thrift store while we were in Florida. The carved wood ball was found at a vintage fair in Knoxville last weekend.
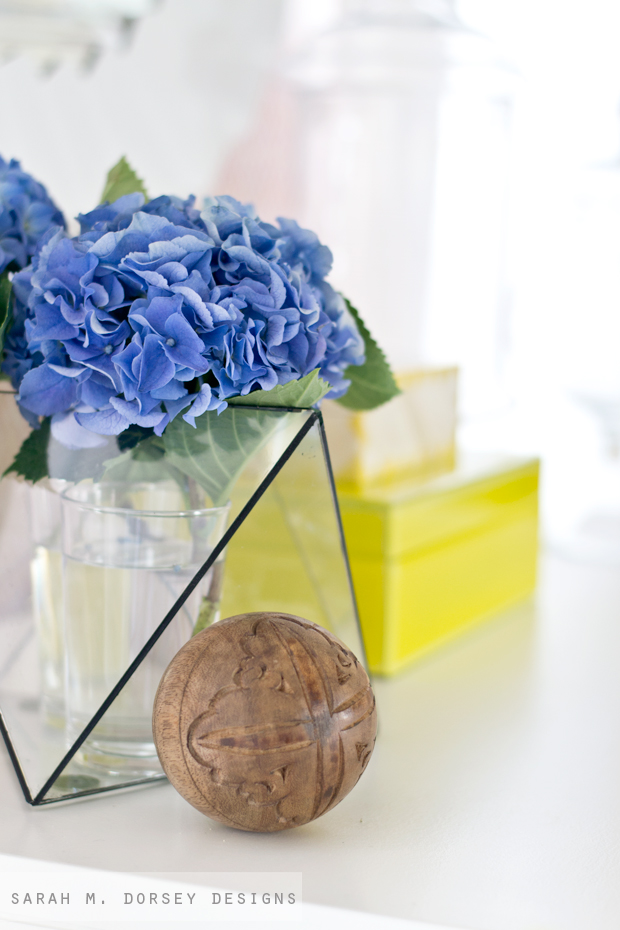
This is the perfect addition to our bedroom. It just feels like me 🙂 The yellow fabric is actually a shower curtain found at Crate and Barrel (we picked it up in store for $15 last weekend!) thanks for the tip, Kate!

The bed frame isn’t something that I’d pick out, but since our rental is a partially furnished, it’s okay for now.

I’m obsessed with this new wall in our room – it’s so bright, fun and happy!
Details on painting a laminate campaign dresser and polishing hardware coming soon! It’s amazing how white paint and polish transform this piece, it now looks super expensive!
Here’s the breakdown.
Cost:
~$15 ($8 mirror and $6 mat board -using a 40% off coupon at Hobby Lobby) I had everything else on hand, but if you needed to buy most of it, it would be around $20-$30.
Time (not including inactive time):
Template design / calculate angles ~3 hrs
Preparing template / Cutting mat board / Gluing ~4 hrs
Applying / Sanding wood filler ~2 hrs
Prep + Painting ~30 minutes
Cutting plywood and securing mirror ~1 hr
Securing frame + hanging hardware ~1 hr
11.5 hrs
We spread it over a few weeks, most of it at night while we were watching tv, so not too bad! I’m obsessed with the final outcome – LOVE it! 🙂
I know this project won’t be for everyone, but if you don’t want to give it a try, I hope you’ll take inspiration and try something with our mat board/glue/wood filler technique! Our geometric pencil cup is a great place to start!
WOW what a great project. I am super impressed with the final outcome. It looks fantastic. Love your tutorial Sarah!
Pure genius. You two have skillz.
Really amazing. So worth the effort for such a large sculptural piece!
The mirror is brilliant! I am amazed at your math skills. I can't wait for the campaign tutorial! I have a large, wood veneer campaign dresser that I've been psyching myself up to paint for about a year now… any tips and tricks you have will be greatly appreciated!
Sooooo impressed- thanks for the tips!!
Y'all have some insane skills!
This is insane! I would love to try this if you could pass on the template that would be so great!
Lovely. …and thanks for sharing your work details. ..it really inspired for a new thing. . 🙂
Lovely. …and thanks for sharing your work details. ..it really inspired for a new thing. . 🙂
Beyond amazing and your ability to create with mat board is super impressive. I have built little model homes from mat board, but have never thought of creating lamps and mirrors. You all have my wheels spinning!! I love this!
Wow. I've seen it all now! Then again, I think that every time you share your latest DIY, until you pull out the next insanely brilliant project. Stunning mirror, and your patience and vision and perfectionism are truly inspiring! I absolutely love that wrapping paper wall, too!
You blow my mind every time. So inspiring, so so stunning!
So beautiful-I am in love! Would love for you to share the templates. I would even pay for them. Maybe put it in your etsy shop?
Alright….sigh! You guys blew my mind once again. Whenever I visit your blog I need to be reminded to not compare or my myself or my husband to others LOL. You guys are just so so amazing.
WHOA. Stunning. You are so talented!
I mean……..what does one even say to this?! I wish someone in my house had the math mind to figure out angles like David does. My brain just doesn't bend that way. The mirror looks spectacular. And the dresser. The dresser!!
Oh my goodness, Sarah. I can't even imagine attempting such an intricate project! Major thumbs up!! Absolutely gorgeous!
This is really impressive, you guys are super talented:) Thanx for sharing
AMaZinG! As an extremely handy DIYer, I'm not easily impressed, you continue to impress me. I LOVE this. I'm adding it to my long list of things I'm working on.
I would love it if you could post a pdf of the template and details for the jig. My husband and I might be able to pull this off. I have also be drooling over this mirror but not the price tag!
Amazing. I would love a pdf of the template and details for the jig. I think my math-nerd husband and I might be able to pull this off. I have also been drooling over this mirror but not the price tag for some time.
I can't get over this!
Say WHAT?!? This is amazing! So impressive to pull this off on your own – I love it!
Sarah, I've been admiring your work for some time and this is definitely my favorite so far. Would love to give this a try if you can provide a template…..I'm in awe of your talent
Mind-blowing, as always. You two are amazing.
The whole section looks beautiful. I love the wrapping paper. We rent, so I need to do something like that.
Excellent tutorial! I would be interested – as many others that have commented- on the template and jig template. I have so much mat board around I can hardly wait to try some thing out! ( think I will try w your pencil holder first. ) thanks for the inspiration and let us know about template! Great job to you and your hubby!
Thanks so much! 🙂 I'm planning on sharing the template and jig, I just have to confirm the dimensions on the jig, so should have it shortly 🙂
I've been eyeing that mirror for months except I wont break down and buy it! I absolutely love this tutorial! I would love the template and jig template, can't wait to try this! Thank you so much for your inspiring ideas!
Yes, please!