• Home
  • About
  • Services
  • Shop
    • Bloglovin
    • Email
    • Facebook
    • Instagram
    • Pinterest
    • Twitter

Dorsey Designs

DIY and Interiors by Sarah + David

  • Home Tour
  • DIY TUTORIALS
  • friday favorites
  • design + build
  • art

get the latest straight to your inbox

Ikat Chevron Office Chair ReUpholstery

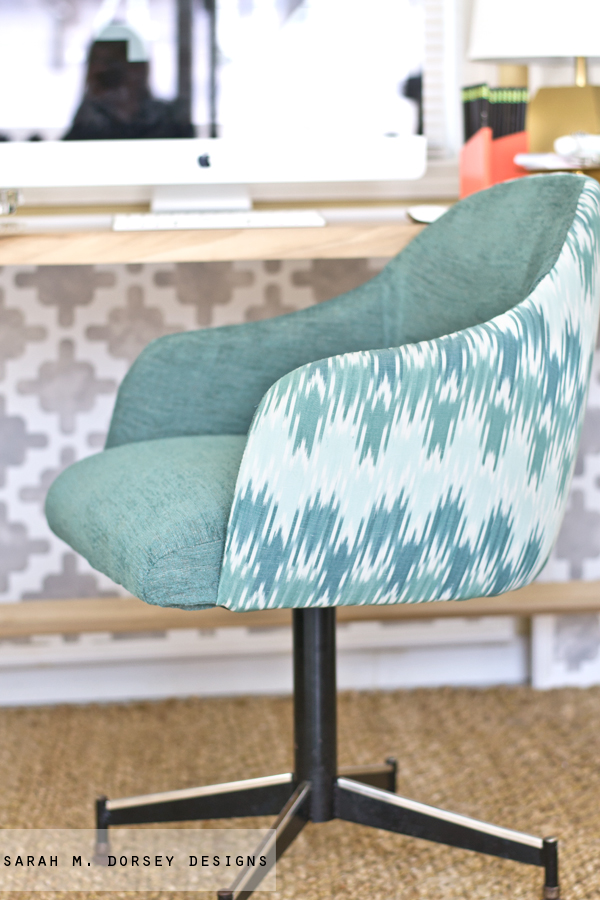
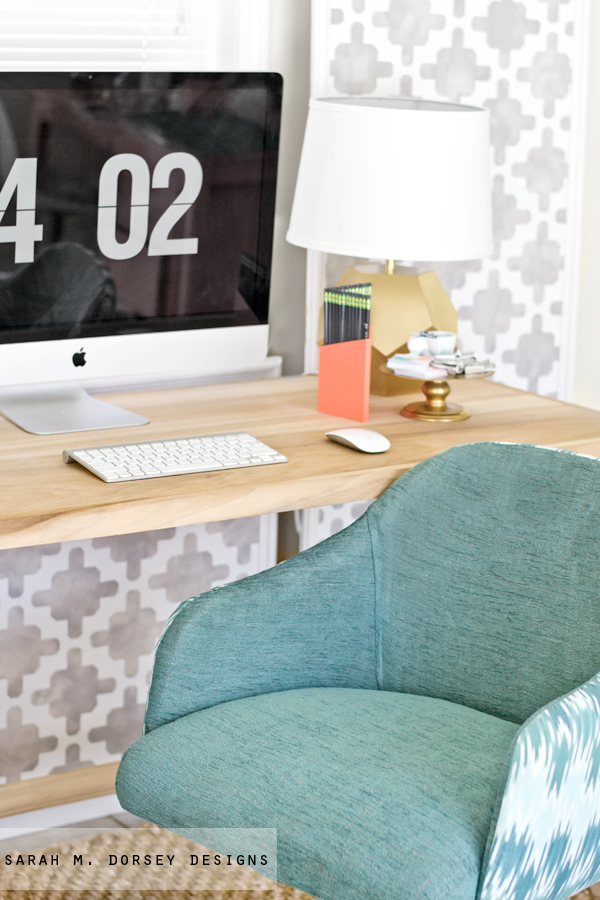
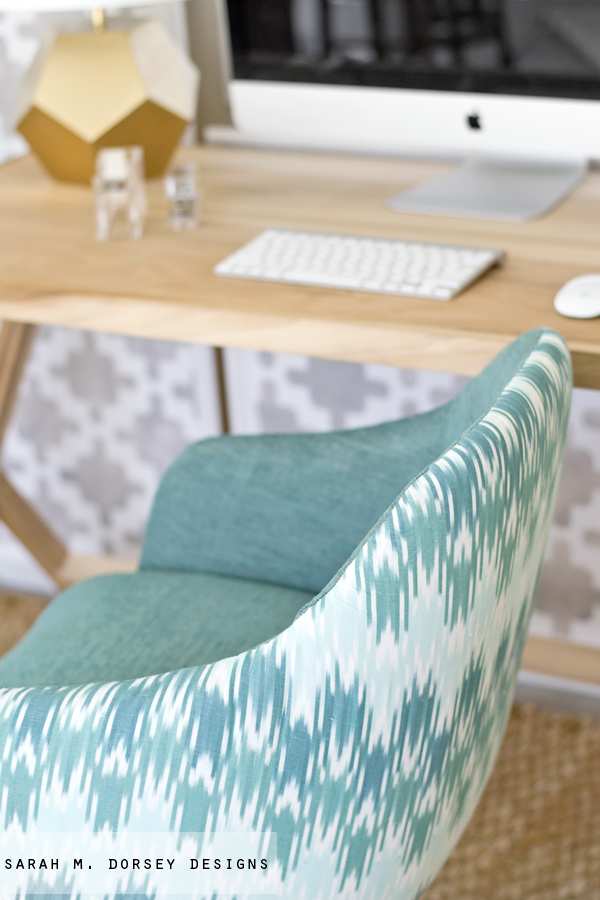
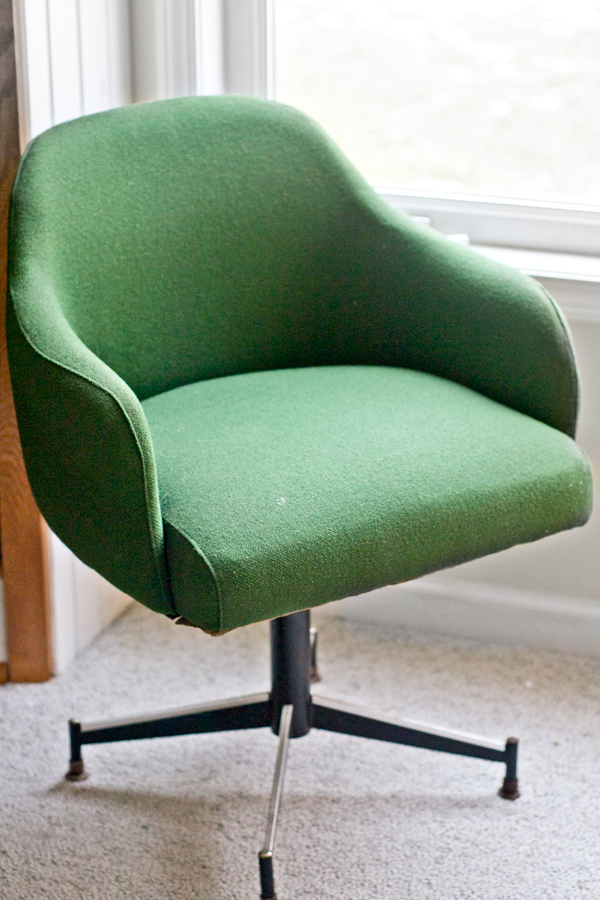
When I first saw this chair in Habitat Restore, I immediately thought of Emily Henderson’s chair makeover for Oh Joy’s Studio – the shape is almost identical!

I didn’t need another office chair at the time, so I passed. BUT when I got home I couldn’t stop thinking about it, so I went back later that day – luckily it was still there! (plus I found an amazing pendant that was hiding!)

It was $20 or $25, so a great deal!! The fabric was faded and stained, so needed to be replaced (plus I HAD to try Emily’s solid and pattern fabric combination).

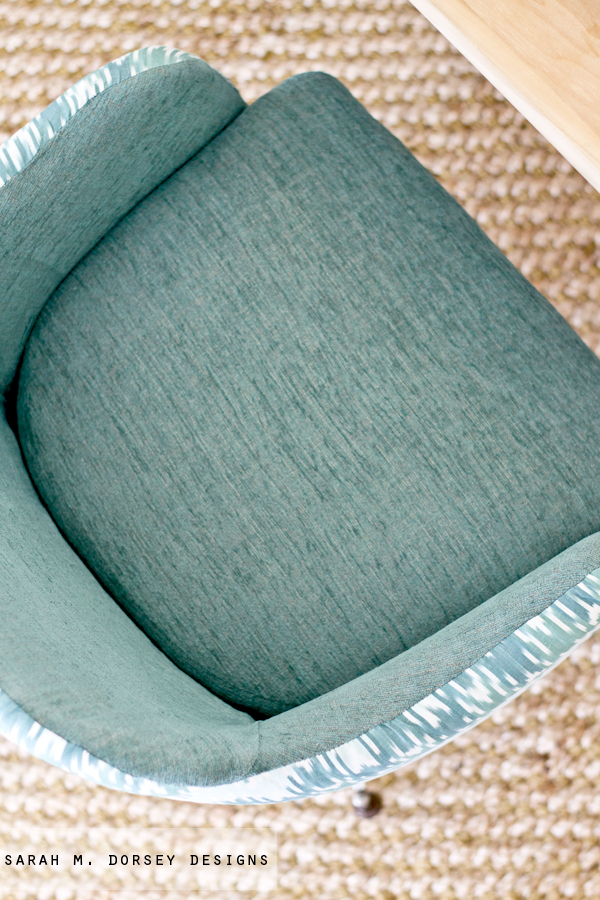
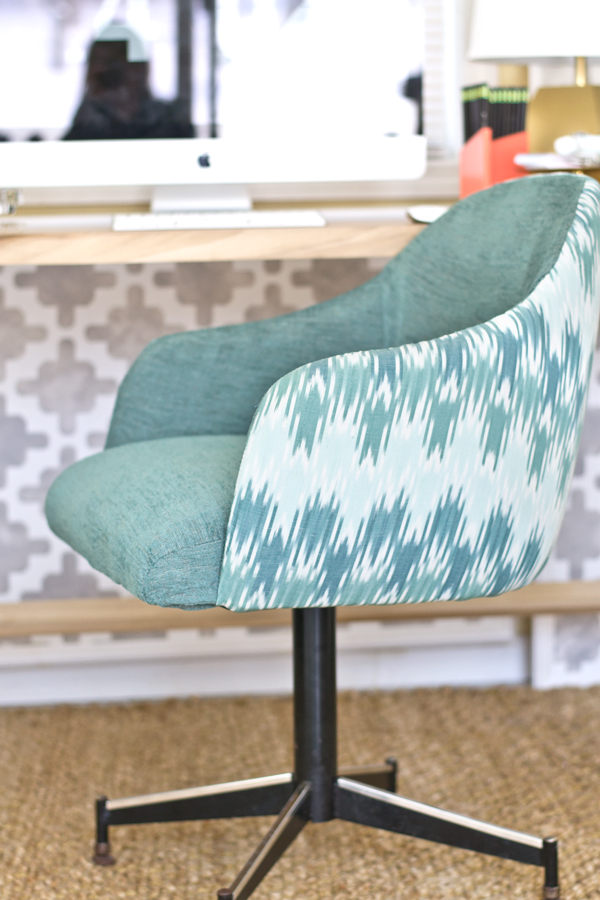
I found the amazing fabric at G Street fabric in Rockville, MD (funny side note, it is located underneath a gym (we were there the day after Christmas – so you know it was busy!) It was SO loud from people dropping weights, etc., I afraid the ceiling was going to cave in) But so worth it because I found this ikat chevron and grayish turquoise chenille in the remnant section. (Sorry, no markings or tags on the fabric – if anyone knows, let me know!)

I won’t be giving a full tutorial, but hopefully the photos will give you good idea of our process in case you’d like to try it!

First, I tore out about 1,000 staples, there were layers and layers. The staples connecting the back to the seat were about 2″ long, so David clipped them and then used a hammer to loosen and then pull them. I took out all of the seams and cut along the stitch line (since the fabric wasn’t even outside of the stitch line), then I laid the fabric on kraft paper.

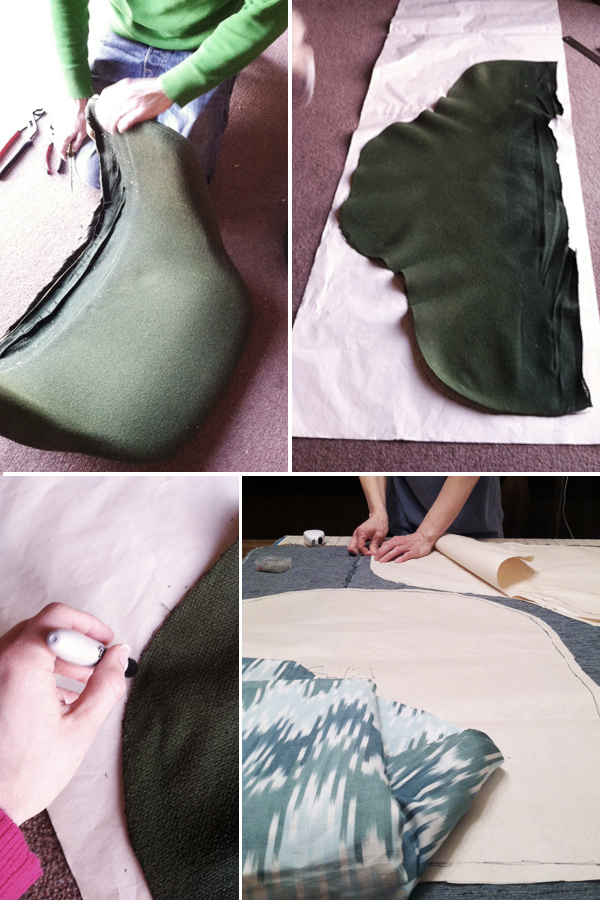
I traced the fabric and then added .5″ for my seam allowance, drawing a second line and then cut it out. I enlisted the help of my Mom since she’s a whiz with the sewing machine. For the back, Mom doubled the fabric and folded the template in half to make sure it was even on both sides, pinned and then cut. Finally, Mom sewed the pieces back together, exactly how they were.

(Sorry for the photo quality, the battery in my good camera died)

As you can see, there was too much fabric to make up by just pulling. The original back never got flat (see photo above) so I’m thinking that it was really stretched. I couldn’t get the fabric to lay flat, so ..

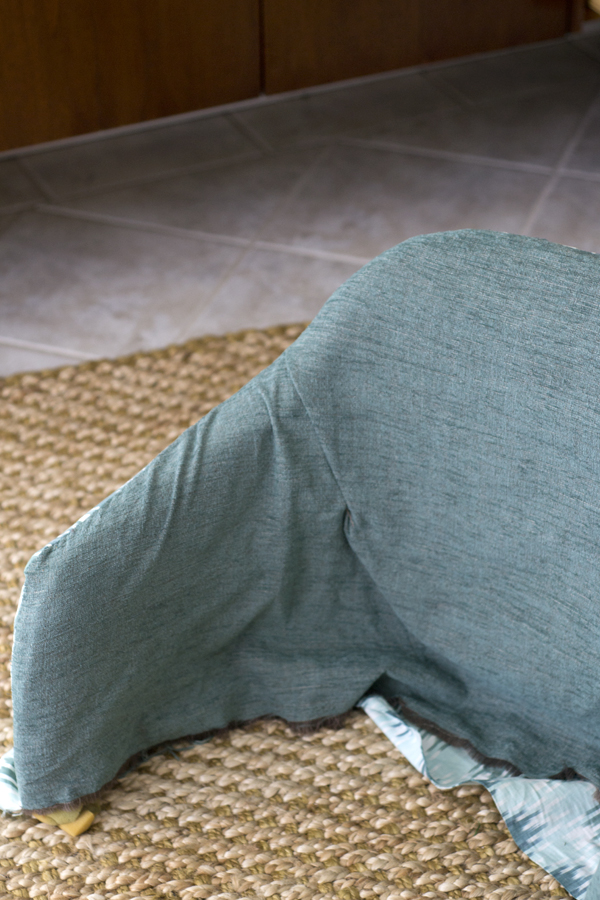
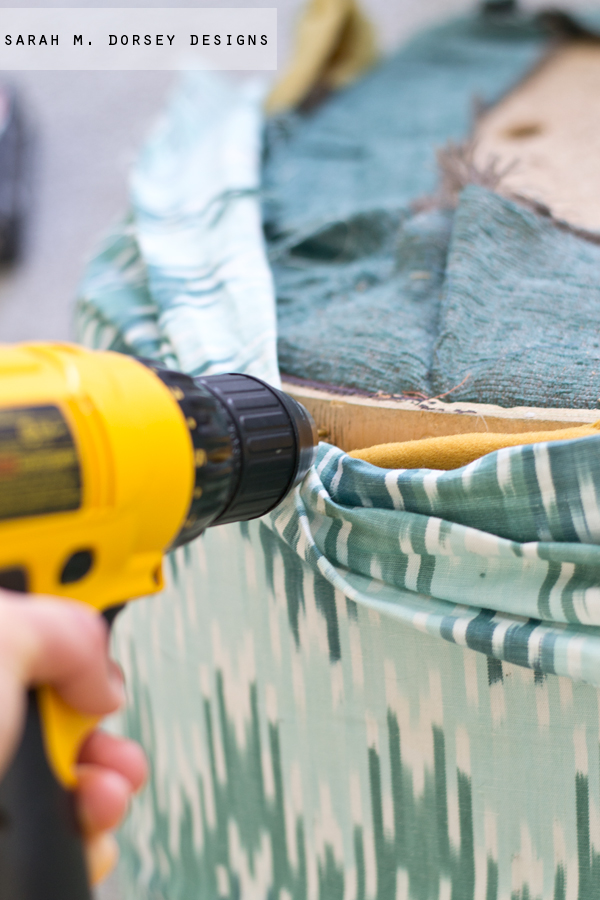
I folded it where it naturally fell and marked it with tape I removed it from the back, laid it flat and then cut down the center (of where it naturally folded) (stopping about .5″ from the top seam).

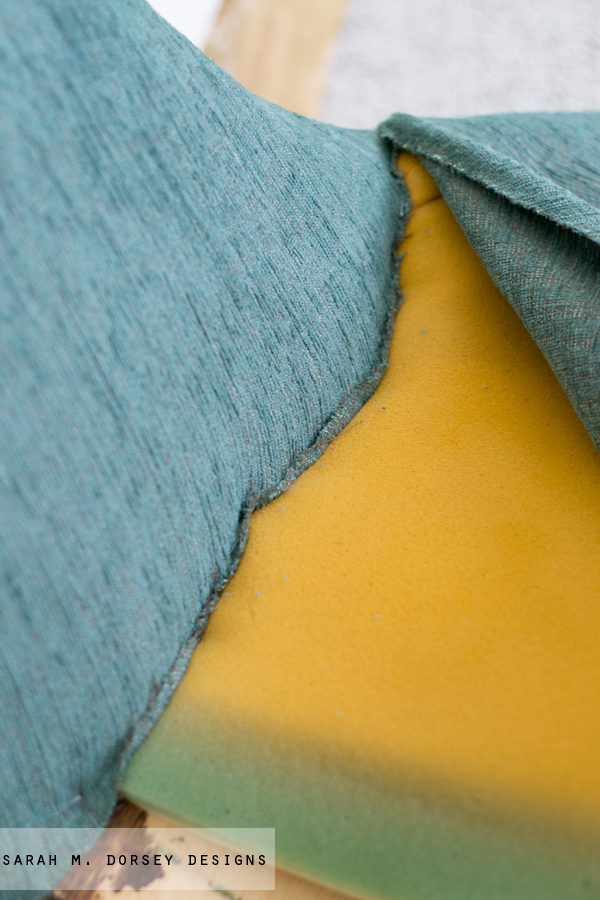
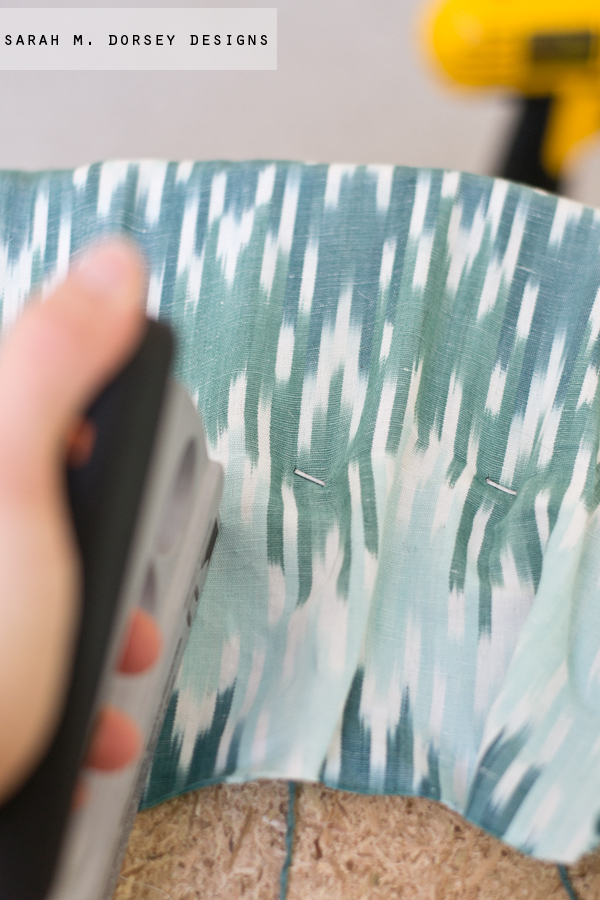
I stapled on one side, and then folded the other side over and stapled at the bottom. I put a little permanent fabric glue in the seam to prevent it from gapping. Also, you can see here that we kept the original foam, it slide over the back like a glove, so it would have been hard to replace.

Once I finished the back, it was time to reattached the seat to the back. I opted for 2″ screws instead of 2″ staples (it’s stronger, plus I don’t have have a stapler for that). 
I carefully adjusted the seat so it was even with the back and pre-drilled holes (slowly so it wouldn’t catch the fabric. note: some fabrics may need to be pre cut first) and then I used 2″ screws (about 6)  
Finally, I pulled the back tight and stapled underneath. Since it is one continuous piece of fabric going around a curve, it helped to staple a few inches away from the edge and gather the fabric towards the back – this prevents folds at the visible edge. Staple a few inches apart and then go back and pull tight between the staples.
I reattached the base (after a good scrubbing) and that was it! 
Isn’t it dreamy? I LOVE that fabric!!
The back is a drapery weight – which works well since it won’t get a lot of wear and the front is upholstery weight. 
I’m planning on keeping my black and white striped chair here, I like the height, plus I think it works better with the stenciled panels. This one might go in my office in the new house. 
One last before:
and after
I’m in love!! The only thing I’m not crazy about is the base .. it has some rust, so I’ll look into removing that. I’d love an all stainless one, so maybe I could sand blast or sand this one down to the bare metal and then put a coat of clear on it? I’ll have to look into that. 
This wasn’t the easiest chair to reupholster, but overall it wasn’t too bad! For the price, I’d definitely do it again! 
Total cost was only about $35-40, $20 or $25 for the chair and $15 for the fabric (gotta love remnants!) 
TDC Before and After

DIY TUTORIALS// furniture// Uncategorized// Uncategorized// upholstery26 Comments

Subscribe

get the latest straight to your inbox

« Weekend Finds | My Wishlist + My Favorites
Updates »

Comments

  1. Julia Konya says

    February 11, 2014 at 6:12 pm

    Gorgeous fabric combo! Love it!

    Reply
  2. Beth of designPOST Interiors says

    February 11, 2014 at 6:13 pm

    I love the mix of fabrics in your room!

    Reply
  3. Megan Duesterhaus says

    February 11, 2014 at 6:17 pm

    Sarah, I always adore your work, especially your upholstery projects! Of everything DIY I've done, I've yet to do an upholstery project. I've got two chairs in the garage waiting for me to get the guts up. You're motivated me time and time again to give them a go! Time to shop for some fabric!

    Reply
  4. Caroline Nolazco says

    February 11, 2014 at 6:23 pm

    What a wonderful way to bring something back to life!

    Reply
  5. Cassie @ Primitive & Proper says

    February 11, 2014 at 7:46 pm

    that turned out fabulously! great work!

    Reply
  6. Cheryl Luckett says

    February 11, 2014 at 8:09 pm

    You are a rock star!!

    Reply
  7. Hannah says

    February 11, 2014 at 8:22 pm

    It looks amazing! I love the colors you chose.
    Champagne Lifestyle on a Beer Budget

    Reply
  8. Brittany Cramer says

    February 11, 2014 at 9:18 pm

    this gives me hope for my chairs! And I love the fabric combo you chose 🙂

    Reply
  9. Laurie from Laurie Jones Home says

    February 11, 2014 at 10:04 pm

    Ok the whole desk area is awesome! Seriously love all the patterns!! Great job on the chair!

    Reply
  10. Love Lion says

    February 11, 2014 at 11:06 pm

    A-mazing!! The fact that I can't sew really keeps me from attempting projects like this. Looks gorgeous!!

    Reply
  11. Minnie Burger says

    February 11, 2014 at 11:38 pm

    I really like the texture of the fabric on the seat.

    Reply
  12. angietrue says

    February 12, 2014 at 2:16 am

    Looks good! You are so good at transforming things.

    Reply
  13. Mimi says

    February 12, 2014 at 3:11 am

    Nice job!

    Reply
  14. Kayla @ KR Dixon Designs says

    February 12, 2014 at 4:58 am

    So so stunning!

    Reply
  15. Jennifer@The Chronicles of Home says

    February 12, 2014 at 12:13 pm

    Beautiful color combo here! Big fan of the solid/pattern combo. Are you secretly an office chair hoarder?? 🙂

    Reply
  16. House Envy says

    February 12, 2014 at 1:45 pm

    love the shape of this chair and the fabric you chose!

    Reply
  17. Gabbi @ Retro Ranch Reno says

    February 12, 2014 at 5:22 pm

    It's gorgeous!! I'm in love with the fabric you chose. Again, your talent is just amazing! 🙂

    Reply
  18. Elizabeth @ The Little Black Door says

    February 12, 2014 at 9:10 pm

    Oh Sarah it looks amazing! The colors in that fabric are so lovely. Well done!

    Reply
  19. Jennifer Jones says

    February 12, 2014 at 9:12 pm

    I am always so inspired by your chair reupholstery projects. You have a gift for turning something that most would overlook, into a show stopping piece. That fabric is amazing!

    And lets chat about that light fixture, it is so great. I may just be a smidge jealous of all of your fantastic finds!

    Reply
  20. Shavonda@AHomeFullOfColor says

    February 13, 2014 at 4:23 am

    You are a reupholstery magi!! Honestly you can do no wrong girl. Another absolutely amazing project.

    Reply
  21. Bethany DeVore says

    February 13, 2014 at 1:43 pm

    Pretty color combo! I'm amazed by your upholstery skills!

    Reply
  22. SHERRY HART says

    February 28, 2014 at 10:26 pm

    Holy smokes…that is a fine looking chair:)

    Reply
  23. pam {simple details} says

    March 1, 2014 at 3:40 pm

    Impressive, Sarah!! I always love that custom look with two fabrics. Love the photo showing the patterns and your diy lights!! Thanks for sharing with everyone at Best of the Nest!!

    Reply
  24. Jennifer @ Dimples and Tangles says

    March 1, 2014 at 4:10 pm

    I think we can dub you the queen of chair makeovers! You are fearless. 🙂 Thanks for linking up with us at Best of the Nest!

    Reply
  25. jaheflin says

    April 6, 2014 at 1:47 am

    Amazing chair!!! I didn't read through all the comments. I read where you got the fabric. In case I missed it, do you have any idea the manufacturer/name/color? Thanks!

    Reply
  26. Laura R. says

    March 9, 2016 at 5:41 pm

    I bought this chair from Sweet Clover for a client in Urbana. Too funny! It's a gorgeous chair!

    Reply

Leave a Reply Cancel reply

Your email address will not be published. Required fields are marked *

Contact Me

sarahmdorseydesigns{@}gmail{.}com

Stay Updated!

Get all the latest goods straight to your inbox!

This error message is only visible to WordPress admins

Error: No connected account.

Please go to the Instagram Feed settings page to connect an account.

Must Reads

Custom Peg Board + DIY Circle Art | FrogTape

Custom Peg Board + DIY Circle Art | FrogTape

Main Level Refresh with The Home Depot

Main Level Refresh with The Home Depot

Sponsor

2016 Daily Simplified Planner

Popular Projects

Headboard Update

Headboard Update

April 6, 2012 By Sarah Leave a Comment

Custom Long Drapery Rod For Under $20

Custom Long Drapery Rod For Under $20

October 27, 2014 By Sarah 9 Comments

DIY Leather Stools

DIY Leather Stools

October 26, 2015 By Sarah 24 Comments

DIY Christmas Gift: Framed Prints

DIY Christmas Gift: Framed Prints

December 24, 2012 By Sarah 2 Comments

Bookcase Progress

Bookcase Progress

March 1, 2012 By Sarah 1 Comment

  • DIY TUTORIALS
    • design + build
    • furniture redo
    • diy in 1 hour or less
  • free printable
  • friday favorites

Disclosure

Occasionally, affiliate links are used when they are available. I do earn a small commission when items are purchased using those links. As always, I only link to things that I truly love. I also link to items that I love when an affiliate link is not available. Thanks so much!

  • Home
  • About
  • Services
  • Shop

Copyright © 2025 Dorsey Designs

MENU
  • Home
  • About
  • Services
  • Shop