• Home
  • About
  • Services
  • Shop
    • Bloglovin
    • Email
    • Facebook
    • Instagram
    • Pinterest
    • Twitter

Dorsey Designs

DIY and Interiors by Sarah + David

  • Home Tour
  • DIY TUTORIALS
  • friday favorites
  • design + build
  • art

get the latest straight to your inbox

Black and White Chair | My Process + What NOT to do

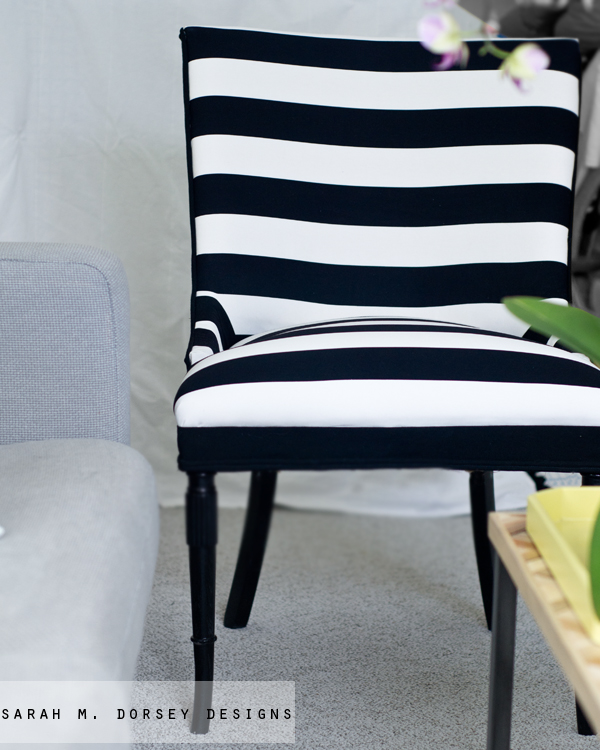
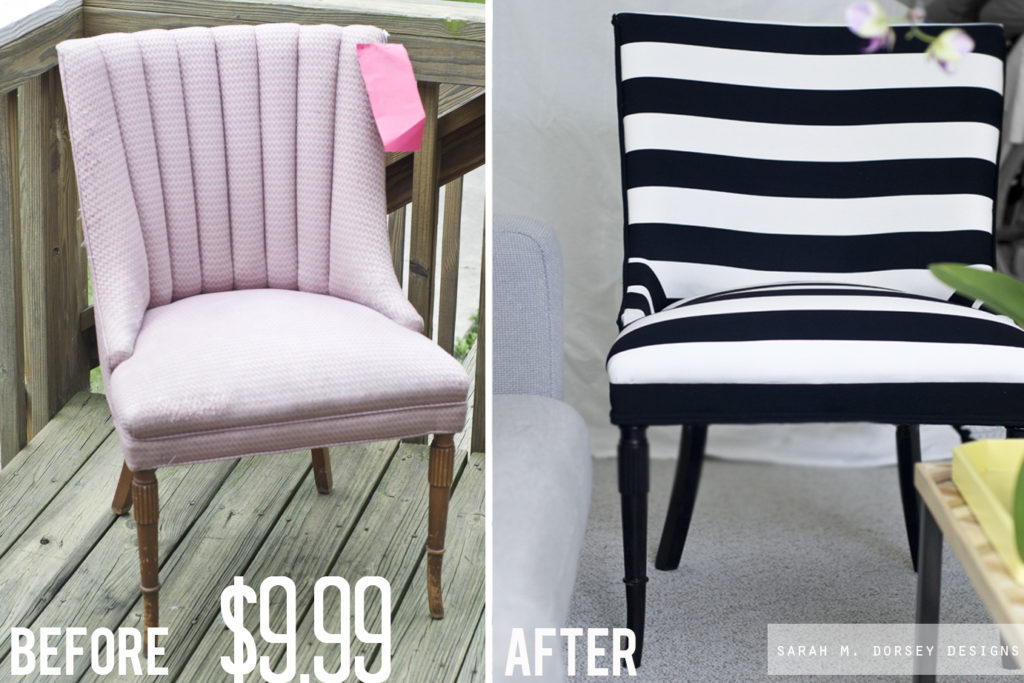
Happy Friday! This week I was determined to finish reupholstering this chair and I did! (barely 🙂

This won’t be a full tutorial, but my general process, my mistakes and what I’d do differently. Hopefully it will help someone avoid my mistakes 🙂

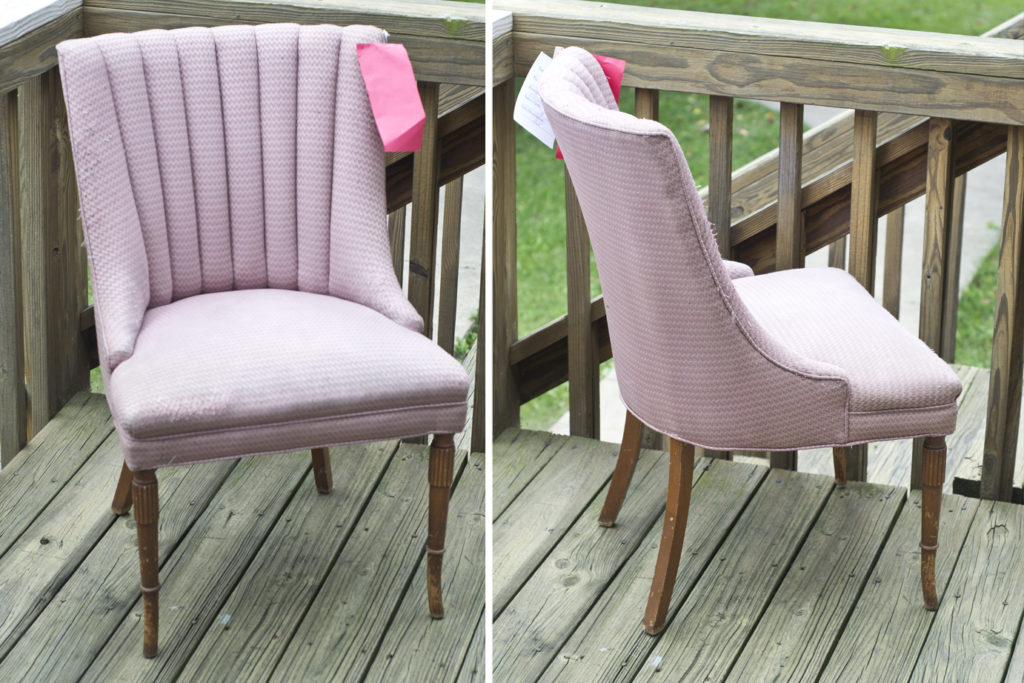
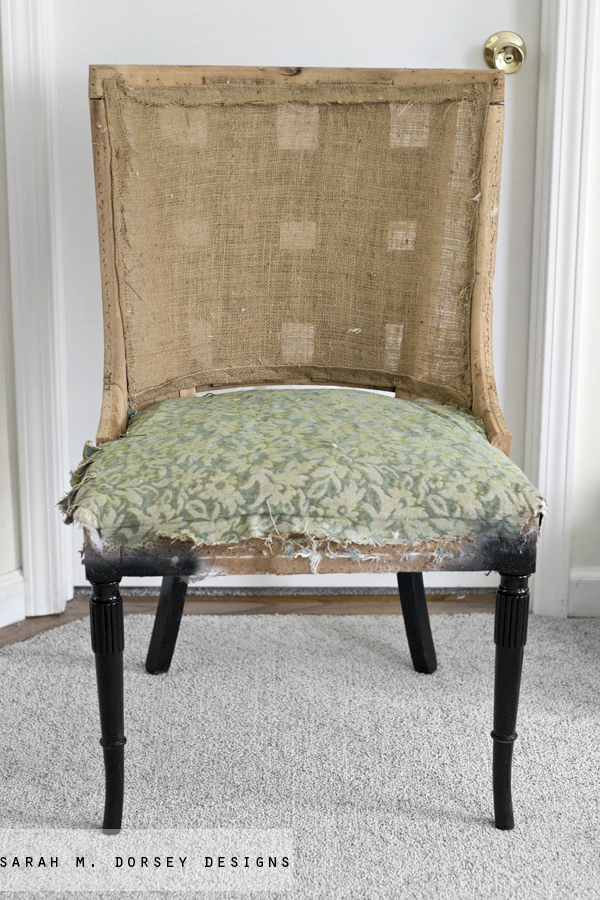
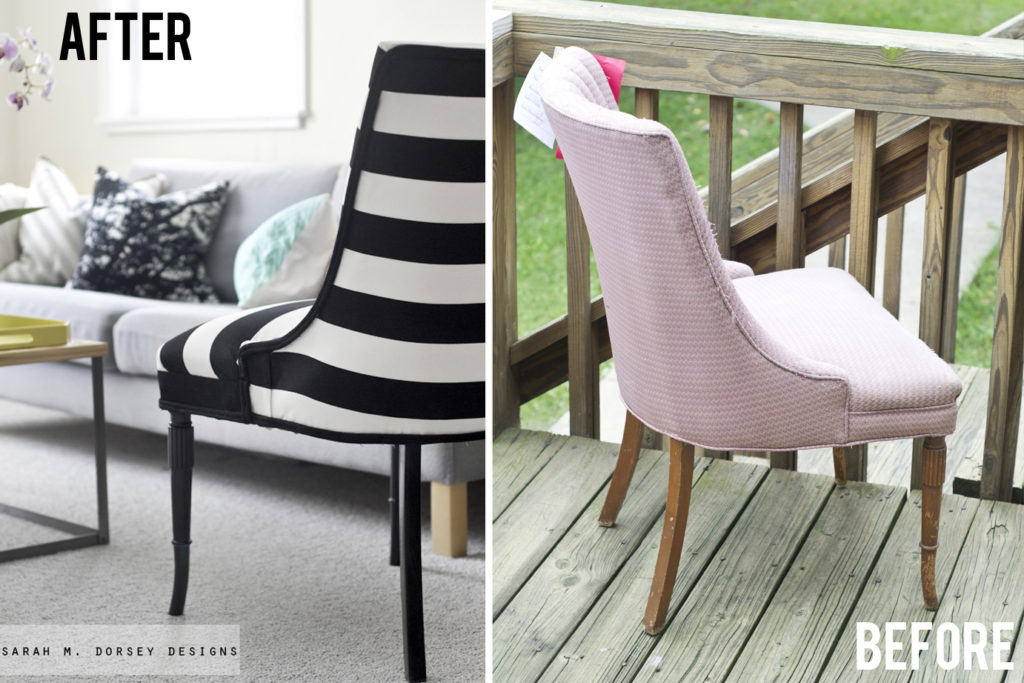
I started with this $9.99 chair from Goodwill. I knew that I didn’t want to attempt the channeling, so I was planning on tufting instead. But it ended up not needing anything! (more on that later)

I tore off most of the foam and upholstery and spray painted the legs glossy black. I left the bottom cushion and one layer of fabric on for stability (I did layer a 1″ piece of foam on top to make it extra cushy) 

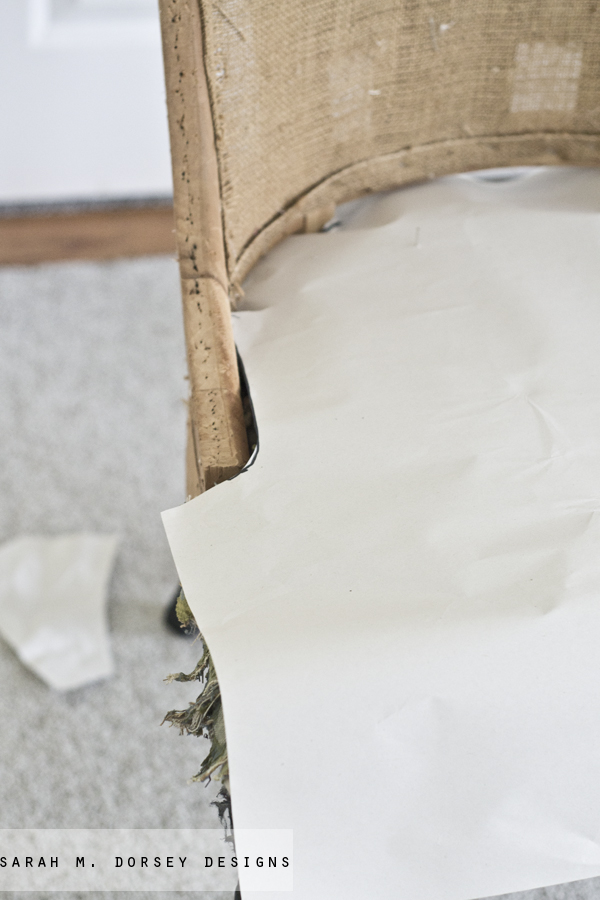
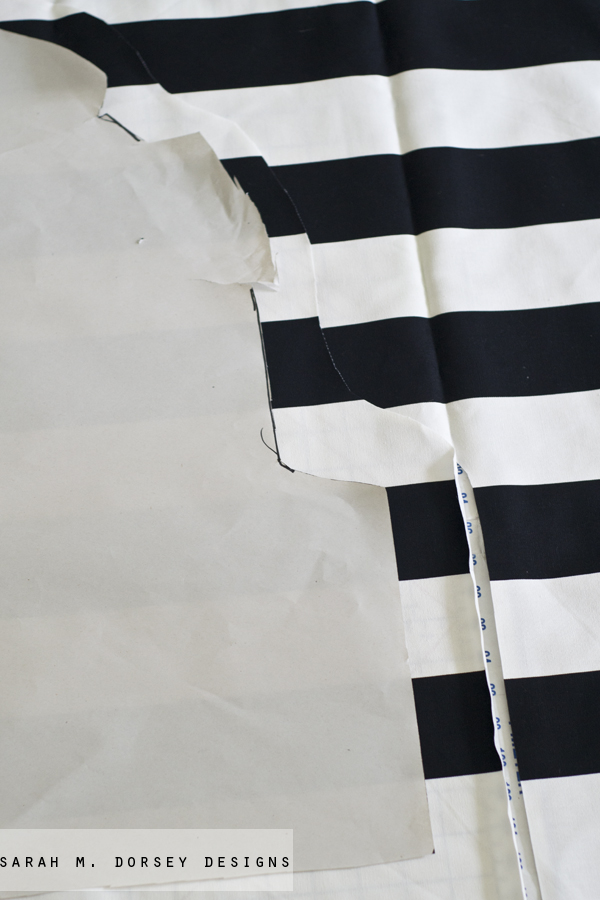
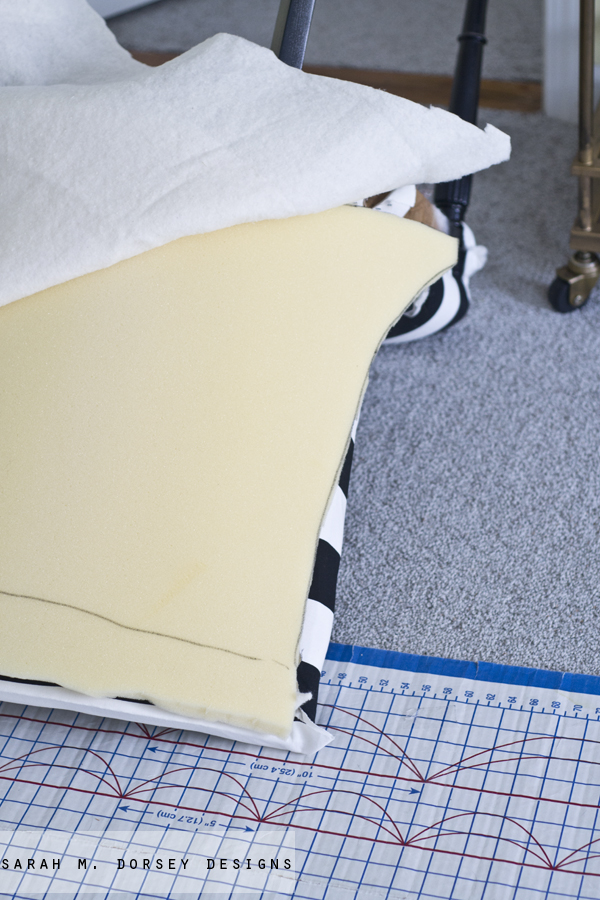
Since the fabric (Sofia from Ikea) wasn’t just a square, I took a large piece of paper roughly pushed it into the crevices, traced with a sharpie, and cut it out for my template.

I then used the template to cut my foam, (make sure that the foam is a little big, it crushes on the edges, you can always cut it down, but it generally works best a little big), batting (a little larger than the foam) and the fabric (larger than the batting)  *** make sure to cut it larger than you think you’ll need. I cut mine almost too small in a few places and it made it hard to work with. You can always cut away the excess if needed.

I upholstered the seat first – it took a while, but it wasn’t too bad .. the hardest part was working around the arms and the back supports. I kinda shoved the fabric down and pushed my stapler down between the cushion and arm so that the staples were hidden.

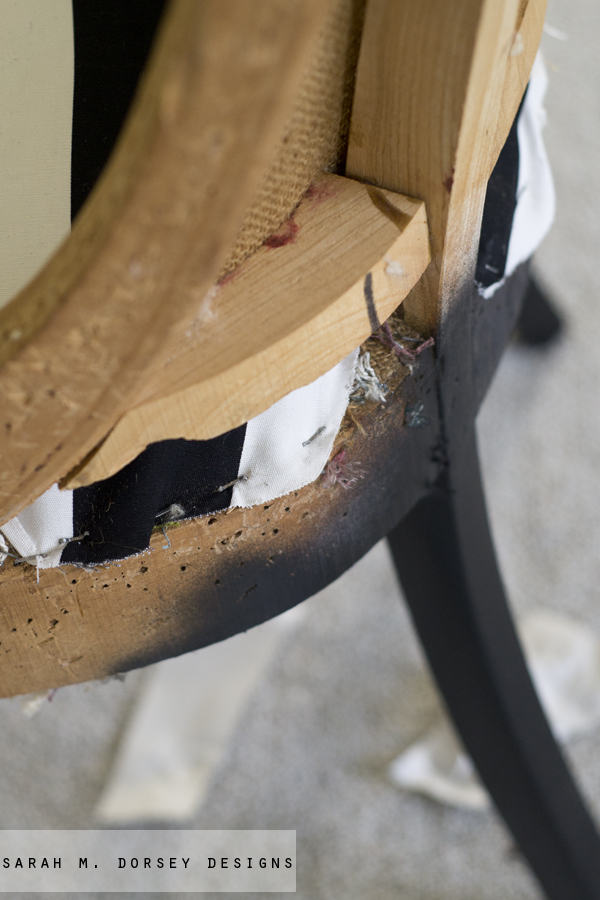
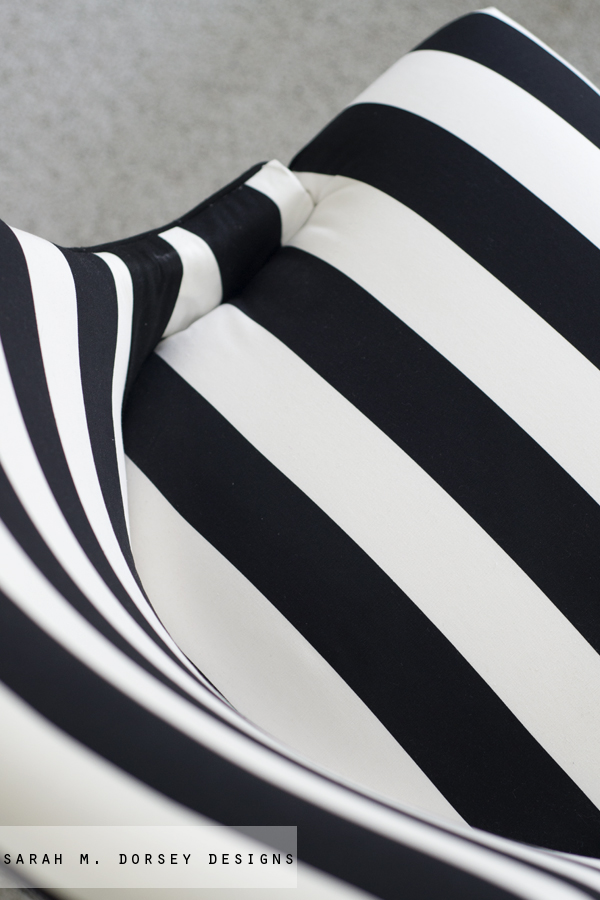
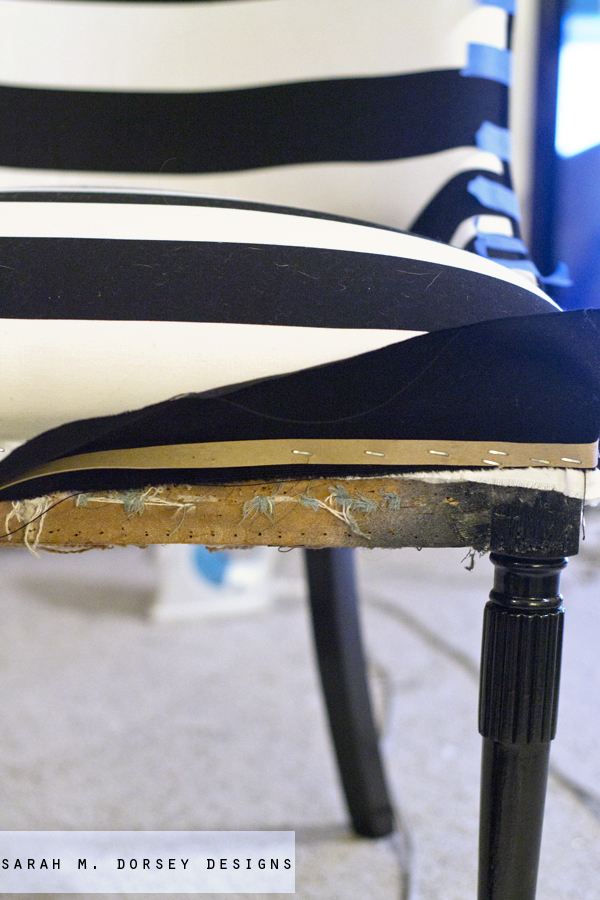
Moving onto the front of the back. I repeated the previous steps (template for foam, batting, fabric). I was having such a hard time getting everything somewhat smooth and tight because of the back supports (the legs ran all the way up). They were NOT easy to work around. ** If I was doing it again, I would have cut them off (in the opening between the back and the seat), pulled all of the fabric evenly/stapled (pulling up on the lower horizontal back support) and then reattached the supports (gluing and re bracing with a metal plate and screws). David ended up finishing up the part since I got too frustrated!! He’s the best 🙂

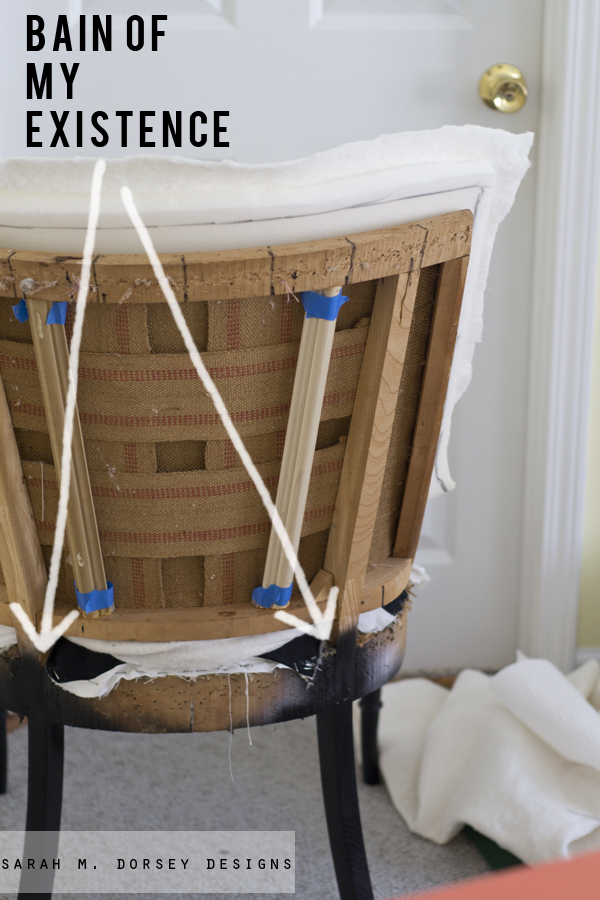
We did add extra supports (made out of extra trim) so we could have the tufting in the center, but we didn’t end up using them .. it got tight enough on it’s own.

Here’s another view of the support.

Next, we worked on the arms .. these were tricky to begin with, but even more difficult because of the stripes. Again, I got frustrated, so David helped with this too. We lined up the first black stripe – to get the fabric somewhat smooth, we couldn’t make it all the way up the arm. So we cut it short and created a black stripe (ironed and folded under on the edges) out of the black fabric used for the cording and stapled in place. 
On the original chair, you could see the supports through the back so I added foam to hide them. 
On the back, for the arms, I didn’t have enough fabric to make it to the end, so I pieced it together by lining up the stripe and sewing an extra piece on. Not ideal, but it worked. (after making two trips to Ikea for fabric, I wasn’t going back 🙂 Make sure to plan out all of your cuts and how you’ll get it out of your fabric. When working with directional fabric, it’s best to plan how you’ll exactly use the fabric.
I stapled the back on and covered the staples with double cord welting (using Jenny’s instructions) and glued in place with permanent fabric adhesive (be careful, it’s stringy and will get everywhere). 
At this point, I started feeling a little better, it’s amazing how finished it makes the chair look! You can use tape to help hold it in place if you’d like. 
To finish the edge I used an upholstery cardboard strip (thanks for the tip Julia!) and stapled in place. This gives a super crisp line!! Once done, I folded the fabric back down, stapled and covered with double cord welting. To avoid this extra step, I should have taken the seat cushion fabric all the way down, stapled, and covered with double cord welting. 
Finally, a few tips. Some are repeats from above, but important, so I’m listing them again 🙂 
1. Keep an iron handy. It helps to keep keep lines crisp and smooth out the fabric. 
2. Cut your fabric large, if it’s too small it can be super tricky to work with – you can always cut it smaller.
3. Plan out how exactly how you’ll reupholster the chair (plan your fabric cuts too) prior to starting. This one is tricky for me because I’m such a visual person, but I did make a fair amount of mistakes because I didn’t plan well enough. 
Annabelle loves looking out the window here! I’m planning on making this coffee table into a bench (for the foot of our bed in MD but it will stay here for now since she loves it so much!) 
LOVE my new campaign chest found at goodwill! It’s a little beaten up, but it shouldn’t be too hard to fix. 
Finally, a few before and afters.
Such a transformation! Also, I was pleasantly surprised with the fabric from Ikea. It was a nice weight (similar to duck canvas), and looks like it should hold up nicely. 
I hope you have an amazing weekend!! Hopefully it warms up enough so I can spray paint (ok, it won’t really be warm enough for a few months, but a little warmer than 0 degrees would be nice 🙂 I’m SO excited to share my next project, it’s a good one 🙂 

DIY TUTORIALS// furniture// Uncategorized// Uncategorized// upholstery21 Comments

Subscribe

get the latest straight to your inbox

« Black and White Stripe Chair
DIY Gold Geometric Lamp »

Comments

  1. Ashley Jo says

    January 24, 2014 at 2:13 pm

    What an amazing redo! I have only tackled wooden furniture at this time — removing veneer, painting, etc. I have always been intimidated by reupholstering but you make it look easy. Thanks for the tutorial!

    Reply
  2. Denise @ frazzled JOY says

    January 24, 2014 at 2:45 pm

    It turned out beautifully Sarah!! Wow!! Great job 🙂

    Reply
  3. Jennifer@The Chronicles of Home says

    January 24, 2014 at 3:31 pm

    Well that does sound a little painful at times but the finished chair is so gorgeous!

    Reply
  4. Amy @ Amy Krist says

    January 24, 2014 at 3:36 pm

    Stunning!I I might try this [some year!] 🙂 Congrats on your new home by the way! It's an amazing feeling knowing you can do ANYTHING you want to it. Hugs, Amy

    Reply
  5. Kristin@bliss-athome.com says

    January 24, 2014 at 3:46 pm

    so good! I am dreading doing my first upholstery project but I am pinning this for reference! Thanks for sharing! xo Kristin

    Reply
  6. Steph @ Three Loud Kids! says

    January 24, 2014 at 4:20 pm

    Well despite all of the hard work, it really looks amazing!

    Reply
  7. Dawn Angileri says

    January 24, 2014 at 5:09 pm

    Beautiful and so sophisticated!! You make me want to attempt this!! I posted a link to this article on my site (http://www.pique-my-interest.com/2014/01/black-and-white-chair-my-process-what.html) I hope you don't mind–I needed to share this!

    Reply
  8. Danielle Oakey Interiors says

    January 24, 2014 at 6:45 pm

    Oh my goodness, this is amazing…as always!

    Reply
  9. Pat Nusbaum says

    January 25, 2014 at 12:48 am

    I gotta say, I worked for an upholstery company for a few years, and this looks awesome. You did a great job, despite all the headaches. If its any consolation, the pro's have them too!!

    Reply
  10. Minnie Burger says

    January 25, 2014 at 2:04 am

    Looks great! I'm still too nervous to try my hand at reupholstering.

    Reply
  11. Julia Konya says

    January 25, 2014 at 4:12 pm

    Such an amazing job and thank you for the shout out 😉

    Reply
  12. angietrue says

    January 26, 2014 at 6:57 am

    Amazing… Thats all I could say.

    Reply
  13. House Envy says

    January 26, 2014 at 2:46 pm

    I re-upholstered a wing back chair, so I know how hard it is to do these things. But your work was worth it! Your chair looks amazing!

    Reply
  14. Robin Warzywak says

    January 26, 2014 at 6:55 pm

    I recently redid 2 cane wingback chairs and they were a doozy! Then, one didn't work for me so I sold it b/c I just could not bring myself to start all over again. Oh well! You chair looks amazing!

    Reply
  15. Lauren Frayne says

    January 26, 2014 at 7:29 pm

    Wow, amazing transformation! I'll vouch for that Ikea fabric too… It's surprisingly durable. I slip covered a chair in it over two years ago in a white and navy stripe and it still looks good!
    {lamourcheznous.com}

    Reply
  16. Carmel - Our Fifth House says

    January 28, 2014 at 3:26 am

    This chair is amazing! And so are those lamps!!

    Reply
  17. Bethany DeVore says

    January 28, 2014 at 7:41 pm

    It looks amazing! I'm sure working with stripes is a paint, but the end result is so worth it!

    Reply
  18. Kiwi at Heart says

    February 4, 2014 at 3:16 am

    What a beautiful chair! Looks like you had a tough time, but luckily it all turned out well!

    Reply
  19. Bridget says

    February 7, 2014 at 2:54 am

    The chair looks stunning. Upholstery work is in my future and I hope the outcome is just as good as yours.

    Reply
  20. Pippa B says

    February 10, 2014 at 11:01 am

    Very impressive. I wouldn't know where to start but this is very inspiring. Thank you. Btw you mean 'bane' not 'bain'. Sorry, I can't help myself…it's a disease!

    Reply
  21. Lynet Sandoval Witty says

    April 13, 2014 at 2:23 pm

    you did a fantastic Job! It looks so professional!

    Reply

Leave a Reply Cancel reply

Your email address will not be published. Required fields are marked *

Contact Me

sarahmdorseydesigns{@}gmail{.}com

Stay Updated!

Get all the latest goods straight to your inbox!

This error message is only visible to WordPress admins

Error: No connected account.

Please go to the Instagram Feed settings page to connect an account.

Must Reads

Custom Peg Board + DIY Circle Art | FrogTape

Custom Peg Board + DIY Circle Art | FrogTape

Main Level Refresh with The Home Depot

Main Level Refresh with The Home Depot

Sponsor

2016 Daily Simplified Planner

Popular Projects

MBR TV Wall Trellis Stencil Update

MBR TV Wall Trellis Stencil Update

March 29, 2012 By Sarah Leave a Comment

DIY Tufted Ottoman Complete!

DIY Tufted Ottoman Complete!

March 13, 2012 By Sarah 42 Comments

Summer Beach Themed Bookshelf

Summer Beach Themed Bookshelf

June 18, 2012 By Sarah 17 Comments

Blogging 101: Growing a Blog

Blogging 101: Growing a Blog

October 14, 2015 By Sarah 6 Comments

Rattan Chair Makeover

Rattan Chair Makeover

April 14, 2014 By Sarah 13 Comments

  • DIY TUTORIALS
    • design + build
    • furniture redo
    • diy in 1 hour or less
  • free printable
  • friday favorites

Disclosure

Occasionally, affiliate links are used when they are available. I do earn a small commission when items are purchased using those links. As always, I only link to things that I truly love. I also link to items that I love when an affiliate link is not available. Thanks so much!

  • Home
  • About
  • Services
  • Shop

Copyright © 2025 Dorsey Designs

MENU
  • Home
  • About
  • Services
  • Shop