It was a great weekend!! We closed on our house (pics soon!), moved some of our things in (the rest is in our Ohio rental) and I took pictures of our dresser that we finished over the Christmas break.
We took a beaten up Mid Century Modern dresser, painted it and lifted it off the ground with legs! Here’s how we did it.

A few months ago, my Mom sent me pics from a furniture sale at her work (isn’t she the best!?) I think I definitely get my thriftiness and love for taking trash to treasure from her.
My Mom works at a retirement community, and every year the resident’s donate unwanted items to be auctioned off (if you’re interested, sorry it’s employees only:( It’s silent bid style, so there’s a starting bid and then you write your bid on the paper – at the end of the day, the highest bid wins.
The starting bid for the dresser below was $8, I guess we were the only ones who saw the potential because we got it for $8!! Mom’s good at under playing the amazingness in a piece 😉 Probably saying, Oh, it’s so short, where are the legs? or It’s pretty beaten up not sure if that can be fixed or I’m not sure why my daughter wants this …
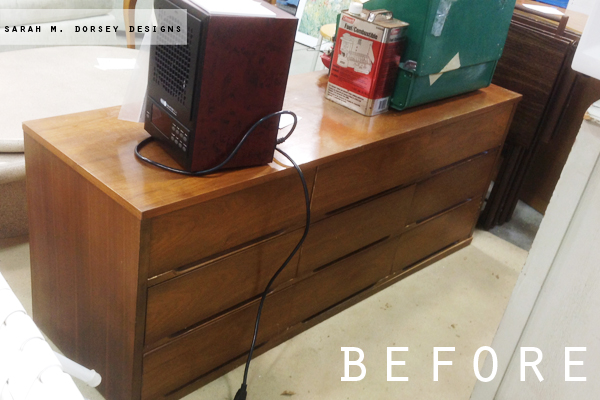
The dresser originally had legs (had the supports and mounts underneath) but they were removed .. maybe to fit under a window or act as a bench? It was pretty short, ~20″. So my first thought was that it needed legs!
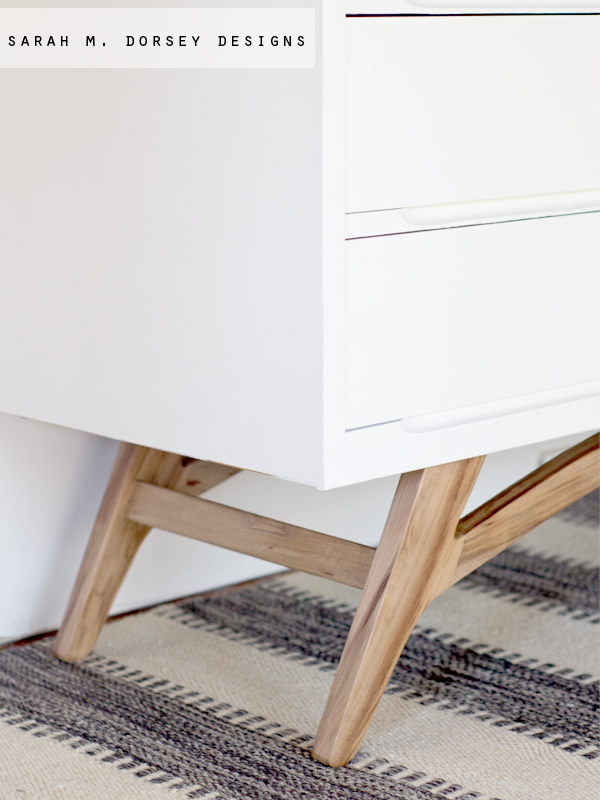
I saw these legs and thought they’d be perfect (with a little modification) for our dresser. So we created a similar style with a little more of a curve.
This is how we David made the legs .. I helped, but David did most of it.
We started with a piece of wood (~1×8) from a tree my Granddad had milled after a hurricane went through. We aren’t sure of the type of wood, but it was from South Carolina and Granddad remembers that it has an unusual name, any guesses?
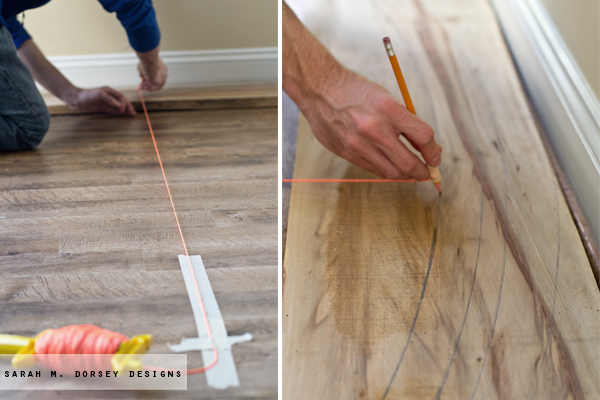
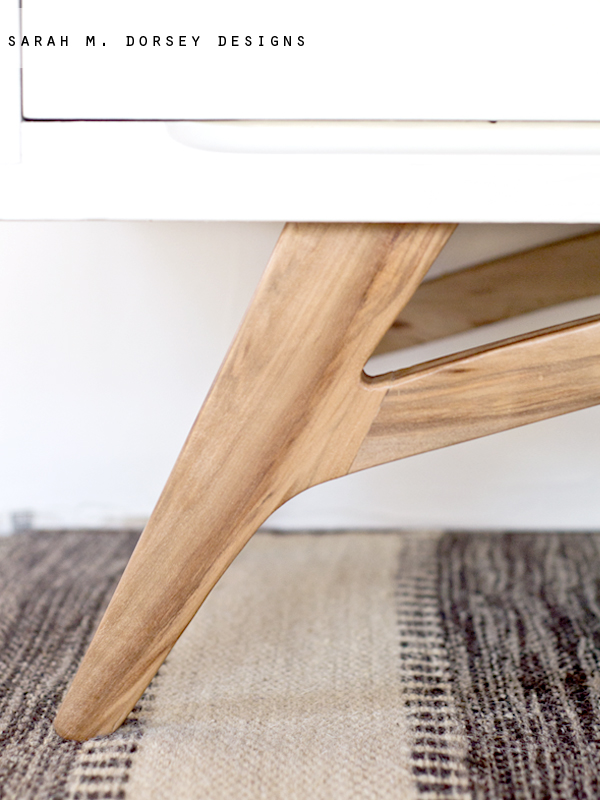
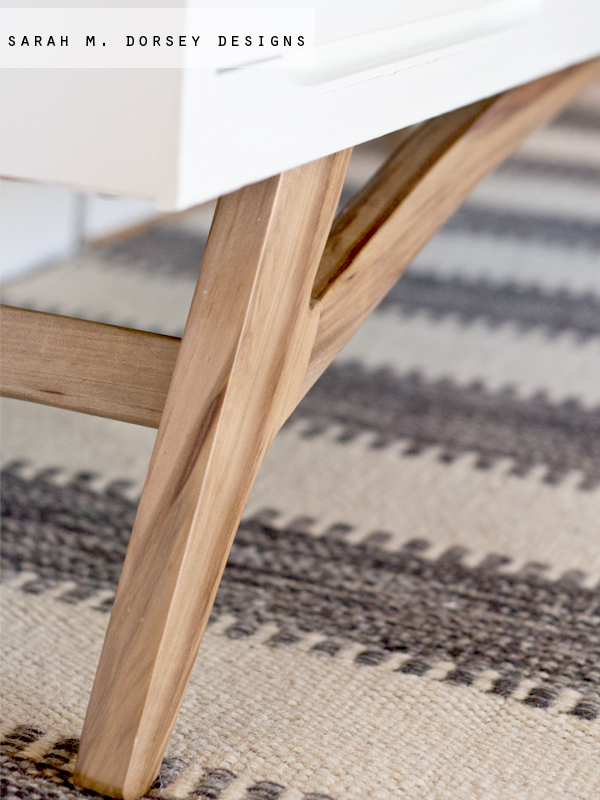
To get the curve, we started with a ridged piece of string, we didn’t want one that would flex a lot. We measured the dresser and determined the total length for the curved piece (the legs are attached separately). Then we measured the midpoint of the board (where we wanted the top of the curve) and then the end point of the curve (where we wanted the top of end of the curve). To make sure that the curve was equal, one held the pencil and string tight at the top and touched the midpoint and both of the ends and the other adjusted the string at the bottom. Then we repeated for the bottom curve (about 2″ thick). This step took a lot of adjusting to get just right, but once we did, I held it tight at the bottom (taped for photo) and David drew the curve at the top.
Next, with the jigsaw, David cut out the curve. There are two curved pieces (front and back of dresser) So David traced the existing board and cut out a second piece.
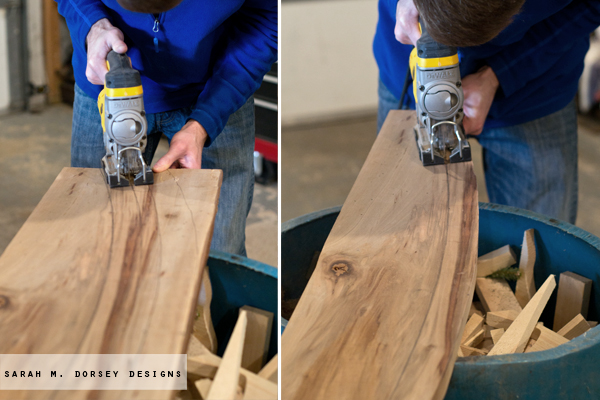
Next, David cut out the legs. We determined the measurements and then free handed the design within those guidelines. Then he cut it out with the jigsaw, traced and repeated three more times.
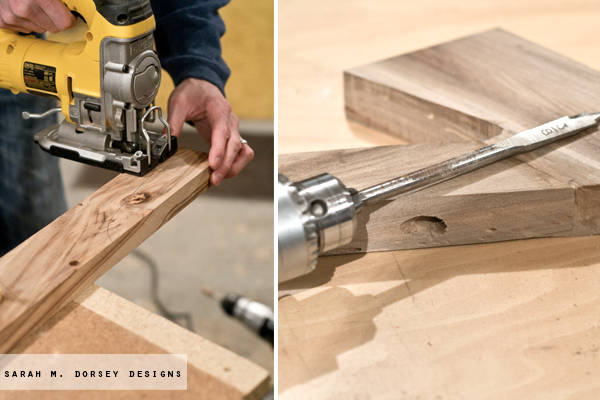
David glued and clamped the curved piece to the leg. After it dried, he drilled through both at an angle with a 3/8″ bit, put some wood glue in the hole and inserted a dowel rod and cut off the excess.
Once dry, we used a router (sorry no picture, but examples of routers here) with an 1/8″ bit to make the edges slightly round. For the tight corners, we used sandpaper to soften the edge.
Then we used 120, 220, then 400 grit sandpaper (lower number means coarser and higher means finer – good for finishing) to give a smooth finish.
We repeated the steps (but a screw instead of a dowel rod) for the side supports.
To seal the legs, we applied Briwax furniture wax in clear.
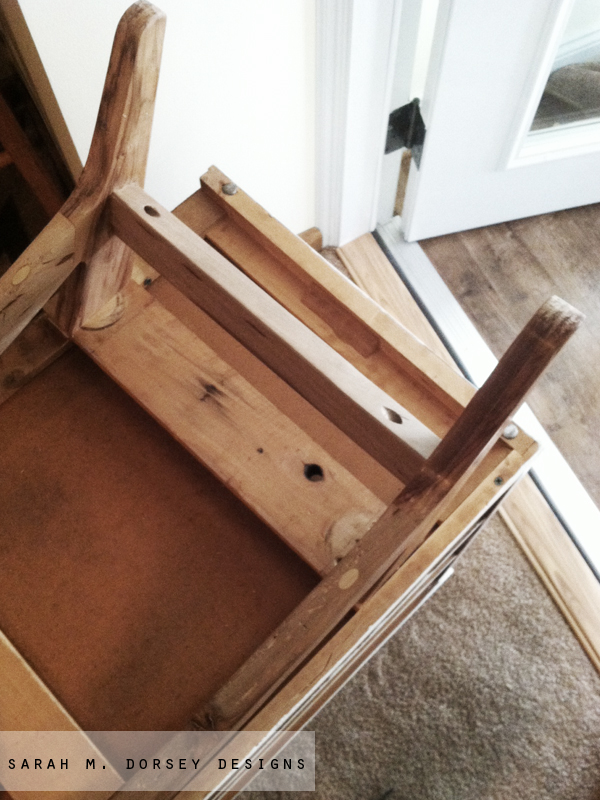
Finally, we removed the existing support for the legs and mounted the legs to the supports (using screws from underneath) Then, we reattached the support to the dresser.
I’m not going to lie .. the legs took forever, but SO worth it because I love how they turned out!
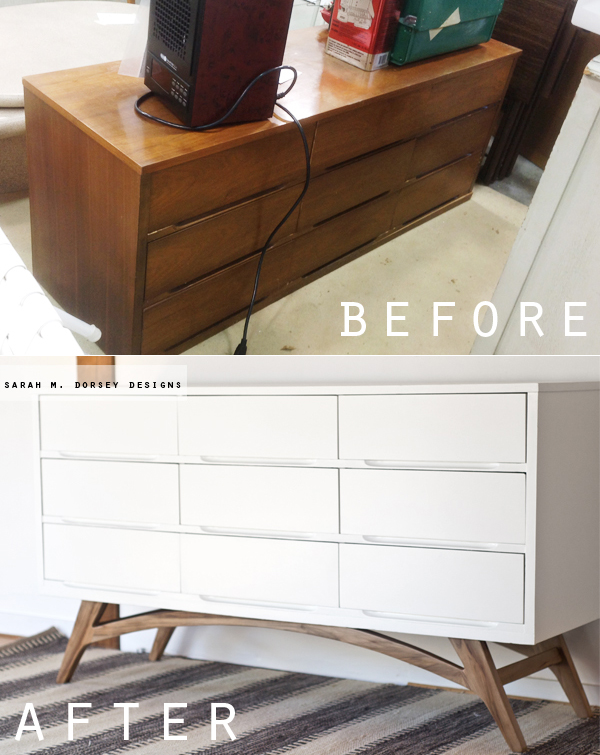
I decided to make the top white so it wouldn’t compete with the legs (Plus it had a good bit of damage so needed some wood filler). Also, I love how it doesn’t need hardware since it has built in pulls. It draws all of the attention to those beautiful legs!!
For the paint, I sanded the entire dresser to remove the gloss (removing all of the dust with a micro fiber cloth) and used Zinsser Cover Stain Primer. It is oil based, so a pain to clean up. I’ll typically wrap my roller in plastic and throw away once it is unusable.
I ended up doing three coats, allowing it to dry in between. I’ve found that if you don’t cover all of the stain, it seeps through the top coat once it sets. However, you can spot treat the spots that show through if you want to avoid multiple coats. I decided to do three so that it was extra durable.
I lightly sanded the primer once dry and then applied two coats of Sherwin William Pro Classic Semi Gloss in Alabaster. I used a smooth 6″ foam roller to apply both and a small foam brush to reach the tight spots.
Finally, here it is in our new house!! We closed on Friday and I quickly snapped a few pics on Sunday. This will be our bedroom, but the bed will go on this wall instead. I’m planning on moving the dresser next to the closet.
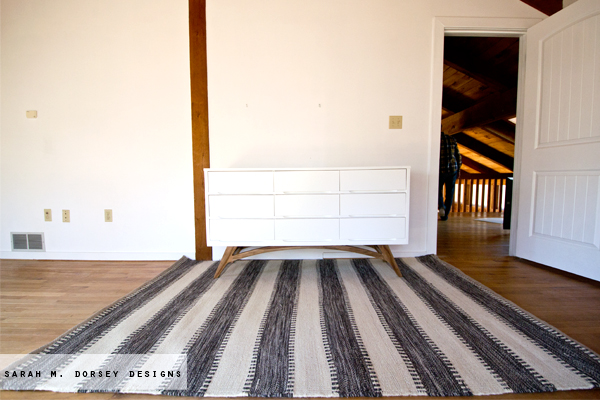
Rug was found at Home Goods about a month ago.
And a few more close ups of the legs since I love them so much 🙂
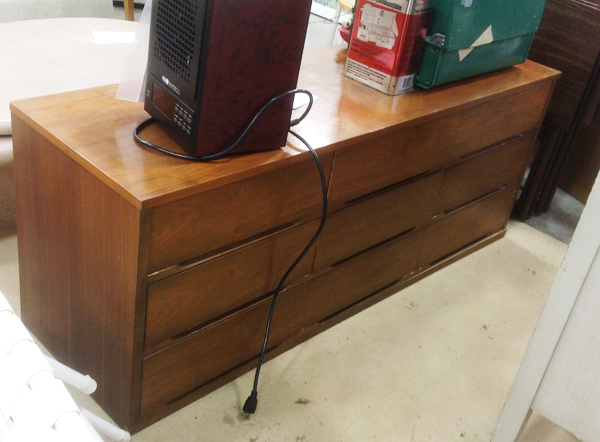
and after!
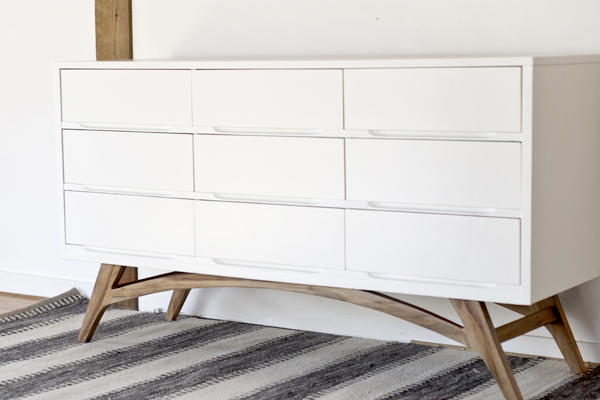
SUCH a transformation!!
I’m planning on full house tour tomorrow so make sure to come back for that!!
—
P.S. Don’t forget to enter Delta Faucet’s New Year, New Room – Bathroom
Transformation, if you had issues yesterday, it’s been fixed so make
sure to upload the best (aka ugliest) photo of your bathroom because the
room with the most votes wins!! More info HERE

jaw drops! you made those legs. can i pay you to make legs for our future tv stand? I'm serious!
Wow! Those legs look amazing, particularly against the white dresser. I love that he offset the joint so that it doesn't line up with the notch, it really helps blend the pieces together. I can't get over how good the wood itself looks either. I'll take a stab with "Tupelo"…? Based solely on this random pdf (http://www.slma.org/pdf/Hardwood-Handbook.pdf)
HOLY COW! This is the best DIY I've ever seen! Great job!
Seriously, this is again one of those rejects that leaves me speechless. Well almost 🙂
It so unbelievably amazing! And $8???
That rug is so good too.
The dresser is great… but the legs, the are perfection. I love it and it makes me want to add awesome legs to every thing 🙂
Amazing job! The curve looks so perfectly proportioned for the dresser and I love character of the wood (whatever it is) against the white of the dresser. Good call on not adding any distracting hardware.
That is gorgeous, love the white and wood combo!
i cant pick my jaw up off of the floor. holy hell i need these legs. bravo, seriously! they're gorgeous!!!!!!
Absolutely amazing!! I am dying over those sexy legs:)
Drooling! That is amazing!
Absolutely stunning! You guys are so talented!
Those legs are simply amazing! I cannot believe you two made those!!
That piece is fabulous! You, your hubby and your Mom make a great team!
SARAH! Shut up and stop this madness!!!!!!!! You are making me sick! My favorite project of yours to date!! love, love, love
i am at a loss for words! beyond amazing!
Ok, seriously…those aren't just any legs!!! That is just beautiful Sarah. You and David make quite the team! And I love the snippet of your new home! The floors look lovely…can't wait to see more!
You never cease to amaze me. This transformation is EPIC, Sarah!!!
someone earlier commented that this was the best DIY ever. I agree 100%. i have other things on my to-do list today, but i just keep coming back to look the great job you did. creepy, i know, but i can't help myself.
Absolutely amazing! You did an incredible job and I love the combination of white and natural wood.
I am savoring those legs. Holy gorgeousness! I'm excited to see what you do with your whole house.
The compass trick is genius! And these legs are just gorgeous. I can confidently say I would NEVER have seen the potential in this piece. You and David are pretty amazing together!
p.s. How did you guys get that seam between the side leg and the curved piece so perfect? I've struggled with that on my kids' rockers in the past and still don't feel like I have it figured out. I can never seem to get the angle perfectly cut.
Hi Jen! We cut the curved piece first and held it on top of the leg piece and drew a line .. then carefully cut it out with the miter saw. Also, I found that it's good to use a square to verify that the angle finder is correct on the miter saw .. mine was slightly off. We did have a small line, a little wood glue (and then sanding after it dried) was good to hide the line. Hope this helps! 🙂
Shut up! That is gorgeous!!
Oh my goodness!! That is an amazing transformation!
OMG Sarah! I cant even STAND how awesome this is. That wood is gorgeous! The white is such a perfect compliment to it. I cant believe it was $8!! Congrats on closing on your new home. Cant wait to see it:)
Sarah, this is absolutely gorgeous! Someone has to tell us what kind of wood it is! It looks oh so pretty with the white!
A beautiful piece of furniture. Those legs are amazing!
Gorgeous!!! Whatever kind of wood that is, I am in love. It looks amazing with the white.
Wow. Those are gorgeous. Hit us up if you ever want to use a set of hairpin legs or some custom table legs for a project…and keep up the good work!
Beyond amazing, Sarah. Seriously. Please come decorate my house. 🙂
Phenomenal! This is one of your best! Great job. It totally transformed the piece! I love it! And on a side note, I had to laugh at myself because I thought your title said how to add Legos to a mid century table! haha I was perplexed for a split second.
My jaw is on the floor. Seriously gorgeous.
i cant even articulate how amazing those legs are! seriously, you two should be furniture makers
Best dresser before and after i've ever seen! Well done!!!
Your dresser is stunning! Great vision. I love the variation of the wood you used for the legs too.
Those ARE gorgeous legs. You two are amazing. And I love your new house! Were you looking for something with so much wood?
Wow!! Great job and yes that white made the legs be the star.
WOW! Talk about sexy legs!! Did I miss you mention what kind of wood they are? the graining is phenomenal.
Hi Karen! The wood came from a tree that my granddad got milled after a hurricane (in south carolina) a while ago. He remembers that it has an unusual name .. we're still looking for the name 🙂
WOW! I love the legs, getting it for cheap, and the after picture!
WOW!!! This is fantastic!!! I absolutely love the white/wood combination of a mid-century dresser. You nailed it. I am consistently impressed by your creativity!!!
This is such a cool project! The after looks amazing and I just can't believe you guys built those gorgeous, dare I say sexy?, legs! Pinned to my Great Furniture Redos board 🙂
amazing. beautiful. inspiring.
Was it acacia wood? It seems like that may fit the bill… Exceptionally beautiful job, by the way!
Great job! I have that same dresser with original legs and your take is spectacular. Not surprising that you chose to paint…it does go a long way to cover inherent flaws. Bravo…would not have thought of your solution.
How did you clamp the legs together?
Wood glue, then we put scrap wood (to prevent denting) and then clamped on the joint. Once dry, we drilled and inserted the wood dowel.
What an inspiration–I'm ready to do one or two! Happy Nesting.
Is it a Zelkova tree. The legs are fabulous.
Love love love the legs! The entire piece is so beautiful.
The legs make the piece. That wood is amazing!
Came here via CentsationalGirl. This makeover is fabulous! The legs really make a huge difference and this is one of the more creative leg additions I've seen. Love the curves!
Seriously impressive. Love the lines of the legs – just beautiful!
Wow! una vera e propria metamorfosi…fantastico risultato!
Angelina
Unbelievably gorgeous! Truly stunning. Looks so professional, I wouldn't believe it was diy had you not said and showed photos. You guys are so brilliant. I am inspired 🙂
Wow. Those legs! Just gorgeous.
Are you kidding me? That is gorgeous! Beautiful!
I want to thank you for your generosity in giving to the world the design for these legs. I have a dresser so similar with nightmare 70s legs. It's nasty. I found you on Man Made. Who knew. Thank you again. Your dresser is gorgeous.
This is beautiful Sarah and David! Do you happen to remember at what angle you cut the legs? I have made many pieces before, but don't know how to figure those out on my own. I am trying to make a similar piece for my nursery. I wondered if you had any tips on how to get those angles right.
Ok there is no way I will make this..so you have a business here…when can I buy these?
OMG! Awesomeness. You totally should be selling these and other designs
This would have been so much nicer had you left that EXPENSIVE walnut alone and UNPAINTED. There are few pieces of this period that are 'too far gone' to refinish properly and better than original. JSYK, paint is never refinishing, it is painting and covering, the easy way out. I cannot understand why you would make that effort on the legs and then paint it??? That is just mind boggling. Moreover, there would not have been any distraction with the legs and the original dresser finish, the white paint is a detracting, distraction.
Hi Sam, thanks for your comment. It may be hard from the photo, but the veneer was too far gone, chipped and broken. I fully support doing what make you happy and smile!
THIS is awesome! You guys did such a great job. I tried re-reading your instructions over and over. I am with other people in that if you make these, I would for sure buy for at least one of our dressers in the house. Great job!
I have this same dresser and chest and previous owner lost the legs. I wish you could make video . I am so lost trying to figure this out . I look at this post everyday trying to get it right . AWESOME
Maybe we will try some sort of tutorial, we've had a lot of interest!
Hi! Do you have a pattern we could follow? We saw some potential in some dressers with a similar look and love your take on the legs! I saw you mentioned a possible future tutorial. Have you guys made one? I just love this piece so much! Brilliant!
Hi! I don’t have a tutorial, but I’ve had a lot of interest, so I will try to come up with something!
I would love one too. I have this exact dresser and while I do have the legs. I kind of hate them. I can probably figure this out on my own but a tutorial would be amazing! It’s really beautiful and I don’t even really like midcentury furniture (mine is a family piece that I’d probably never have picked out otherwise- but I’d love to try to make it more my style!)
Thank you!
This is such a stunning job, but unless you have a “special relationship” with a skilled carpenter, this will not happen. What is the name of this design where the legs are attached in this manner? The only word I can think of is “undercarriage” legs, but I made that up. I have always been in love with this design for MCM re-dos. Attaching four legs is great, but duplicating this design if fabulous.
Bonnie
Thank you! The legs are attached to the supports under the dresser, I’m not sure of the name. Thanks!