I shared a few sneak peaks of our most recent headboard last week, here’s the finished pics! When our friends mentioned that they were looking for a headboard, we quickly volunteered! I’ve been wanting to try a deep tufted headboard for a while now – so this was the perfect opportunity.
Here’s how we did it:
First we picked up our supplies:
1/2″ plywood
2×2 pine (qty 2)
2×4 (qty 1)
1 piece of 3″ camping foam from Home Depot
Batting
Fabric (I used a drapery panel from Target – in tan)
Buttons to cover
Gorilla glue
Upholstery thread
Nailhead
Tools needed:
Chop saw
Long needle (for tufting)
Hammer (for nailhead)
Upholstery stapler
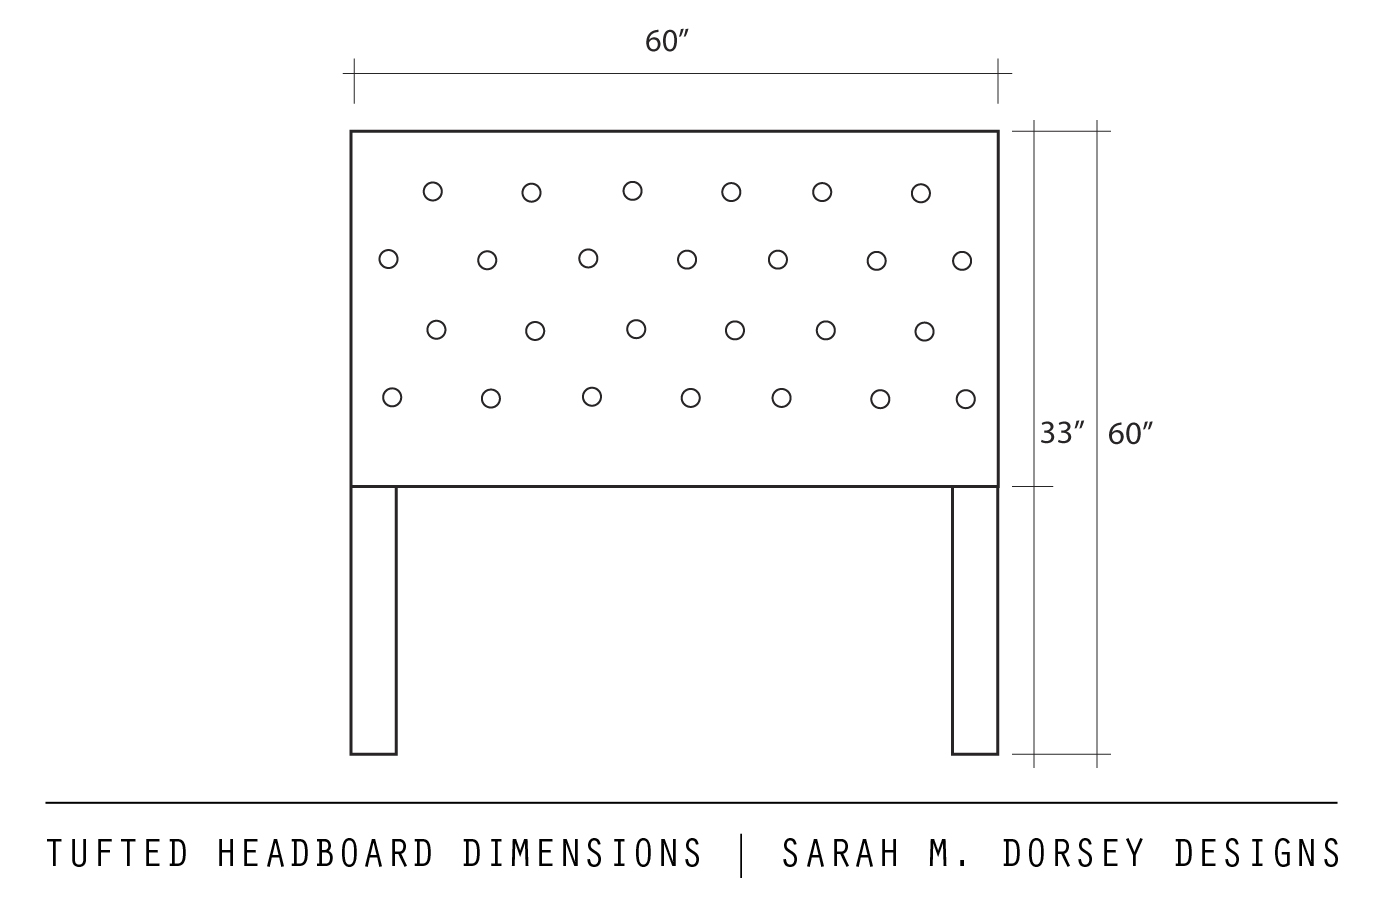
We decided to make the headboard flush with a queen mattress 60″ wide, a few extra inches would work too.

First the boys worked on the frame.

Above is the completed wood frame, minus the 1/2″ plywood behind the legs (to make it flush) – which was added last, minus the 2×4 at the bottom on the plywood, minus the extra 2×2 on the leg. Whoops … forgot to take another pic!
We measure and drilled holes for the tufting with a 1/4″ drill bit.

Since the foam wasn’t wide enough, we pieced it together at the bottom, using spray adhesive to secure it. Then from the back we poked through the holes with a meat thermometer. (We used an extra sharp kitchen knife – the filet knife cuts it like butter!)

Using a knife, we cut the foam at an angle (wider at the top) down to the plywood.
Using the instructions on the kit, we covered non upholstery grade with the same fabric as the headboard. Tip: use a little Gorilla Glue before you seal the button to keep them from popping off.


We laid the batting and fabric overtop and started tufting. Balancing the headboard against the kitchen island, David threaded the long needle with upholstery thread (doubled up) and threaded it through the back. In the front, I folded the fabric where I wanted it to go, inserted the button on the needle and sent it to the back to be stapled. I wanted the button to be pushed down to the plywood, so I used the end of a hammer since it was so deep. Tip: use the end of a thin paintbrush to help you find the hole. David pushed it from the hole in the back and I stuck the tip of the needle in end and pushed it back out. Finding the hole through 3″ of foam can get tricky, so it helped us find the hole the first time.
TIP: With deep tufting, make sure to not to pull too tight between the buttons, the extra fabric should go into the folds, pushing the button down helps keep it tight. If you pull too tight, you won’t have enough fabric to work with as you go to make the folds. Also, make sure to leave plenty of extra fabric at the sides since the tufts take a lot.
Tufting is a little frustrating and time consuming, but it gets easier once you get the hang of it. Expect to spend several hours. We had to redo a few tufts at the edge to the correct amount of fabric at the edge so it was smooth around the outside frame.
*Note: getting it smooth around the edges is tricky – it is easier to create folds (from the tufting) on the edges, which would require reconstructing the exterior frame or you could also cut a separate piece of plywood for the tufting and attach it to the back piece of plywood and frame (see this tutorial)

After we finished tufting, we started to pull tight on the sides and top and bottom.

Love this stapler! Makes the whole process a lot easier. We found ours at Ace Hardware for about $20, but I think Home Depot sells it too.

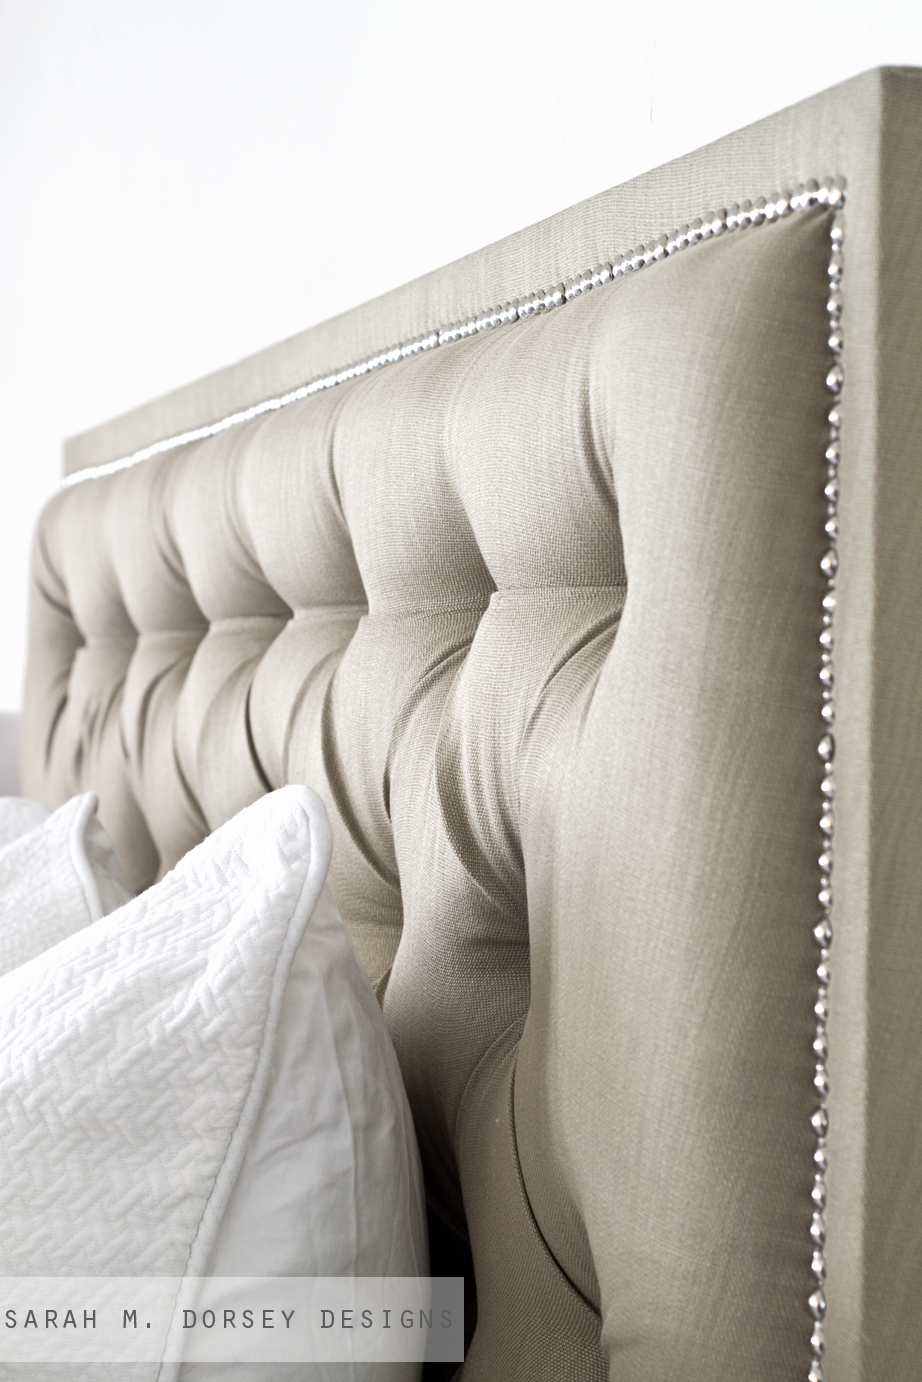
For the corners, we put a staple in and folded the front over. We didn’t have any issues with it bunching in the front at the corners. At first, when planning, we thought we’d have to fold it at a 45 on the corners (on the front). But this worked well!

Next we finished the legs. Since our fabric wasn’t long enough for the legs, we cut and stapled the fabric. Folded and ironed a seam on the piece for the leg – and stapled from the back.

To pull the edge tight, we added nailhead strip. I normally use individual nailhead, but since we weren’t going against a straight line, this helped, plus this is SO much faster.

It took us about 30 minutes to lay out the whole thing!

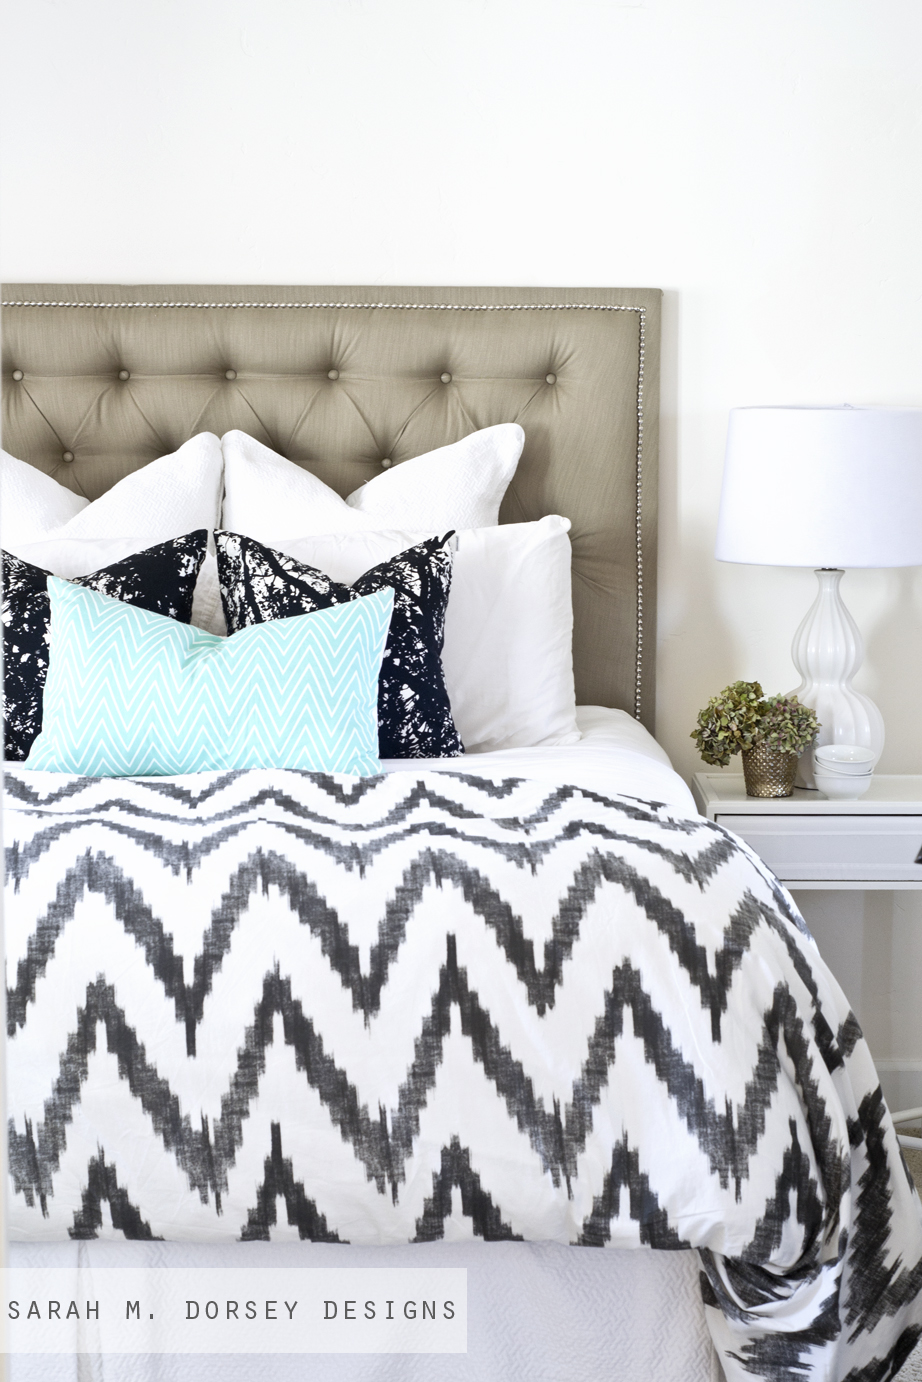
Love how it turned out!!
Also, we let the headboard free stand between the mattress/box spring and the wall. Having the plywood go under the mattress and the legs to the ground helps lock it in place. We haven’t had issues with it moving, but since it can move, I’d recommend using french cleats to secure it to the wall to be extra safe.

We photographed it in our house before taking it over to our friends. I loved walking past it and looking at it for the few hours that it was here. Made me feel like I had a put together bedroom again (at least from the hall 🙂

I added black and white Marimekko pillows purchased from a Crate and Barrel outlet a few years ago.
and my Caitlin Wilson Designs pillow in tall chevron mint.
The lamps were found at Target a few months ago for $16 each. Finally, we flipped the drawer on our nightstand so it was white. Still loving my organic chevron duvet from West Elm 🙂

Cost Breakdown:
Wood and Foam (home depot) $50
Batting: $8 (with coupon at local craft store)
Buttons: $12 (6 packs from Amazon)
Nailhead: $13 (Amazon)
Fabric: $25 (Target)
$95 Total
SOURCES:
Duvet: Organic Chevron | West Elm
Chevron Pillow | Caitlin Wilson (mint no longer in stock)
Black and White Pillow | Crate and Barrel Outlet a few years ago, Marrimekko Tuuli Pillow Sham
Night Stand
Lamp | Target Summer 2013
I love love love how it turned out!!!
We’re already have a plan for our next headboard! Now we just need a place to put it 🙂 The movers are coming in a few hours and then we’re packing up to head towards Ohio. We’re making a road trip out of it, so make sure to follow our progress through Instagram!
Stay tuned this week for a fall tour hosted by Lindsay and Kristen (I’m the 2nd!), and a few guest posts from some of my favorite bloggers!!
Absolutely gorgeous, Sarah! I've got a DIY headboard on my list, and your tutorial answered some of the questions I had been wondering about. Thanks, great job!
heads up, your title says "tudted"
i love this. i made a tufted headboard while ago and it was so hard!
whoops! Thank you 🙂
so so gorgeous, you did an awesome job. 🙂
Really, really beautiful! I love a deep tuft 🙂 Safe travels and I hope it all goes smoothly this time!
LOVE the DIY nailhead head board!!! It looks like it came from West Elm! Great job!
That's pretty amazing Sarah!!!! Great job!
You are amazing…it's beautiful!
Wow your friends are so darn lucky because this is GORGEOUS!
Wow. This is beautiful! Looks like something from Crate and Barrel!
Very very beautiful Sarah!
This is so beautiful! What a hard project to tackle and you did a great job, Sarah!
Love the headboard! We are trying to make our upholstered headboard next week but am running into issues finding foam to fit our budget. I went to HD requesting camping foam and they had no idea what I was talking about. Looked everywhere, I couldn't find anything. What section of the store is it located? I'm in NC, maybe it's not available in my area. I've considered mattress topper, carpet pad, etc. Thanks for any help you can give! -Tracy
Hi Tracy! Do you have hobby lobby? With a 40% off coupon it's pretty affordable!
Sarah this is beautiful!!!
What fabric did you use to make those black and white pillows?? I've been looking for fabric like that for way too long and i LOVE it!!!
allie
Hi Allie! They are Marimekko from a crate and barrel outlet a few years ago. Love them – they are so unique!
I've seen these tufted headboard diy's for a long time and really want to make one. Your tutorial seems very thorough but I have to ask, is this really as easy as you outline? I'm sure of how long it takes but I'm not too terribly handy so I'm worried about spending the money and it being a total flop.
where did you find your comforter at?! i have been looking for one like that!!!
it's the organic chevron from west elm, link is above the last image if you're interested 🙂
Hello Sarah. This piece is beautiful!! You have really inspired me!!
I have a couple questions as this will be my first attempt at upholstery. To clarify on the construction of the frame, you added a 2×4 across the bottom after you took the picture? I am adjusting this to fit my king bed. If my plywood will be 76"x40", how much material do you think I will use? I just want to be sure to account for enough extra slack. Also how many packs of the nail heads did you use? And what measurements did you use on the spacing for the buttons?
Thank you so much in advance for taking the time to answer my questions, I am very excited to begin this project!!
Hi Dana – Thank you! The 2×4 was used to make the headboard more sturdy and to help hold the foam in place, a 2×2 would also work. I'm not sure on the exact measurements for a king, but for the fabric, I would allow around 18-24" of extra on the right and left. I used one roll of nailhead, 15' of nailhead to go top to bottom. Hope this helps! 🙂
Amazing work Sarah!! I'm hoping to attempt this myself. How big around did you cut the circles in the foam? Thanks!!
Thanks!! We cut them a little larger than the button
How much space is in between each button?
Hi Rosemarie, I'm not sure on the exact spacing. We made it for a friend, I'll measure next time I'm over. thanks!
Hi Sarah. Thanks so much for the how-to! I'm in the middle of trying to make this headboard, and I finished all my buttons and am now stapling the fabric to the back of the board. Any tips on how to get the fabric so smooth around the edges? I can get it smooth on one half of a side, but then it seems I have just pushed all the excess folds/fabric over and they have no where to go. Thanks!
Hi! So glad that you're trying it! I didn't have a lot of fabric to spare, so most of it went into the tufts. Try pulling the extra fabric down to the bottom (where you staple) or you may have to loosen and redo some of your tufts on the end – to fold more fabric into the tuft. Hope that helps!
Is the duvet cover grey or green? Online it says green but it looks more grey here in the pictures.
The duvet is a dark graphite and white
http://www.westelm.com/products/organic-chevron-duvet-shams-g379/
Hi Sarah. I am thinking about making this headboard and getting this bedding but I have dark brown furniture in my room currently with hardwood floor. Do you think it would still look ok?
I'd recommend a light fabric to go with darker furniture.
Sarah I have everthing ready to go to, make this headboard! (Very excited) just one question, how far apart are the button's and the rows of buttons? Thanks for these amazing instructions and inspiration!
Hi! I'm not sure on the exact spacing. We made it for a friend, I'll measure next time I'm over. thanks!
Hi Sarah,
I am about to start my own headboard and I have been using all your headboard tutorials as a good place to start/ get an idea of what materials to purchase and start the project. In this tutorial your back piece of plywood is 33inches wide compared to your other tutorials where you left them all at 48inches. Is there any reason for this? I plan to do a deep tufted headboard with arms like you did on your very first headboard post.
Thanks!
Hi! We made this one a little shorter than the others. This worked best with the foam that we were using. The height is your preference, but you want to make sure that the mattress covers the bottom of the headboard 🙂
I have a question 🙂 My boyfriend and I are going to try to make one soon but I don't know how we would attach it to the bed frame! Any suggestions? 🙂
Thanks!
Hi! I'd try french cleats on the back, here's a little more info: http://www.lowes.com/cd_LCI+Blog:+Hanging+With+Cleats_1263832854_
I absolutely love this project! How did you layout the pattern of the tufts to make sure you had them evenly spaced?
Hi Joshua, We measured to make sure that they were even… we made it for our friends, so I'll measure next time I'm over.
Where did you find your fabric for your headboard, I see Target. Was it a curtain??
It's Threshold™ Natural Core Solid Window Panel – Tan
Going to and make it this weekend! The cost ended up being higher for me…where did you get your foam?
Did you cut circles around where the buttons would be or just poked holes for reference? I have all the supplies and am going to give it a try this weekend!
Hi Kathy! We did cut holes in the foam for the tufting. and we found the foam at Home Depot, ~$20, great price! I think it's only available at certain stores.
When you ordered the duvet from West Elm did it come with any pillow shams or did you have to order them separate? And if so, did they come in packs of two?
The shams are sold separately, pack of one
This is so beautiful and I definitely will be attempting this when we move into our house next month! I have never done a DIY on this scale, and I have a few questions. I noticed that you don't attach the fabric until you're done tufting – how would this work with patterned fabric? I'd be concerned that it would shift. Would it be better to use a thinner foam? Thank you!
For my fellow Canadians, the costs are higher. The total was about $200 for mine. The result was much better than the $500-800 upholstered ones that were only trimmed with nailheads and not tufted.
Wood from Home Depot: $30
metal French cleats from Home Depot: $12 each
3" Camp It Foam Sleeping Pad from Canadian Tire: $34 each. I purchased 2 as one wasn't enough.
Fabric was a curtain panel from HomeSense: $30 (dark grey silk/linen texture)
Batting from FabricLand*: $25 for 100"x60" (single layer)
4 pkgs of 1.25" button covers: $2.00 each
7 pkgs of large nailheads (18 ct) from FabricLand*: $5 each
I had staple gun, glue, adhesive spray, nylon string, screws, etc. on hand.
Thanks for the step-by-step instructions. Very straightforward to follow. It was a great weekend project.
Hi Sarah!
Are there more pieces of wood outside of what you mentioned needed in total? I noticed to said some pieces were missing from the frame photo.
Thank you!
Hello – We just added a strip of plywood to the 2×2 leg so that it was flush with the headboard.
Hi Sarah – Your headboard looks awesome! I'm wanting to make one based on your template, but despite the previous question & response, I'm still a tad confused regarding the actual frame construction.
It looks like you used two (2), 2×2 legs that are 60" tall, with a 2×4 across the top of the frame, and a 1/2" thick piece of plywood (60" wide x 33" tall) as the back of the frame. Is this correct?
After that, where exactly did you place the other 1/2" plywood that you mentioned ("..behind the legs (to make it flush) – which was added last..")??
Also, where did you place the other 2×4 ("..at the bottom on the plywood..") and the extra 2×2 ("..on the leg..")? Please be as descriptive as possible. Thanks!!
Hi Katie – In addition to the frame in the photo – we added a strip of plywood (the same thickness as the back) just to even it up – looking at the photo – you see a gap – added a piece of plywood the same width and length as the leg makes it flush. A second piece of wood (2×2 or 2×4) was added at the bottom of the plywood (the main backing material) to add stability and lock the foam in place.
you are truly amazing, I was impressed with the tutorial Tufted Headboard with Nailhead in this article, this is so perfect, this design is very neat and not spend a lot, I like .. thanks
I know you said you would answer this question in previous posts (although it has been a couple of years since you posted this!), but what are your spacing measurements between buttons?? The reason I ask why is because I have looked at a LOT of tuft headboard tutorials and their button spacing is always too close together making it look busy/crowded. Yours is the BEST looking one by far and that is the only important detail that this awesome tutorial is missing! Please tell us or have your friend measure it for us so ours can look as amazing as yours! Thank you!
I scaled the photo and this is what I found 🙂 side to side is 7-1/8" and top to bottom is 7-1/8", buttons start 4" from the top, rows are offset to the center of the buttons (after the first row)
Also, from inside of the 2×2, the rows start 7-1/8" from the side
Can you use 2 inch foam? Found 3" at JoAnns for $120 – a 90 x 24" piece. It is high density foam. The 2" is a little less expensive.
Hi, Sarah! I'm gathering all the supplies needed for this amazing project. Which buttons did you use from Amazon? Thanks!
great job. I got rid of my girlfriends ugly headboard and now I have to replace it, WE decided I would build a tufted headboard. I would like to know how do I measure and map out the location of the holes.