• Home
  • About
  • Services
  • Shop
    • Bloglovin
    • Email
    • Facebook
    • Instagram
    • Pinterest
    • Twitter

Dorsey Designs

DIY and Interiors by Sarah + David

  • Home Tour
  • DIY TUTORIALS
  • friday favorites
  • design + build
  • art

get the latest straight to your inbox

Refinishing Rattan Chairs | Tutorial

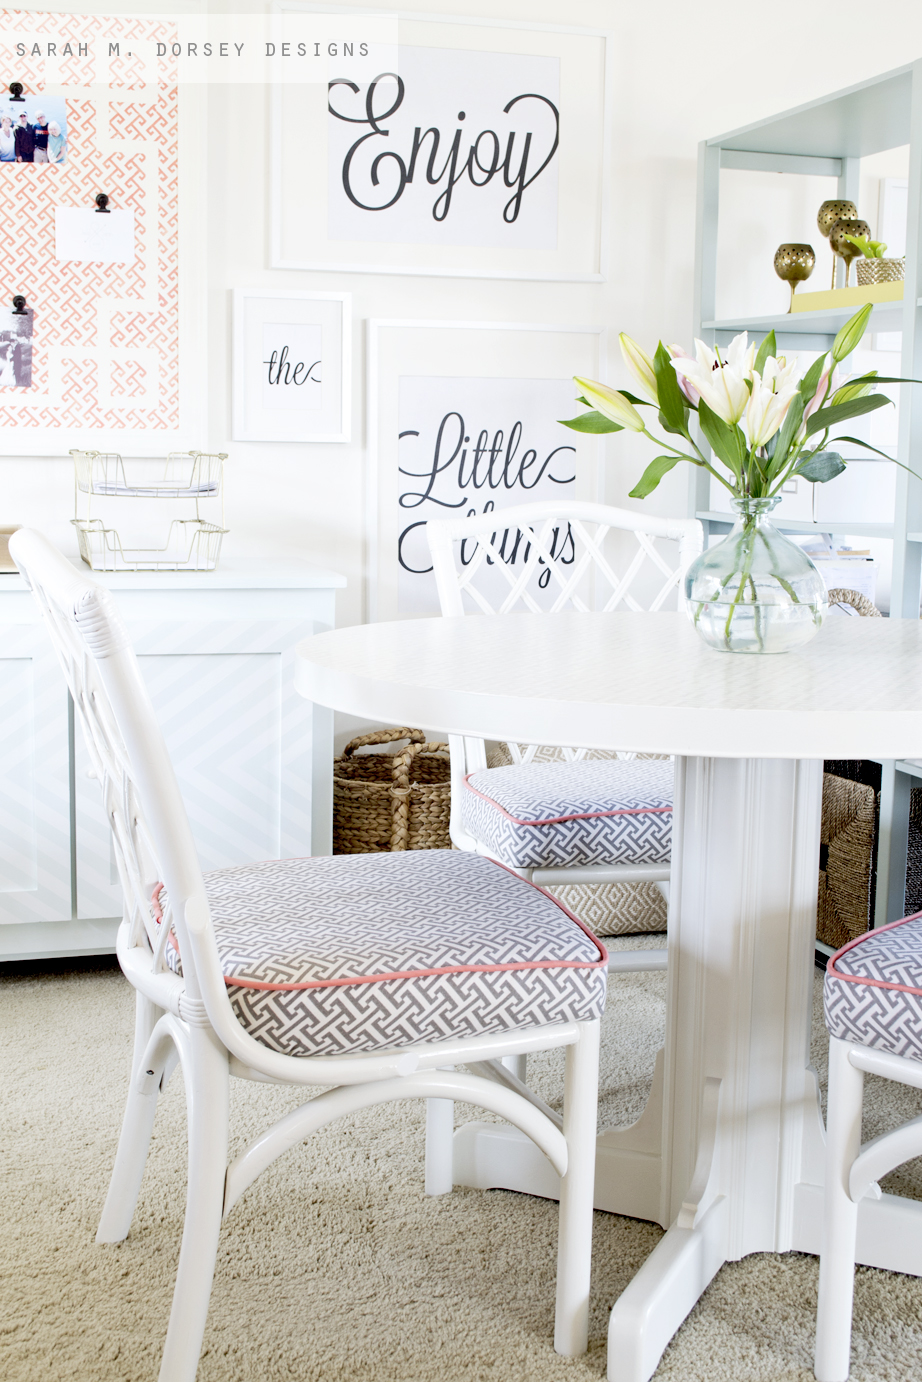
Today I’m sharing how we refinished the rattan chairs. They were a little extra work than originally anticipated (as usual in goodwill/craigslist, etc. I was enamored by the potential and didn’t see all of the work …) All in all, it wasn’t too bad and the end result definitely made it worth it!

Here’s our process.

First things first, I removed the seat cushions and the nasty fabric and foam (probably the worst I’ve seen … yuck!) and then scrubbed down the rattan with white vinegar and water. David and I decided that the bottom x’s made the chair feel bottom heavy so I used the jigsaw to cut through the middle and then I pulled them out.

ahh much better! 
Next we filled all of the holes with wood filler. These chairs had obviously lived with a pet or small child since the rattan x’s had bite marks on it (yikes! Didn’t see that before purchasing …) so I filled those too. Finally, I’d recommend filling in as many crevices as possible prior to painting. Once I painted, the rattan wrapping at the top of the chair looked cheap since the crevices were more noticeable with the white. I ended up filling them in with extra paint, but it would take less paint if filled with wood filler first.
After it dried we sanded with a combination of flexible foam backed sanding pads (purchased at Sherwin Williams) and the orbital sander. Since the surfaces are all curved, we were careful not to sand the filler too much to make it flat.
Prior to painting I applied a little wood glue to the back of the rattan so it wouldn’t move once painted. My original plan was to spray prime the crevices and brush the rest, but soon realized that the entire chair needed to be sprayed. It is way too much curved surface area to brush!! I used two cans on three chairs, but it probably could of used one more coat. I’ve said it before, but Zinsser Cover Stain primer is my favorite! It sticks great, goes on evenly and covers well. It comes out fast, so press lightly to get an even, thin coat. 

We decided to airbrush our chairs with Sherwin Williams Pro Classic paint (SW Alabaster), since we had that on hand. For those without an airbrush, spray painting would work just as well. If you’re curious, the airbrush is great for smaller areas where you want more control. Since the paint is easily controlled, it uses less paint since there is less overspray. However, I wouldn’t recommend using it on a large surface since it would take too long. 
We then decided to finish it with Krylon’s Lacquer (purchased at Sherwin Williams) to give it a glossy protective finish. This has been one of our favorite clears since it didn’t create drips easily and went on great. 

Mom’s here this week and her timing couldn’t of been more perfect to help with the cushions! She is a sewing master and volunteered to make the cushions for me (thanks mom!) First Mom made the cording by cutting coral fabric on the bias (diagonally across the fabric) which helps the cording bend. Here’s a tutorial on how to make double cord welting that I’ve used before, the principle is the same, but you don’t use the second step.

Next, mom made a template for the top of the cushion, cut it out and then sewed the cording to the top of the cushion.

With the pieces right side in, mom pinned the bottom panel and sewed those pieces together.

We cut the new foam (Home Depot sells 3″ camping pads for $20) out about an 1″ larger than the MDF bottom. This worked best with the cover to make it tight, but you want at least .5″ overhang since the foam will crush. Tip: to cut the foam, we used a very sharp kitchen knife (David likes to use the filet knife), it cuts SO easily and literally only takes about a minute!

Almost done! Mom modeled the seat cover after the original one, which had an open seam in the back. After a little trial and error, we realized that the traditional pulling tight alternating from all four sides wouldn’t work. Instead we started the center of the front and worked around both sides (alternating). For the front corners, I pulled in the center of the corner and then very slightly gathered the fabric to the side of the corner under the MDF so that there wasn’t any creases in the front of the fabric.

Finally, the flap on the back allowed us to make up the difference and pull tight. It’s definitely doable with one person, but we found it easiest if one person pulled tight and the other stapled.

We reattached the seats and then we were done!

We’re planning to use them as accent chairs in the living room/office until we finish the mid century modern chairs, but for now they are at the round table.

I think the coral piping is my favorite 🙂

Annabelle made a brief appearance for the photo shoot 🙂

These chairs have come a long way from their neglected, dirt covered beginnings!

—

We recently scored another set of chairs and we’re almost done with those too! Stay tuned!! 🙂

DIY TUTORIALS// furniture redo// office// Uncategorized// Uncategorized16 Comments

Subscribe

get the latest straight to your inbox

« Refinishing Rattan Chairs
Large Fretwork Stencil Now Available »

Comments

  1. Cassie @ Primitive & Proper says

    July 23, 2013 at 7:10 pm

    they are just stunning and removing the bottom x's was perfect!

    Reply
  2. Sarah {Lacquer and Linen} says

    July 23, 2013 at 7:38 pm

    Your chairs are so gorgeous! My mom does all my sewing when I catch her at the right time. I need to learn to sew really bad. The pink welt is too cute 🙂

    Reply
  3. Thalita @ The Learner Observer says

    July 23, 2013 at 7:38 pm

    Absolutely gorgeous! The whole room is stunning and needs to be in a magazine, or something! P.S. can I please hire you and your mom to make over some cushions for me? ;)#nosewingskillstospeakof

    Reply
  4. Auralee says

    July 23, 2013 at 8:33 pm

    Sarah – great job by all of you! Looks fantastic!!!!

    Reply
  5. Gwen, The Makerista says

    July 23, 2013 at 11:51 pm

    these turned out great! boy, do i know what you mean about the "facade of a deal." i just picked up a chair on the side of the road the other day. i don't have anywhere to put it, but i really loved the shape and it wasn't something i've seem a lot. i started sanding it the other day and realized that it's covered in scratches and dents. the front two legs have huge gashes in them!

    it's amazing what we are blind to in the heat of the moment. 🙂

    Reply
  6. Jenny T says

    July 24, 2013 at 2:19 am

    Which Home Depot do you go to? I can never seem to find the foam pads…

    Reply
    • Sarah says

      July 24, 2013 at 3:56 am

      Hi Jenny! San Luis obispo. In mine it's near the carpet section.

      Reply
  7. Jesse @ Scout & Nimble says

    July 26, 2013 at 2:26 am

    Incredible job! I love the touch of pink welting in the cushions…gorgeous!

    Reply
  8. Magda says

    August 13, 2013 at 8:30 pm

    These chairs look incredible and the cushions are gorgeous! Great tutorial, I just wish that all the great Zinnser products were available in Germany!

    Reply
  9. Dan says

    November 13, 2013 at 10:45 am

    That is a fantastic job, I've been thinking about restoring furniture myself. How much extra value do you think you've put on this set?

    Reply
    • Sarah says

      November 13, 2013 at 11:50 am

      Thanks Dan! I consigned them before we left CA, and the three chairs and round table sold for 325.

      Reply
    • Dan Barrett says

      November 13, 2013 at 7:19 pm

      Thats' fantastic Sarah, well done. I think I might go looking round the markets this weekend

      Reply
    • Dan Barrett says

      November 13, 2013 at 7:21 pm

      That's fantastic Sarah, well done. I think I might go looking round the markets this weekend see if I can bag a bargain 🙂 Here in the UK I would retail that at £399 ($595 USD)

      Reply
  10. jana bek says

    January 14, 2014 at 8:20 pm

    Sarah! I love when I google for how tos & your name pops up! You are da bomb!

    XX jana

    Reply
  11. S Str says

    January 26, 2014 at 2:57 am

    Sarah- Thank you for showing me how to paint a very important piece of rattan furniture. Your tutorial is fabulous and your work is stunning! Q1: How fine a grit should I use when I sand with the flexible foam pads? Q2: Would you suggest *not* sanding the fragile rattan wrappers? (Will the Zinsser Cover Stain do the trick?) Thank you, Stacy

    Reply
    • Sarah says

      January 27, 2014 at 5:54 pm

      Hi Stacy, I'd start with a medium grit and finish with a fine grit. I'd lightly sand the rattan back and the zinsser cover stain works great!

      Reply

Leave a Reply Cancel reply

Your email address will not be published. Required fields are marked *

Contact Me

sarahmdorseydesigns{@}gmail{.}com

Stay Updated!

Get all the latest goods straight to your inbox!

This error message is only visible to WordPress admins

Error: No connected account.

Please go to the Instagram Feed settings page to connect an account.

Must Reads

Custom Peg Board + DIY Circle Art | FrogTape

Custom Peg Board + DIY Circle Art | FrogTape

Main Level Refresh with The Home Depot

Main Level Refresh with The Home Depot

Sponsor

2016 Daily Simplified Planner

Popular Projects

Custom Long Drapery Rod For Under $20

Custom Long Drapery Rod For Under $20

October 27, 2014 By Sarah 9 Comments

TV Wall Trellis Stencil Progress

TV Wall Trellis Stencil Progress

April 2, 2012 By Sarah Leave a Comment

Art for Above the Headboard – Take 1

Art for Above the Headboard – Take 1

May 7, 2012 By Sarah 3 Comments

Large Glossy Vintage Inspired Letter | DIY Tutorial

Large Glossy Vintage Inspired Letter | DIY Tutorial

November 10, 2014 By Sarah 9 Comments

Anthropologie Inspired Draperies Complete!

Anthropologie Inspired Draperies Complete!

March 19, 2012 By Sarah 27 Comments

  • DIY TUTORIALS
    • design + build
    • furniture redo
    • diy in 1 hour or less
  • free printable
  • friday favorites

Disclosure

Occasionally, affiliate links are used when they are available. I do earn a small commission when items are purchased using those links. As always, I only link to things that I truly love. I also link to items that I love when an affiliate link is not available. Thanks so much!

  • Home
  • About
  • Services
  • Shop

Copyright © 2025 Dorsey Designs

MENU
  • Home
  • About
  • Services
  • Shop