• Home
  • About
  • Services
  • Shop
    • Bloglovin
    • Email
    • Facebook
    • Instagram
    • Pinterest
    • Twitter

Dorsey Designs

DIY and Interiors by Sarah + David

  • Home Tour
  • DIY TUTORIALS
  • friday favorites
  • design + build
  • art

get the latest straight to your inbox

DIY in 1 Hour or Less | Removeable Jersey Lampshade cover

Today I’m sharing another DIY in 1 hour or less! A removable lampshade cover is the perfect solution if your current lampshade doesn’t work with your room, but you want a quick and cheap temporary solution.   

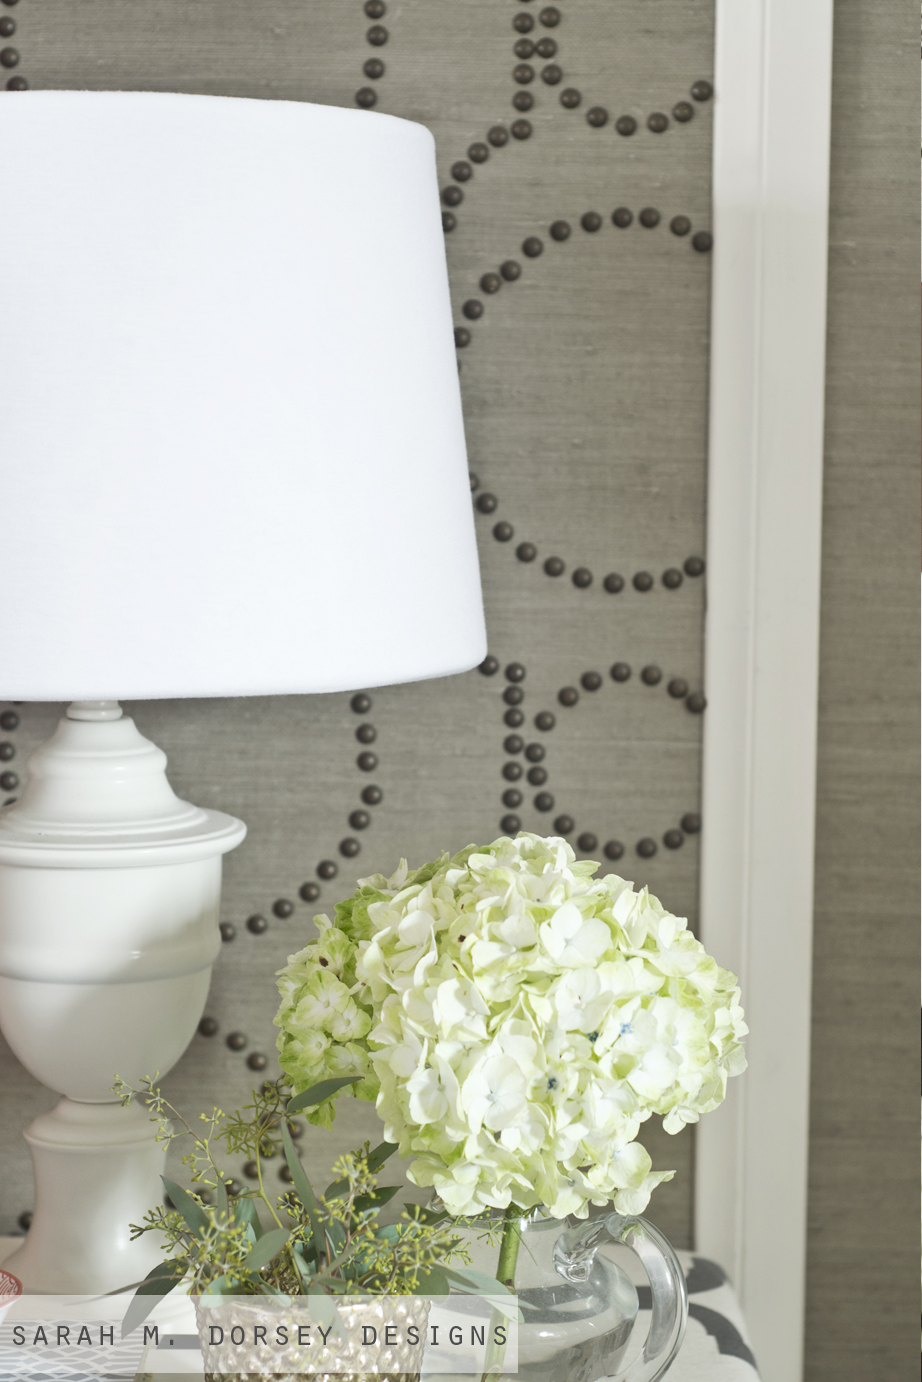
When we took pictures for our final CWTS project, we had to get all new accessories (since photos were submitted anonymously), including a lamp because every bed needs light. Not only is it practical, it helps add height to your nightstand, which helps balance the height of the headboard. We had to return the light that we used (we kept a lot of things that we used too) and make our existing lamp work.

Instead of buying a new shade I decided to make a removable lampshade cover that wouldn’t damage the shade, in case I decide to use it again.

Jersey is the perfect solution – especially for a tapered shade because it stretches and conforms to the lampshade. It is also great because it requires minimal sewing – only on the connecting end. The top and bottom don’t need to be sewn since it doesn’t fray.

It is translucent, so white wasn’t the easiest choice, but I’ll explain how I fixed that in a little. 

 Here’s how I did it!

1. I measured around my lampshade (about the center but closer to the top) and calculated the amount of fabric I would need. ~46″ to go around the shade and since the height was 10″ I would need about 11″-12″ for each layer. For 2 shades (3 layers of jersey each) I purchased 2.5 yards and had some left over.
2. I cut 3 – 46″ long and 12″ high (to be safe) sections. I wrapped one layer of jersey around the shade, pulled somewhat tight and pinched the top (on the line where I would sew), and pinned in on the top and bottom. 
** Once cut, the jersey curls one way, when I was pinning, I made sure that the curl would go in the inside (on outside while sewing and then flip so it’s on the inside) so it would curl around the inside of the lampshade. 
 

 3. After doing a normal stitch and it bunching because of the stretch, I tore out the stitch, looked online and found that the stitch has to zig zag. I put my sewing machine on the zig zag setting (#3) and started sewing (make sure not to back stitch, I had to start over one more time…)

** I did slightly taper my
stitch so that it was a little wider at the bottom. The jersey is pretty forgiving and will stretch, so this probably wasn’t necessary. Getting it tight at the top is
the most important and then it stretches a little more at the bottom.

4. I sewed one line and cut off the extra fabric. So easy, once I figured out the right settings!

I put the seam of the cover on the seam of the lampshade and then repeated so I had three individual layers. I decided to do the layers separately since it was easier to sew that way (at least for me 🙂

After the third layer, you could still see through to the shade underneath. I decided that a thin piece of white paper (like normal printer paper) would work well underneath the jersey to hide the pattern.  Since the shade is tapered, a large piece of paper would be needed to get one continuous strip. I didn’t have any on hand, so I placed a layer of paper towels between the lampshade and the jersey. I couldn’t get it out of the height of the paper towel, so they are layered and taped inside. It isn’t pretty, but the layers of jersey smooth it out.

Super easy!

The jersey hugs the inside lip of the lampshade perfectly! 

The hydrangeas from last weekend still look great!
We are using our Ikea Lack upholstered tables temporarily until we built new nightstands that won’t hide the grasscloth + nailhead feature wall.  They aren’t perfect in the space, but they will work for now!
I purchased the jersey from Fabric.com –  it looks like the exact fabric is no longer available, here is the gray version. 
This is such an easy way to (temporarily) update a lampshade! I may add a ribbon trim a little later, but for now I’m loving the white.
—
I spent all day in the garage yesterday, and I’m almost finished our round table … photos soon!!!

Bedroom// diy in 1 hour or less// Uncategorized// Uncategorized6 Comments

Subscribe

get the latest straight to your inbox

« Weekend in Photos: vintage furniture, swapping lights, and beach time
Destination Nursery | Dream Nursery or Kids Room Makeover Giveaway! »

Comments

  1. Craftivity Designs says

    June 26, 2013 at 6:45 pm

    When you measured your length did you use the bottom or the top of the shade? Love how simple this is!
    -Lora @ Craftivity Designs

    Reply
    • Sarah says

      June 26, 2013 at 6:57 pm

      Hi Lora! 🙂 I just measured in about the center, but closer to the top of the shade. I did slightly taper my stitch since it is wider at the bottom. Getting it tight at the top is the most important and then it stretches a little more at the bottom. (I'll add this to the post, thanks for asking!)

      Reply
  2. Jennifer @ Dimples and Tangles says

    June 26, 2013 at 7:22 pm

    You are so clever! I never would have thought to make a temporary cover. What a great solution for a shade you may not want to permanently glue over!

    Reply
  3. Julia Konya says

    June 26, 2013 at 8:25 pm

    Oh wow, who knew?! I would have never guessed Jersey but such a smart idea!

    Reply
  4. Lauren Monique says

    June 27, 2013 at 6:31 am

    Jersey… clever! I might have to try that for a plain ikea lamp we have in the living room…

    {lamourcheznous.wordpress.com}

    Reply
  5. Crazy Cat Lady says

    July 2, 2013 at 3:35 pm

    I've used poster board as a way to provide structure to a lamp shade that was just a metal frame. I bet it would work well under your jersey to help block the pattern. I get the poster board at Dollar Tree for fifty cents, so it's economical. 🙂

    Great post! I will definitely be using this in the future!

    Reply

Leave a Reply Cancel reply

Your email address will not be published. Required fields are marked *

Contact Me

sarahmdorseydesigns{@}gmail{.}com

Stay Updated!

Get all the latest goods straight to your inbox!

This error message is only visible to WordPress admins

Error: No feed found.

Please go to the Instagram Feed settings page to create a feed.

Must Reads

Custom Peg Board + DIY Circle Art | FrogTape

Custom Peg Board + DIY Circle Art | FrogTape

Main Level Refresh with The Home Depot

Main Level Refresh with The Home Depot

Sponsor

2016 Daily Simplified Planner

Popular Projects

Layered Headboard for only $20 | Contributing Article at Houzz

November 5, 2013 By Sarah 12 Comments

Grasscloth Mat + Succulent Prints + Walls Republic

Grasscloth Mat + Succulent Prints + Walls Republic

February 25, 2015 By Sarah 20 Comments

DIY Tufted Ottoman Price Breakdown

DIY Tufted Ottoman Price Breakdown

March 27, 2012 By Sarah 2 Comments

Blogging 101 | How to Grow Your Blog

Blogging 101 | How to Grow Your Blog

October 7, 2015 By Sarah 6 Comments

TV Wall Trellis Stencil Progress

TV Wall Trellis Stencil Progress

April 2, 2012 By Sarah Leave a Comment

  • DIY TUTORIALS
    • design + build
    • furniture redo
    • diy in 1 hour or less
  • free printable
  • friday favorites

Disclosure

Occasionally, affiliate links are used when they are available. I do earn a small commission when items are purchased using those links. As always, I only link to things that I truly love. I also link to items that I love when an affiliate link is not available. Thanks so much!

  • Home
  • About
  • Services
  • Shop

Copyright © 2026 Dorsey Designs

MENU
  • Home
  • About
  • Services
  • Shop