Over the long weekend, we finally had time to finish our new coffee table. This has been one of our most time consuming projects, so it feels great to be done!
I’ll give a full tutorial for how we got this look, but if you’d like to
make something similar without milling your own wood, I’d recommend
looking for thin strips of wood with the width already cut. This would definitely cut down the time significantly!
We started this project with a large pile of driftwood that we collected on a local beach (That’s David on the left).

Once we decided on a pattern (with a little help for you all!), we calculated the number of pieces we would need and started cutting. We needed around 300 4″x1″x.25″ pieces to make the top surface. WOW, that’s a lot! At this point we were re-thinking the project, but we had already started cutting and loved how it looked inside, so we decided to keep going.
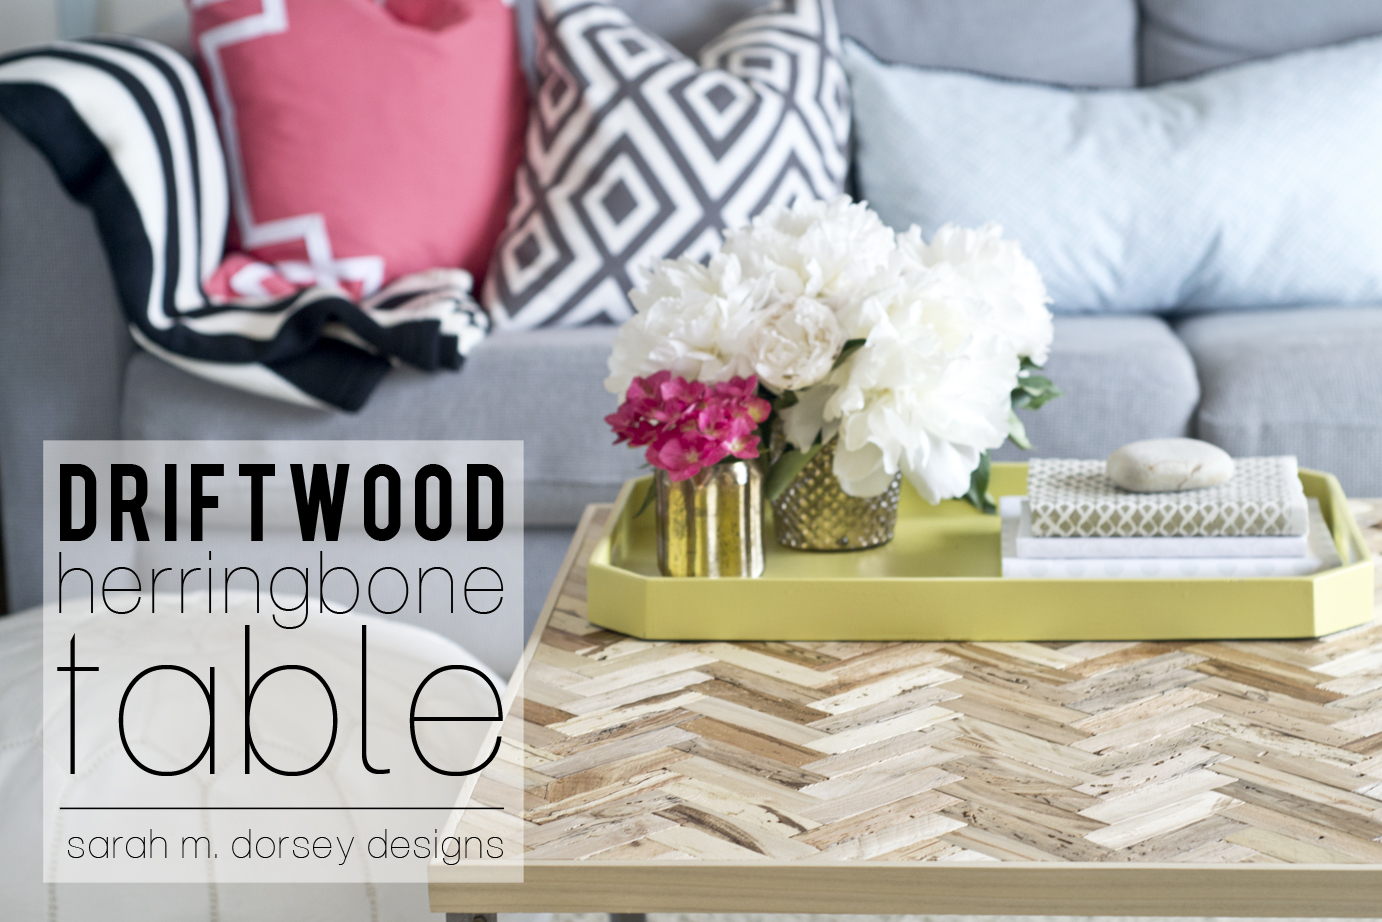
Our table measures:
36.5″ L x 28.5″ W x 15.5″ H

Here’s the time consuming part, milling our own wood …
First David cut the driftwood into ~5″ sections. To prepare the wood for the table saw, he cut larger pieces in half and cut one side so the board could sit flush on the table saw fence. For smaller pieces, he just trimmed off a round edge, laid it flat on the saw and cut another round edge to create the square side for the table saw.


Next, David setup the table saw for the .25″ thickness and ripped all of the 5″ sections into the strips. Whenever getting near the blade like this, always use a push stick to keep your hands clear! Now we had strips of wood that were about ~5″ and smooth on three sides.
 |
| ~300 pieces ready for the final cuts |

Next, we setup the saw to cut all of the little pieces down to 1″ wide. While David ripped the pieces to the 1″ width, I cut the the edges with the chop saw to bring them down to the 4″ length. We measured and secured a 2×2 piece of wood at 4″ so we didn’t have to measure every time.
Whew, that was a lot of cutting but I was so happy with the variety in all of the pieces, it was definitely motivation to keep cutting!

For the tabletop, we used 5/8″ MDF from Ace (we purchased a half sheet). We also got them to cut it to size since it was free. We measured and drew the pattern for the center row. Setting up the first row so it was straight is important because that will determine how straight the rest of the pattern is. I had a 4×4 square that worked perfectly to make sure that it was straight. We then used wood glue to attach them to the MDF.

For the edges we decided to custom cut the edge pieces so that it would be as straight as possible. I held in place and marked the cut with a pencil while David cut with the chop saw. I did a little by myself when David wasn’t home which worked fine, but it is definitely easier with two people.
After gluing in place, we moved onto the frame.


After a little trial and error with removing the coating and breaking some jigsaw blades and drill bits, we had a frame!


I love how open it is on the bottom! Annabelle does too, since there is plenty of room to lay underneath.


Peonies are my absolute favorite flower (this actually looks a lot like my wedding bouquet). The little hydrangea came from my plant which just started to bloom again, love the color!


Annabelle in her usual sleeping spot 🙂


Maybe a lucite tray so I don’t have to cover up any of our hard work?
Total Time (too much to count, but here’s an estimate 🙂
Cut down driftwood ~ 8 hours (broken up with several breaks, fatigue around saws = not good!)
Lay out pattern and secure strips of wood ~ 4 hours
Finish edge of tabletop (mark where strips meet edge and cut, add poplar frame edge) ~3 hours
Cut and assemble steel frame ~2 hours
Apply polyurethane ~1 hour (plus drying time)
To significantly reduce time, buy pre-cut wood such as thin poplar/oak hobby board (I wouldn’t recommend paint sticks since they shrink and curl as they age)
Also, I didn’t mention it throughout, but always use your safety glasses, hearing protection, respirator and gloves where needed (which is a lot with this project!)
Total Cost:
Half sheet 5/8″ MDF: $7 (Ace)
1″ Angle steel 6′ long – $12.00 (Home Depot)
1″ straight steel 6′ long- $8.00 x2 (Home Depot)
Polyurethane: $11 (spray already owned) (Home Depot)
Total: $46
Definitely a time consuming project, but I love the end result!


Aloha,
What a beautiful table! And if you move, what a great reminder of the beaches in CA.
Mahalo.
Thank you! I was planning selling it when we move, but now I think I'd like to keep it (a great reminder of our time here and so much time invested! 🙂
I'll buy it from you! Are you still looking to sell? I would even pay you to make another one, haha. Let me know!
Thx!
I'll buy it from you! Are you still looking to sell? I would even pay you to make another one, haha. Let me know!
Thx!
I'll buy it from you! Are you still looking to sell? I would even pay you to make another one, haha. Let me know!
Thx!
I'll buy it from you! Are you still looking to sell? I would even pay you to make another one, haha. Let me know!
Thx!
This looks amazing!! I'm so, so impressed with your patience :). Well done!!
Thanks Chaney!! Definitely worth it! 🙂
Wow Sarah, your table is absolutely incredible!
Thanks so much Brandi!! 🙂
Seriously Amazing. Love!
Thanks Emily! 🙂
So. very. amazing. Gorgeous! Sounds super time intensive, but that table is so perfect! (And I'm assuming some of your time estimate is double the man hours since there were two of you working on it.)
Thanks Sarah! 🙂 Probably a few more hours for one person, but a lot of the cuts could only be done one at a time (since we had one of each saw). We were both cutting during the final cuts, so alone it would probably be an extra 2 hours?
You are the hands down DIY Queen. Seriously, I'm in awe! This table turned out so, so beautifully. And yes, I say go for the lucite tray – no covering up that beautiful wood!
Thanks Amelia! David is SO good at figuring out my crazy ideas!! and yes, the lucite tray is officially on my list! 🙂
I adore this. And am super impressed at your motivation to mill all that wood. Wow. The color variations in the wood is so great though, I have to imagine it feels worthwhile with such a beautiful finished piece!
Thanks Jen! The wood required a lot of patience and motivation, thank goodness for David!! Having it come together like it did (I was worried a few times :), definitely make it worthwhile!
i'm thoroughly impressed! that is seriously amazing! it's gorgeous!
Thanks so much Erin!! 🙂
So beautiful. I was wondering how you cut all that drift wood. That's insane! The result is stunning though.
Thanks Julia! 🙂 Yes, the cuts that it took to get it down to the small pieces was pretty crazy (David is a genius!)
wow, you guys are amazing!
aww thanks Jen!! 🙂
Turned out amazing! I'm impressed with your tenacity milling your own driftwood – it looks like a pretty daunting task.
Thanks Rebecca! Milling the wood definitely took a lot of patience (more than I was anticipating!) But in the end, worth it!! 🙂
Wow, I was looking forward to seeing the final result… All your hard work clearly paid off! I was admittedly sceptical, but it's gorgeous!
{lamourcheznous.wordpress.com}
Thanks Lauren! I was skeptical too! ha! Thankfully it all came together in the end! 🙂
This is gorgeous! I am so impressed!!!
Thanks Jackie! 🙂
Wow! I'm blown away. Gorgeous!
Thanks so much Ashley!!
THAT.IS.SUPER.IMPRESSIVE!
aww thanks so much Auralee!!
Unreal! It is gorgeous! I am seriously impressed by your skills and vision!
Thanks so much Sita! David is so good at figuring out how to make my crazy ideas happen! 🙂
Amazing Sarah!! Well done!
Thanks Elizabeth!! 🙂
A lot of work indeed, but the result is really awesome!
Thanks Barbara! Yes, SO much work, but the end result made it worth it!
I would never, ever do that but it is flippin' awesome!!!
Thanks Catherine! 🙂 I know, definitely involved and time consuming (we're a little crazy 🙂 So glad that it turned out though!
Wow. It's gorgeous. What a lot of work, but so totally worth it, I think! So talented!
Thanks so much Jeanette!
the most amazing diy table ever!!!!!!!! in the history of table building.
haha thanks Cassie!!! 🙂 we're pretty happy that it turned out as well as it did!!
SWOON!!! This is absolutely incredible!!
xo-Kristin | The Hunted Interior
Thanks SO much Kristin!! xo Sarah
This is amazing! I love it so much!!
-Megan @ make bake & love
Thanks Megan!! 🙂
100% amazing, 100% unique, and I'm 100% jealous! Love it. Congratulations on such a time consuming project!!!
Thanks so much Thalita!! 🙂
OMG Sarah, I absolutely LOVE this table. LOVE it. LOVE. IT.
Thanks so much Carrie!! 🙂 Hope you're doing well!
wow! i love the contrast of the wood with the sleek metal. and, i love that it's so open at the bottom so you can put baskets or other stuff underneath. it might have taken hours to make, but it's definitely a piece you'll have forever!
One of my favorite parts too! I a few baskets that would be perfect!
Stunning table, and beautiful pictures to showcase it 🙂
Thanks Sarah!! 🙂
You both are blessed with an abundance of talent and patience. What a beautiful piece!
Thanks so much!!
I emailed your teaser post to my friend with extremely coastal decor and now I'll email this. Amazing. Beautiful. Coastal. Bravo!
Thanks Marcia! 🙂
Love this! Saw something similar on Pinterest that I wanted to make (using some old shed boards from our backyard). Since we have kids, I'm thinking we'd need to top it with glass or (sexy) plexi (picture juice seeping into the wood…yikes).
Thanks so much!! 🙂
I just stumbled on your blog and I have to say wow! The table turned out beautifully, and was definitely worth the time invested. So unique and personal.
Oh my gosh Sarah I die! That I absolutely stunning. My mouth dropped open when I read you milled your own wood. What in the what??? So impressive. All the variances in the wood is so killer. Love it!
Thanks so much Beckie!! It was definitely time consuming, but the variety in tones and textures definitely made it worth it!
Amazing- as usual! You really inspire me with all this creativity! <3
Thanks so much Hannah!
Stop it! You are seriously one talented lady. I've been wanting a square coffee table, but there's no way I'd be able to pull off making it. This looks awesome!
Hi Tara! Thanks so much! It was definitely a lot of work, but we are so happy with the end result!
WHat a labor of love!!!! It is so absolutely amazing! I would love to have it my home…so let me know if it is ever for sale. 😉 lol
Absolutely fantastic! I'm glad there are other people out there who will go to such lengths to get what they want. Love It!!!
It was SO much work! We might not of tackled it if we knew how much cutting was going to be involved, but in the end I would definitely say that it was worth it! Thanks so much! 🙂
Oh my god! Just came across your blog throughh Pinterest and I'm just voicing what other people said – but you are AMAZING! That is one of the best DIY projects I have ever seen. It looks a million bucks. Well done you creative creature 🙂
Thanks so much Maya!! 🙂
Love the table! Saw a similar project done to the top of an end table and they actually used paint stir stcks and stained them, it came out really good. Love your blog, you're very talented!
Thanks so much Devan!! 🙂 If you try it with paint stir sticks be careful because over time they can warp and curl, just wanted to give you a heads up 🙂
Great project! Don't you just love how old wood gets that stippling and stripe look to it? Love it! I saw you listed over at Centsational Girl's Best of the Blogs list. Congrats!
Toodles,
Sara
Hi Sara, Thanks so much! Our favorite part was cutting into the wood and seeing what it looked like inside, amazing!! 🙂
Gorgeous!!! I saw a table like this recently and just loved it but I am super impressed that you actually took the time to make this from scratch. This would sell for like $1000 at an upscale furniture store so kudos! It looks absolutely amazing.
Hi Heidi! Thank you! It was definitely labor intensive – but worth it in the end! We were planning to sell it, but now I definitely think that we'll hang on to it! 🙂
Wow, this is so gorgeous! You put a lot of time and effort into this and it shows, it turned out beautifully!
I am inspired because you milled your own wood and made your own metal base without needing to weld. If I can afford a table saw one day, I may try my hand at something similar. =D Following!
Thanks Yvonne! Milling the wood was definitely not easy, but we love the end result! 🙂
Came to this post from Dwellings By DeVore's blog…this is gorgeous! Do you know of anywhere that you can order milled driftwood from? I'm not sure I/my husband would be able to do the milling as expertly as you guys.
Thank you! I'm not sure, some local lumber stores may have the equipment to mill wood – I'd check there 🙂
What a beautiful table; very inspiring. When we renovated our turn of the last century home, we had to remove some wooden lathe strips from the walls and at the time, I didn't have time to do anything with them, but they would likely be suitable for a project like this. They probably wouldn't warp considering that they are already 100 yrs old. A light sanding would even out the finish, but I would still cover it with some glass or plexi. Thanks for the inspiration.
Great idea for the wooden lathe strips! Adding glass/plexi would be a good idea too!!
I came her from AT; love the table. Instead of cutting each piece at the edge individually, try a trim router (or rather, look it up for your next project like this). Saves a ton of time!
Why didn't you just use paint stirring sticks?
Thanks for your comment! Paint sticks warp over time. To avoid this, make sure to wood that has had time to dry out completely.
WOW! That's gorgeous. Love it!
I love this!! The only thing I would've done differently would be to put a sheet of glass on top to protect it. Either way, your hard work definitely paid off beautifully!
This is a very beautiful table!! Stunning!
Sarah, I just found your site. So glad I did! I have been wondering about how to make a steel frame for table and you answered my question! Thanks so much for breaking it down. Your herringbone is just stunning. I know how much work this is as my husband (David!…All Daves are handy…lol) and I did a herringbone ceiling from reclaimed wood. I would love it if you could stop by and see what you think. also, I am absolutely in love with curved legs you made for that MCM dresser!! Again, just what I was looking for! I have some walnut that would be perfect for some legs. just a question on how you cut the one piece (the actual leg part that attaches to lower part of the curve) It looks like you cut that via jigsaw?? It's the foot part that connects to start of the long curved part. Make sense? If you email me I could send u the pic. I would appreciate the help!! thanks again. And seriously, beautiful, stunning work you two do.
http://makemeprettyagain.blogspot.com/2013/03/reclaimed-wood-herringbone-ceiling.html
Hi Beth! Thanks so much 🙂 The leg portion for the MCM dresser was cut with a jigsaw – that worked best for us! Hope this helps!!
Wow! This table is awesome! What a great idea! T
My dad is going to help me build this table for my apartment– thank you for the inspiration and tutorial! We live in CA so we'll probably go the time-consuming driftwood route. Has anyone else built a similar table and sent you photos of the finished product?
You're welcome! I haven't received any photos of finished projects, but that would be nice!
Beautiful table and amazing job!!!
Maria Gilligan
Do you have info on what size the small wood pieces would be and the base for option "A" at the beginning of the post?