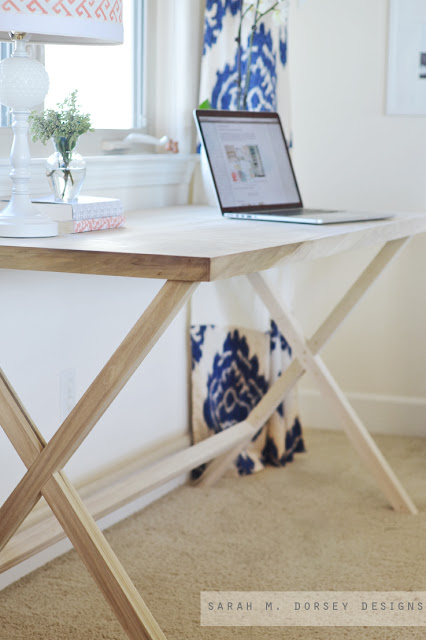
This weekend we finished our campaign style desk! I didn’t really do much on the desk other than working on the design, holding things in place while David clamped, and some sanding (of both desk and finger, ouch!) It was kinda a one person job, and since he works in front of a computer almost all day, I was happy to let him have at it! Especially once it got a little tricky … more on that below. David did a great job!
We decided to build a desk because 1. our old desk was too big with everything else we needed in the space, the credenza and sofa table 2. we couldn’t find one on craigslist 3. we like building things 🙂
Once we agreed on the design, I instantly thought of Jennifer’s X-benches from The Chronicles of Home for how to connect the legs. Jennifer has a great tutorial! We modified the center support since it is a desk, and lowered it so our knees don’t knock it.
I’ll be back with a full tutorial, but for now I’ll explain why this took longer than a weekend project and if we were doing it again, how we would turn it into one!
We picked up some poplar from Home Depot. Since poplar has so many different shades, (purple to green and a light wood color) we carefully picked out boards that were the same color.
Why it wasn’t a weekend project:
We looked at the boards to make sure that they were straight, but here comes the issue. Since the entire desk consists of 1x12s and 1x2s glued and screwed together, having them line up perfectly was important. We decided on poplar because we liked the uniqueness of the color and wood grain. It’s a hardwood, but not as hard as oak, so that combined with being stored vertically (instead of flat) caused them to be warped slightly, which = lots of gluing and SANDING to make sure that it was level where the boards meet. All of ours were very close, but to get it absolutely level it took a lot of sanding …
How it could be …
To turn this into a weekend project, I would recommend using oak or maybe even poplar from a local lumber mill that stores it flat. Having extremely straight wood will save lots of time!
Ok, hope I haven’t lost you! Here are a few pictures in the office.
We definitely need to cover up the carpet, way too much beige going on! And still waiting until we can get to Ikea to pick up a sheepskin for the Eames chair cushion, to bring those up. btw anyone know of an affordable sheepskin option online?
It lines up with the credenza instead of going halfway into the first door like the old desk.
We still have to add a few coats of polyurethane to protect it. It was about $9 cheaper on Amazon than I was able to find at any local store, so I decided to order it through there. My thriftiness got the best of me!
I’ll be back soon with how it was made!


It's beautiful! Can't wait to see how it's made!
Ikea has a cheaper alternative called the TEJN faux sheepskin rug – it's a little easier on the sheep population and just as soft! it's $10, can't beat that!
http://www.ikea.com/us/en/catalog/products/30229077/
Wow you guys are talented! I have been looking at an x-leg desk to purchase for myself…I am excitedly waiting for the tutorial, maybe I can just make one! I just started my blog 2 weeks ago today and need a desk for sure..Great project!
Oh it looks wonderful!!