As I wrote yesterday, after seeing a gorgeous bended dome pendant light in a room by Martha O’Hara Interiors I knew that I wanted to make something similar.
Because this was my first time working with rope and Mod Podge, a lot of trial and error was involved, but it ended up looking close to what I had imagined…
The short version?

1. I gathered my materials – All purpose glue, Mod Podge hard coat, rope, painter’s tape, and a beach ball
2. I built a template from extra wood so that all of the bends would be the same and then glued at every point of contact
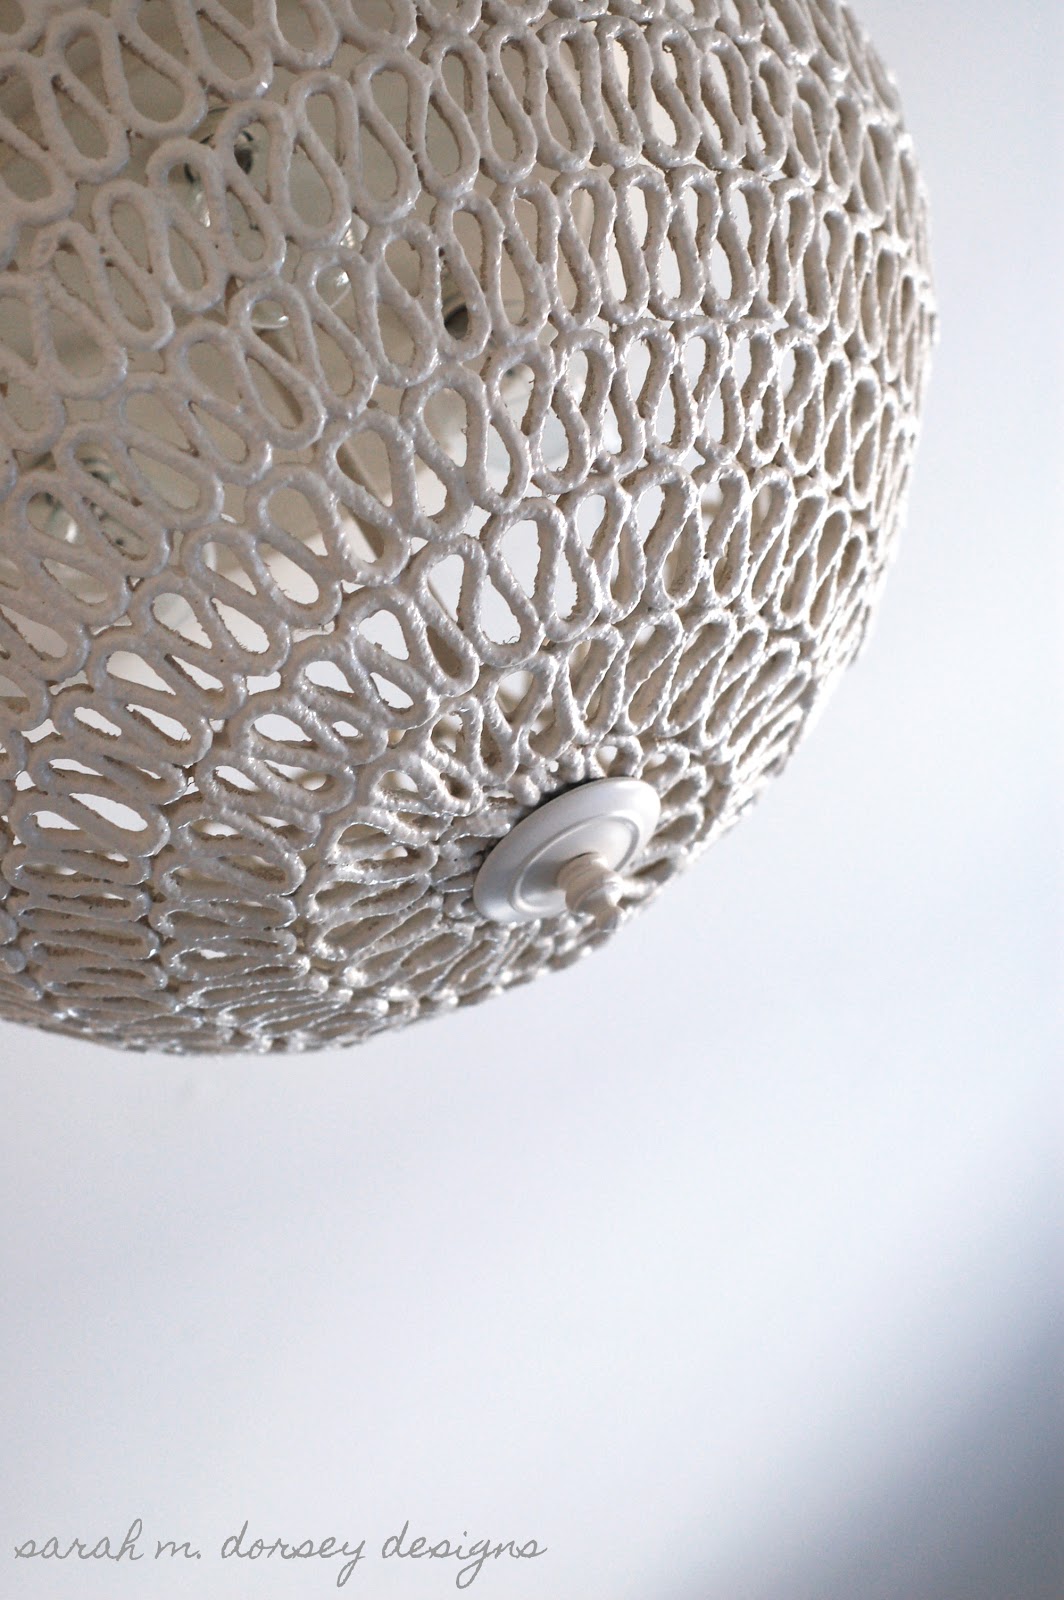
3. Wrapped painter’s tape (sticky side out) around a beach ball and wrapped the folded rope around around so that each row would touch
4. I brushed several coats of Mod Podge hard coat (allowing to dry between coats)
5. Spray painted heirloom white
6. and hung it in the bedroom!
if you are interested in doing this or something similar I would recommend reading the long version too 🙂

I gathered my supplies – quick dry tacky glue, Mod Podge hardcoat, painter’s tape, 100 ft cotton clothes line, and a standard beach ball … sadly this isn’t my first photo of my supplies, after folding 100 ft of synthetic blend clothes line I realized that the glue didn’t stick very well and it came apart too easily … I then purchased quick dry glue and a cotton clothes line, which stayed together much better!

I built a template for the rope out of extra wood by screwing screen mold into a 1×3 so that all of the folds would be the same height – the painter’s tape is not in the photo (because this was from my first attempt) but I ran it (sticky side up) along the bottom to attach the rope to. I would fold a 6′ section and once completely dry would move the tape and rope so I could work on the next section. The tape is important because otherwise the rope glues itself to the wood …
Also, I folded the section in the center smaller so that it will bend easily in that tight space.

Once all of the rope was folded and dry, I carefully removed the painter’s tape from the back of the folded rope.
I then circled it around the beach ball wrapped in painter’s tape (sticky side out) until about the center of the beach ball (took all of the 100 ft. of rope)

I applied the Mod Podge (I didn’t have enough of the hard coat, so I used regular Mod Podge in the middle coats) and allowed to dry between coats – the difficult part is not getting it too heavy otherwise it will fill some of the holes (I had to remove some once dry with an xacto knife)
I used about 4 coats on the interior and exterior and allowed it to dry between coats

I primed and then sprayed it with Rustoleum’s Heirloom White to give it and even finish (the cotton rope was a little dull)
My original plan was to use the existing fixture in the guest room, but since the shade could be easily seen through – it needed to be painted and since it’s a rental, that wouldn’t work (but maybe for you if you own?) … so I purchased this used fixture for $8 and removed the shade, I also purchased a longer threaded center rod to accommodate the height of the new shade (It was 12″ and we cut down to the correct height)

I lightly sanded the metal with steel wool and primed and painted Heirloom White
After turning the power off, we removed the old fixture and installed the new one …


Taking photos while holding the fixture wasn’t easy … a few came out ok 🙂
We put in 25 Watt round clear bulbs and secured the shade to the center piece with the painted existing hardware

While the shade is firm … it isn’t firm enough to support it’s own weight pulling on bottom center, so it was photographed with some wire to prevent it from sagging. I am hoping that the Mod Podge will harden over time (it is now off of the fixture), but if not, I will use resin, epoxy or something else to stiffen it. Anyone stiffened rope with success?
** Update: It took a few months, but the Mod Podge did firm up a lot! It is currently installed with cup hook below a recessed light, but I think that it would be strong enough to support itself as shown in these photos **
I am still deciding whether to put it in the guest bedroom


I like it here, but it looks a little small … maybe something that has a little more drop?
or at the first landing above the front door


There is currently a recessed light here, so since we can’t take it out … the shade would act as a diffuser – I like the way it redirects the light, the only problem is finding a good way to attach it to the ceiling/recessed light
decisions, decisions 🙂
Here is the cost and source breakdown:
Cotton rope (100 ft) $3.47 (wal-mart in the hardware section)
Mod Podge hard coast ~$4.20 (with coupon at Michaels)
Beach Ball .97 (wal-mart)
Painter’s tape (already had)
Spray paint (already had)
Fixture $8 (Habitat Restore)
Fast Dry Tacky Glue $2 (local craft store Beverly’s)
Total $18.64
Time breakdown … a lot … but most of that was trial and error and waiting for glue to dry!
I am seriously impressed with your ingenuity. That looks awesome! Well done! I'm pinning it.
So creative…so much patience!
This looks so great! I bet it makes some awesome patterns on the walls when its on 🙂
It does! I will try to take some photos at night 🙂
I'm in the process of decorating our great room in a beach house sort of way and love the rope lighting idea! I have six recessed lights that would look awsome done like this! Will need for them to hang down tho because the ceilings are are at least 25 ft. high. Love your work and thanks for sharing! Barbsanders29
Totally inspiring. Beautiful DIY results, great instructions, and so many clever innovations that can be applied to other projects, lighting and beyond. Wow and pinned. Thanks for sharing.
Robin @ happilyhomeafter.blogspot.com
It kinda looks like white chocolate covered pretzels!!! 🙂
I LOVE it!!! I'm thinking of trying this for our laundry room!
cool idea! this would be a really cute and cheap way to dress up boring apartment light fixtures!
i've used liquid starch to stiffen up yarn for a similar project but i'm not sure it would be strong enough for the type of rope you used. you could try soaking a piece, letting it dry and see how it holds up.
Hi Michelle! Thanks for the suggestion! 🙂
i love it congrats
Gorgeous…so inventive! And I've had an idea using rope for awhile, and hadn't figured out where to find it affordably….thanks for the resource!
Hi Cassie! Wal-Mart was by far the cheapest that I found! Looking forward to seeing what you do with the rope 🙂
Ingenious! I vote for the landing. You can see it every day and enjoy it more.
This is sooo cool! Pinned it! I have a couple of those horrid boob lights in my hallway and this would totally work there! Thanks, Sarah! I found you through Pinterest, from your other amazing mirror project! Great work!
Incredible. I'm going to try this to cover all the "boob" light in my hallways. Thx so much. Love your blog.
Very cool! I pinned!
Very creative and easy to do! Thanks for for cool pics and great instructions. Pinned. 🙂
Hi Sarah!
So excited to come across your website today! It is fabulous! I love this post! Your light is amazing! So cute! I just pinned it! Thanks for sharing!
-Amy Kelsch
The Mindful Shopper Blog
Thanks so much Amy!! 🙂
I found you through the modpodgerocks blog.
Beautiful project and great tutorial! Very clever idea of the template.
In case you can't find strong glue or the loops come loose, you could also stitch it together, it kind of looked like it in the picture where you had just laid it on the beachball. It would cost lots more time though.
I'll add it to my (massive) to do list, for things to do when we move to a house with garden and workspace (shed, garage, extra room) – now with a baby and toddler in a tiny appartment is not the time for this, but I would sure love to try this!
Really nice art. Playful. Thank you for the instruction on how to do it. Nice pendant light.
Are you kidding me! this is just awesome, I am moving into my house in a month and this is a must! Thank you for this post.
Thanks so much! Let me know if you try it 🙂
Love it! Using brown twine came to mind for a more rustic look which is strange as I'm very contemporary. LOL I just might try this with 18 gauge wire.
I hope the glass of that lamp is destined to be a terrarium…! 😀
I just discovered your blog, and it is my new favorite. You are amazing! I have loved this Oly pendant lamp for a couple years now since I saw it in House Beautiful. It has a prohibitive price tag thought. I had thought about a DIY version, but never came up with a good idea on how to do it. Yours is genius!
Thanks so much Alexis!! 🙂 sarah
So clever!! Just a couple of questions:
1. Did you do the entire shade in one continuous length of rope?
2. How did you end it?
3. Did you just go half-way down the beachball?
I'm thinking these would make nice decorative baskets, perhaps with different size balls!!
Thanks!:) 1. yes, we used one continuous piece of rope 2. We just ended it by stopping, so at one point the shade is higher and lower, we put it on the backside so it is less noticeable 3. It was about half way down the beach ball
I love your shade! About a week ago, I tried something similar with for a multi-head floor lamp using yarn saturated in mod podge hard coat. I used the yarn flat, no loops, and coiled it tightly around the original plastic shades, prepped with tape. Then I added a couple more coats of mod podge They came out great, but I contacted the Mod Podge people to ask questions about the curing time. I was told that I used the wrong product and that they wouldn't hold up. I figure since you've done a similar project, I'd ask you how yours has stood the test of time so far. Thanks so much
Great tutorial! I'd love to try this. I turned out amazing. Thanks
Amazing! You've got a new follower!
This is awesome! I want to try this for my pre-teen grand daughters room!
Nice variation on the mid-century modern (and post-) spherical or globe-shaped pendant lamp shade. Thanks for sourcing the affordable materials.
You are welcome!!
Beautiful! Will try. Love your detailed instructions and how you recorded the mistakes too.
thanks! Glad you found it helpful!!
This is absolutely beautiful and what a brilliant and creative mind you have!
If I lose what is left of my mind I’d like to try making a whole beach ball and then turn it in to a hanging fixture.
I’d have to make two haves and figure a way to attach them secretly…
Now if you get to it before I do send me an update. Sincerely—– Kris
Let me know if you do it!