
Yesterday I finished the headboard!
I fell in love with a square headboard with wings from Charm Home Design and decided to make my own version with David’s help of course!
Measurements below are for a queen bed; however you can easily adjust the measurements for any size bed, by measuring your frame and adding about 1/2″ to an 1″ on each side for the center measurement.
i.e. a standard queen mattress is 60″ wide, our frame is ~ 61 1/2″ so we allowed 62 1/2″ for the measurement between the wings so that the frame would fit easily inside. Even if your mattress is a queen, always measure because your frame may be different.


Once we had our plan, we gathered supplies:
62 1/2″ x 48 1/2″ plywood (1/2″), 1 x 4s, (for back supports), 1 x 6s and 2 x 6s (for side arms), 4 yards of fabric, 28 buttons to be covered, 62 1/2″ x 48 1/2″ foam (1″), batting to cover front and arms
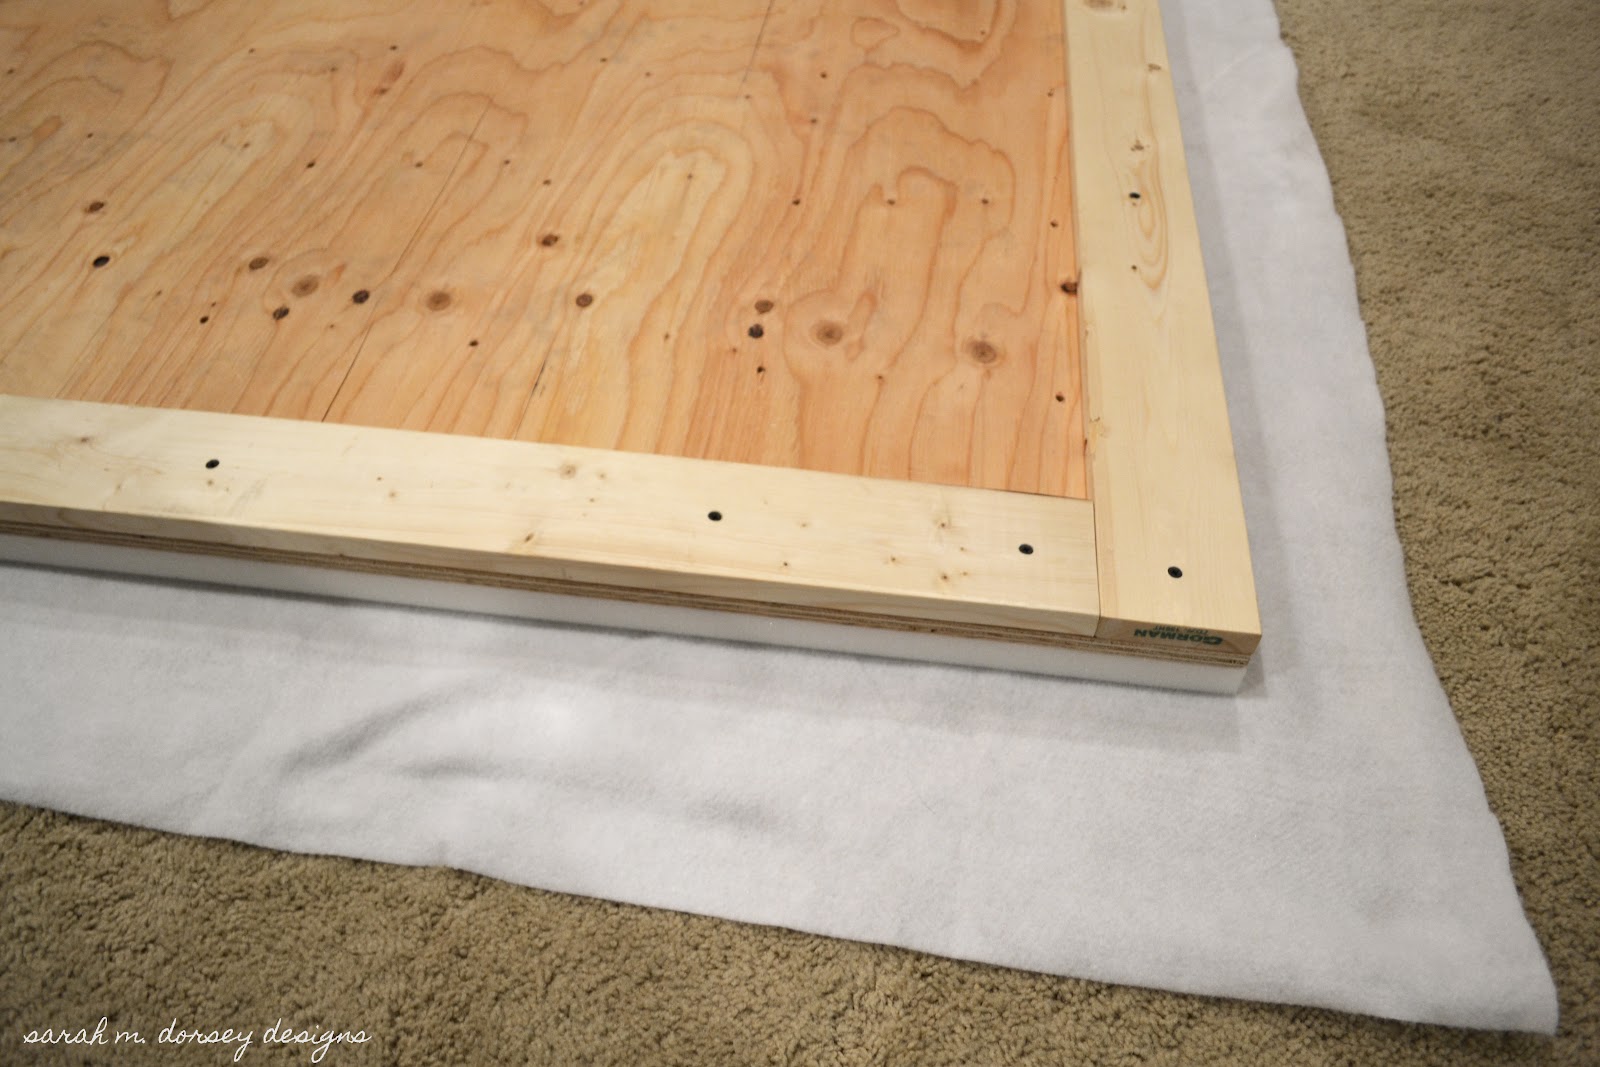
The plywood was cut to size, holes drilled in plywood for tufting, 1x4s were cut to build a support around the entire back
1″ foam was attached with adhesive to avoid it slipping while tufting
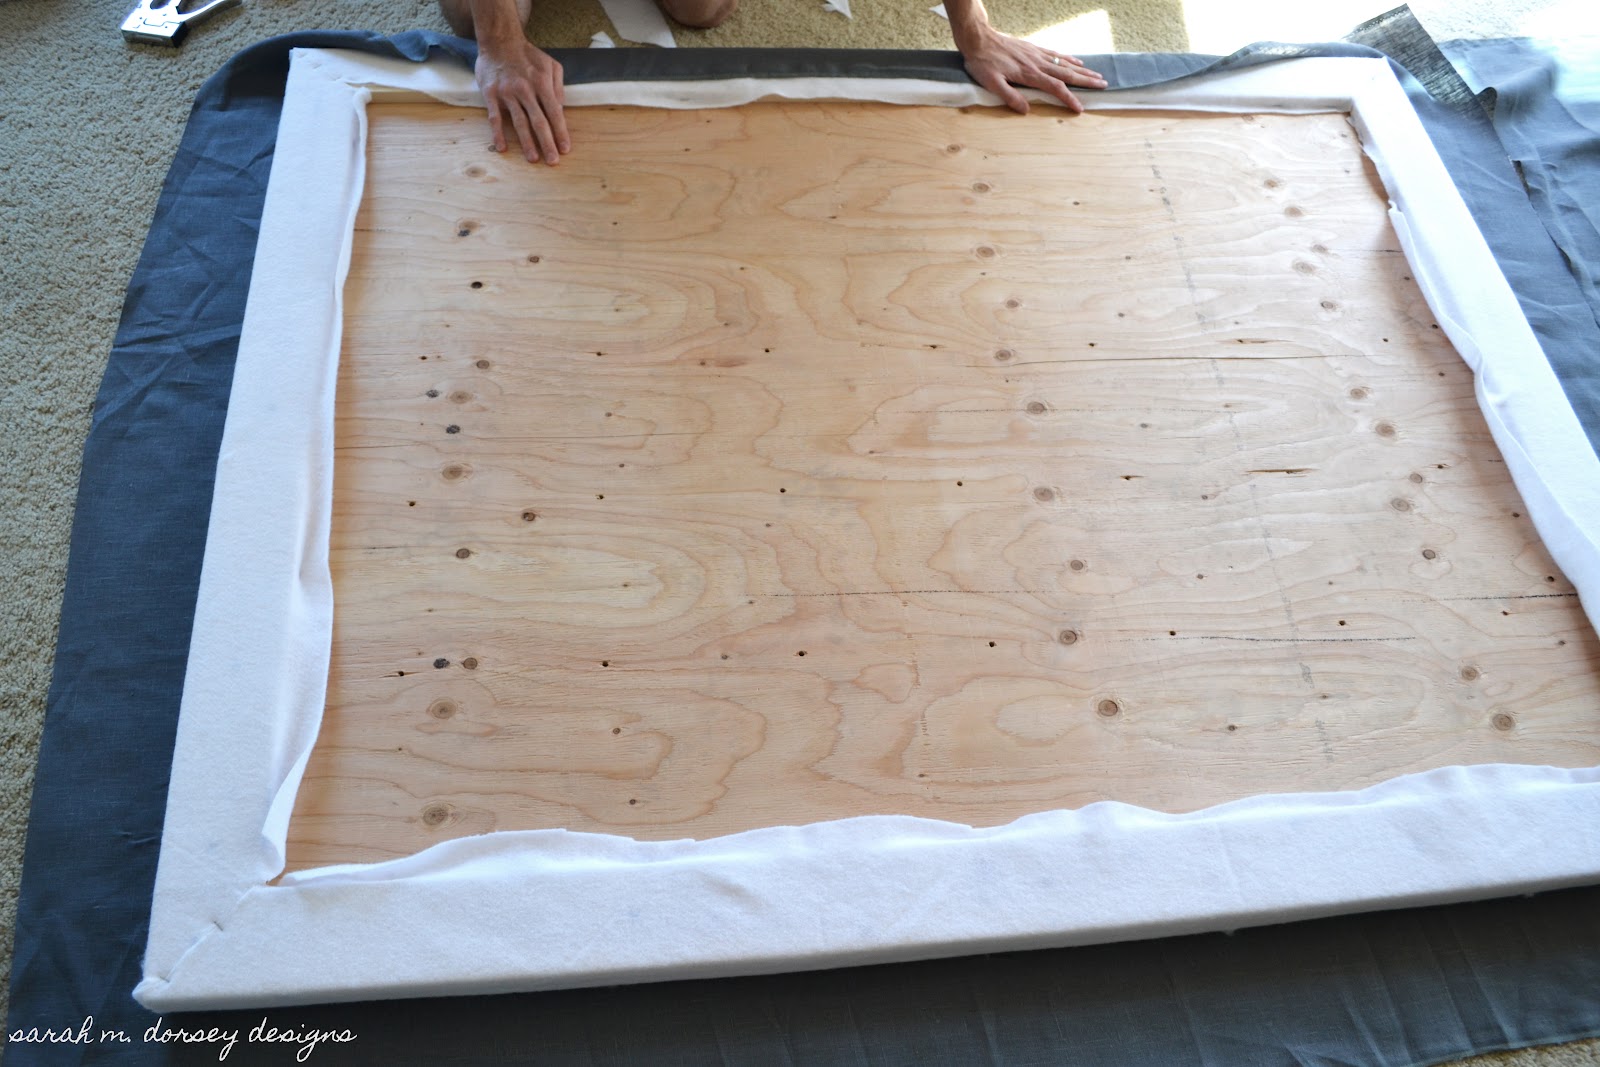
Batting was attached with staple gun, fabric on top (attached after tufting)

Buttons were covered with fabric (I also applied a small amount of gorilla glue on the interior of the button since I wasn’t using heavy duty button covers, to avoid them popping off)
I doubled up upholstery thread and used a long needle to tuft

Like the ottoman we made, I pushed to button from the top – pulling the fabric tight as I went

and David stapled from the bottom
Fabric was pulled tight and stapled underneath on all sides
Next the arms were attached – a 2×6 and 1×6 were attached together with screws – fabric and batting were cut to cover the arm – fabric and batting were placed in between headboard and arm then the arm was attached to the headboard – fabric was pulled tight around the arm and stapled to the back


pulling the fabric over the top – stapling on the outer side (staples to
be covered by next step) and then wrapping the fabric around the front
and side of the wing – folding the top edge to create the crease (excess fabric and
batting were cut off at this point too) and then stapling in the back


Price Breakdown:
Plywood ……………. $8.49
1 x 4s ………………… $4.98
1 x 6s ………………… $8.98
2 x 8s ………………… $7.58
Fabric (4 yds) …….. $40.00
Batting ……………… $14.98
Buttons ……………… $12.00 (28 buttons total)
Nailhead ……………. $13.82 (I used about half a 500 nail head box)
Foam ………………… $29.97
Total …………………. $140.80
Not bad considering the amount of fabric and foam needed!
i was wondering what color and type of fabric you use for this headboard? thanks!
Hi Val – Thanks for stopping by! It looks like the fabric I used is no longer available; this is the same fabric but a little darker
http://www.fabric.com/ProductDetail.aspx?ProductID=6cff044b-1b41-4bf1-9322-c70dfbecf490
I found the linen to be hard to work with – the fabric had to be pulled very tight to get the wrinkles out – but I love the texture so still decided to use it. Let me know if you have any other questions!
Hi Sarah I love your headboard and the nightstands lol. I wanted to know how long were the boards you used for the wings??? Also what size screws did you guys use to screw the wings on and the boards on the back of the headboard??? Again I love it the color is fabulous and the gold trim is everything lol. Oh that's what I forgot where did you get the nailhead trim tacks from???
Dear Val,
I love the headboard-soooo wonderful. I have two empty bedrooms I am trying to figure out how to decorate-then I saw this bedroom. I love the modern and shabby chic style. I want to decorate one of the bedrooms in this color scheme-the other-more masculine. I will have to find some ideas for the masculine look. I have older grand boys.
May I ask you what the measurements would be for a twin -size headboard? I would really love to make one as close to this one that is featured in your blog-but in a twin size. Thanks for sharing your talents!
Thank you! My measurements are for a queen bed – I added 2.5" to the standard queen measurement to account for the metal frame that sticks out a little from the mattress – for the back piece I would measure from widest point to point and add a little extra (so the mattress will fit inside the arms) – for a twin this will be approximately 41.5" (but will vary based on your bed frame) – please let me know if you have any other questions!
Thanks! Sarah
Your headboard is the best DIY I've seen in blogland! Can you explain how you attached the arms to the frame, particularly with fabric in place?
Thanks, Kari
Thanks Kari!! After the fabric was wrapped tight around the headboard – we placed the batting and fabric roughly cut to size (leaving enough to wrap all the way around the arm) in between the headboard and arm. Since you won't see the fabric there – we cut a small hole in the batting/fabric for the screw to go through (the trick is lining it up!) – the arms were also pre-drilled so that the screw would go in straight (make sure the screws are long enough) Hope that makes sense, if not feel free to ask! If you try it, I'd love to see pictures! Sarah
I love this and have been looking for a King size head board similar to this so I just might try to do it myself. Since this would be my first DIY can you please explain what batting is?
Batting is a thin dense fiber – used in this application to hold materials tight and smooth out imperfections. There is a link above under price breakdown for what I used. Hope this helps!
I'm curious as to what you did with the fabric at the top end of the arms of the headboard, did you fold and tuck it under the sides before stapling or sew a small slipcover?
Thanks for your question! I updated the post above to include a photo and a description of how I did the corner. I folded and tucked the fabric; however, a slipcover would probably work well too. Hope this helps! Thanks, Sarah
Awesome! Thank you!
I love this headboard and all other projects of yours. I am a new follower. =) My husband and I just got a house and in the process of remodeling. We are painting the master bedroom gray ( SW agreeable grey) with an accent wall in darker shade ( SW Anonymous). I'd like the combination of grey and yellow and throw in a bit of purple or lavender in for a fresh but intimacy look. What color do you recomend for the headboard ? Thanks !
Thanks so much for your comment! A lavender gray solid fabric for the headboard could look nice or a pattern that plays off of the two grays that you are using could also work (hard to say without seeing what else you have in the space!) Keep me updated!
Thank you…let us get started…and i will give you an update. Sorry for bothering, but i think i will be asking more questions. I love your bedroom so much !
This is just gorgeous. It looks so professional! I shared this on FB and Pinterest.
Thank you so much for your kind comment and for sharing!!
A friend forwarded me your blog- this is fabulous! I have curtains in the same fabric as your pillows and that headboard would look awesome in my bedroom…I might just have to make one:) Great job!
Hello Sarah! Love this headboard! Thanks so much for sharing. Question: How did you attach the headboard? Did you screw it into the metal frame or did you use french cleats on the wall to stablize? Appreciation in advance for your response.
Lucinda
Hi Lucinda! Thanks for stopping by! The headboard is actually not attached the the wall or the metal frame, and simple sits between the bed and wall (the wider arms stabilize it while the bed locks it in place) We haven't had any issues with it moving. Since this isn't technically correct, I can't recommend it; however, it does work well for us. Hope this helps!
I love the contrast of the wall color with the headboard and other colors in the room. Do you know what it is?
The walls were painted when we moved in, so I am not sure of the exact color – it is close to SW dover white …
Hope this helps!
Do you have measurements for the buttons? How far down did you put the first row, and the spacing between?
Thanks
Do you know what the measurements would be for a king bed? This is the best of the DIY headboards I have seen!!!! Thanks so much for sharing!!!!
The measurement can vary based on your bed frame. I would measure the width of the frame and allow about 1/2" to 1" on each side for the center board measurement (so that the bed will fit between the two arms). Hope this helps! 🙂
Thanks for sharing your wonderful instructions, I decided to take the plunge. It was truly a labour of love and it's kick-started my DIY passion for upholstery.
Wow! I abosolutely adore your style. Gorgeous.
Saw your feature over at 6th Street Design School and had to check out the headboard. I hadn't seen anyone else DIY a headboard with the wings. You did a very nice job. It looks super classy!
LOVE this! It looks so high end. 2 questions: What width of fabric did you use to avoid seams? And are you able to elaborate on how you joined the side panels and wrapped the fabric around them. Specifically, do the side panels have a separate piece of fabric or is it the same piece as the headboard but wrapped around??
Thanks a million. You've inspired me (and subsequently made my hubby's list of things to do one project longer! lol )
Hi Nicole, Great question! The fabric was 58" wide, but we ran it the other way, so it took just under 2 yards for the width (would only work with a solid, unless the print looks good sideways) and then the height (48.5") had plenty with the 58" width. We also got the length of the arms in one cut by the same method, so the length of those was about 2 yards as well. Total we used almost exactly 4 yards.
Yes, the side panels do have separate pieces of fabric, a little extra on the top and bottom to wrap those edges. The arms were attached to the body with long screws, and we cut little holes in the fabric/batting for the screws to go through so the fabric wouldn't pull.
Hope this helps! Let me know if you have any other questions.
Sarah 🙂
Sarah, Thanks for adding the details about the side panels! That is super helpful. I have more questions now that I have been shopping for supplies. I am only able to find foam that is 24 inches. Therefore I'd have to put two pieces together to cover 48 inches. I'm not sure if that would show through my fabric in the form of a crease once the tufting is done.
So, here's my question. Would I really have to cover the area behind my mattresses with foam? Could I just make the upholstered headboard to go down a few inches behind the mattress but not all the way to the floor? That would save on wood, fabric and foam and make it even more affordable. Please give me your feedback. Thanks a trillion!
Oh, and what size buttons did you use? Okay, I think that's all! 😉
Hi Nicole, yes you can put two pieces of foam together, just make sure that you use spray adhesive so that they don't slide around and a few layers of batting to cover the seam. Also, I would put the seam in between a row of buttons. I would say as long as the mattress is covered with some extra allowance, you could make it any height that you wanted! Sarah 🙂
and buttons are 3/4"
I love your posting. This is a project I want to tackle for my master bedroom. I've done a diamond tufted headboard (for my guest room) but my goal is to create a wingback tufted headboard and wasn't sure on how to do the "winged" part. Thanks for the inspiration and tutorial. At some point I'll get started on mine. 🙂
I love this, beautiful work! I'm trying to collect my supplies now! I have not been able to find the foam though for a reasonable price. Where did you get yours? Thanks so much for sharing your wonderful idea! I can't wait to get started!
Tara
Hi Tara – Thank you!! I purchased my foam at buyfoam.com. The price is pretty good but shipping is costly, so if you need foam for a few projects, order at one time. If you have a Hobby Lobby near by, with a 40% coupon their foam is well priced. Egg crate mattress toppers (flat side out) is also a good option. Hope this helps 🙂 Sarah
Do you have the name of the exact nail heads that you used? I'm looking on the website that you linked and they seem to cost a bit more than you got yours for…unless maybe you had a coupon?
thanks!
ALSO, do you know roughly how many nail heads you used?
Hi! Here is the link: http://www.diyupholsterysupply.com/BR1558/upholstery-nail-716.html
I used about half the box (about 500 nails), so I cut the price in half… Hope this helps!
I love your room! I'm changing the master to greys and yellows right now. I've been looking for bedding similar to yours. Why did you get it?
Thank you! The duvet cover is from Target and I made the pillows from Thomas Paul Dahlia Dove, Covington Winsor Citrus, and Waverly Stepping Out Sunshine.
Sorry, where did you get?
Absolutely love this and will be making mine next weekend! I'll be sure to link you to the project when I do it 🙂
Could you tell us how you laid out the buttons for tufting please?! The spacing?
Sure! I just measured, they are about 4" from the top and about 8" in between each button.
This is absolutely GORGEOUS! Definitely adding this project to my "must do!" list!!! Thank you so much for the great tutorial!!!! 🙂
Thanks so much Cristina! Let me know if you do it, I'd love to see pics!
I did it! Thank you SO much for the awesome inspiration! I've just posted pics on my blog of my completed headboard.
http://thepaintedkey.blogspot.ca/2013/03/our-new-headboard.html
Thanks again!
This one is on my to do list, just beautiful
Ok so i have made this headboard and its now time to attach the sides…do you screw it into the side of the plywood or the extra support we put on the backside? How many screws? Please help lol. My husband comes home from deployment anyday now so i need to finish it up. Thnaks
Hi! I just added an additional image (in the post) with text to explain how the wings attach better. Let me know if you have any other questions! Best, Sarah
Hi Sarah!
My room is a similar color scheme and i'm having the hardest time finding a cute dust ruffle for the bed. Where did you find yours? Did you make it? I couldn't find a post about it within your blog and would love to know!
Thank you!
Hi Sarah!
I made the bed skirt just before I started my blog so no post, but I did make it out of Covington Windsor Citrus. Hope this helps!
Hi Sarah– I loved your headboard so much I had my husband help me make it this weekend. We did everything the same with the exception of the buttons. It turned out beautifully–thank you for your easy-to-follow instructions and inspiration 🙂 Caitlin
Hi Caitlin, Thank you! So glad that your headboard turned out well! If you take photos, I'd love to see them!
Amazing…I will have to try this with my Daughters bedroom.
I would love to know where you are getting your materials from. I have been searching for foam, batting, and other supplies and don't find anything as cheap as you list. Please help!
Hi Christa! I have a few links to some of the products at the bottom of the page under price breakdown. I purchased foam from buyfoam.com, I purchased for a few projects so it made sense to pay the shipping. If you are only purchasing foam for this, I would check Home Depot. Mine sells a thick 3" foam camping pad that could be cut in half (cut side down) you can hide the seam with a few layers of batting. If you don't want to cut it, I would look for a foam mattress topper, they cost around $15-20 at Wal-Mart. Fabric.com has the best price for batting that I've found. Joanns and Michaels can be great resources for supplies too because you can use the 40% or 50% off coupons. Hope this helps! 🙂
Hi Sarah,
I love the headboard!.
Did you attach the headboard to the bed frame? Or to the wall? Or does it stand alone?
Thanks,
Kerri
Hi Kerri!
The headboard stands alone and is balanced by the arms and from being wedged against the wall. We haven't had any issues with it moving, but I would still recommend attaching it to the frame or wall. I did a quick google search and lots of pages came up 🙂
Hello Sarah,
I know you said that the exact fabric you used is not currently available; however, could you give me maybe a description on what type of fabric you chose and why you may have chose that particular one? Also, did you make the buttons using the same fabric and how did you go about doing that?
Hi Ami,
I chose a linen because I love the texture to it. A few other bloggers have recommended this linen: http://www.graylinelinen.com/index.php/linen/warsa-linen-49-colors-50.html/
Due the wrinkly nature of linen, it can be hard to work with. I would recommend starching prior to using or using a thicker, smoother upholstery fabric.
I made the buttons with a a kit from here: http://www.joann.com/craft-cover-button-kit-size-36/zprd_10687838a/. Also, I did use the same fabric. Hope this helps! 🙂
Thank you so much. This is one of my first DIY projects so I am a bit nervous, but you have to start somewhere yes? I did want to ask you a couple more questions though, so is this the best way to do it or is emailing you easier?
you can email me at sarah.m.dorsey@gmail dot com
thanks!
LOVE the headboard! Was it hard to get the nail heads straight?
It wasn't too bad. I think it just takes a little practice 🙂 Here is a post where I talk a little more about my technique: http://sarahmdorseydesigns.blogspot.com/2012/08/tips-for-applying-nailtrim-and-what-im.html
I was just wondering, would you say this would be a hard DIY for someone who has never done any real DIY's before or ever worked with wood? I've fallen in love with the idea of making this, but I have never done anything like this. Also, could this be done in say a weekend or would you need more time?
Hi Selena – This took a good part of two days. I would say that the hardest part would be attaching the arms and applying the nailhead. It's a lot of pulling and stapling which is pretty tiring, I would definitely recommend getting a friend's help!
Hi Sarah,
Thank you so much for the reply. Great, I'll get some help with this. I had another question for you, if you don't mind. I am redecorating the guest bedroom in my house, three of the walls are a light grey color and the accent wall has this wallpaper on it: http://www.anthropologie.com/anthro/product/home-wallpaper/860077.jsp I was planning on putting the bed against the accent wall. What color fabric/type of fabric would work best?
Thanks again,
Hi Selena – Gorgeous wallpaper! So many colors work so well with gray, the possibilities are endless! Feel free to contact me at sarah.m.dorsey at gmail.com if you would like to discuss my design services. Thank you!
Hi Sarah,
Love this post and all decor you have used in this room. I was wondering where you got your lamps? Thanks!
Oops, never mind I just found your post on the diy lamps;)
Hi there I was wondering what kind of buttons you used?
I purchased a 7/8" button kit from Joann fabrics, here's the link: http://www.joann.com/craft-cover-button-kit-size-36/zprd_10687838a/
Hi Sarah, I am planning to build and upholster a bed for my college age son. This will be his bed for a long time I expect. What you did is spot on for what I am planning to build. It was great to find your instructions. You have taken care of so much of the planning for me. My bed will be covered in a gray chenille upholstery fabric. It is surprising our similar our bed will look. I think that I may shape the arm a little differently.
I also have the companion desk and dresser to your side table that I am painting for his room. I am using Annie Sloan chalk paints. Just took a class for using her paints. Can't wait to give it a try.
Your craftsmanship and eye for design are excellent!! Thanks for sharing all of your projects. I look forward to following what you do next!
Hi Gayle, let me know how it goes! 🙂
The headboard looks amazing. I have a question on how and why you attached 2×6 and 1×6 were together for the arms?
I can't wait to try this!
Hi Lauren, The 1×6 and 2×6 were attached because that was the easiest way that I found to achieve the thickness of the arm that I wanted. You could make them thinner, just a matter of preference 🙂
Can you please tell me if you cut holes in your foam prior to placing your buttons?
I didn't cut the foam. I found that it didn't need it since the foam was only 2". For deeper tufts, I would recommend it! 🙂
Hi Sarah,
Do you recommend using 1" or 2" foam for the headboard?
we used 1" foam
Thank you so much for this diy project! I followed your instructions with a few modifications. I did this myself, so it took me quite a bit longer…along with quite a bit of cursing during the arm attachment portion of the job. 🙂 But I'm really happy with the result! Thank you!
http://www.flickr.com/photos/akussman/8585050325/
I'm still a little confused with the buttons….what is the point of the threading and how did you get the needle to go through the plywood? Sorry if this seems like a stupid question….first DIY project ever for me lol
Before installing the foam, we laid out the pattern that we wanted for the tufting, drilled holes through the plywood, used a long needle and heavy duty upholstery thread to pull through the hole to the back of the plywood and then stapled a few times to make sure it was secure. Hope this helps! 🙂
Oooooooooooh thank you so much!
Hi Sarah,
I just wanted to let you know that I featured your headboard in a blog post of my favorite DIY headboard roundups at this link: http://www.lilikoijoy.com/2013/04/15-favorite-diy-upholstered-headboards.html
Thank you for inspiring me! I appreciate the instructions and the headboard turned out beautifully. Sharon
Hi Sharon, Thanks SO much for including me!! 🙂
Did you only have the arms acting as the legs or did have additional boards run past the plywood for additional support?
The arms are the only support. The 1×6 and 2×6 combined make a pretty substantial support on each side. See the first diagram (second image down) for more info.
You are absolutely AMAZING!!! Like others have already stated – this is BY FAR the best blog and detailed instructions I've found for the headboard!!! Thank you SO much for sharing! All of your stuff is SO great!
I'm sorry if I missed this somewhere . . . . but, did you make the bedskirt for your master or did you buy it somewhere?
Hi Elizabeth! Glad that you found my instructions helpful! 🙂 I made the bedskirt just before I started my blog, but I later made a short tutorial,
Here you go: http://sarahmdorseydesigns.blogspot.com/2012/10/how-to-make-custom-bedskirt-from.html
I have a question Sarah, What is the distance from the edge of the headboard to the first road of buttons? thanks
They are about 4" from the top 🙂
awesome I just started to make my headboard today, ill post the pictures so you can check it out. I just finished the frame and tomorrow im going to predrill the holes for the ruffing and add the sponge, thanks for your great tutorial.
sara
It looks very very nice, and I love the color combination.
Love this headboard tut…thanks so much for sharing it! Just found your site….LOVE LOVE LOVE! Am your newest follower.
K
Hi Kelly! Thanks so much for following along!! 🙂
Sarah, how did you secure the buttons on the back of the headboard? I can see the staples, but mine won't hold…..could you give more details? Thanks, Lynn
Hi Lynn, We stapled a few times (about 4 staples per tuft) and used a hammer to hit in any staples that weren't tight before moving onto the next one. Hope this helps! 🙂
Hey, I used your tutorial to make my headboard and just blogged about it, so I just wanted to say thanks! I added a few of my own blunders/lessons learned in my post. Your tutorial was so helpful–thank you! 🙂 http://lisaandbryan.blogspot.com/2013/05/diy-upholstered-headboard-with-nailhead.html
Thanks so much for sharing Lisa!! Looks great! 🙂
Hi Sarah, my wife and I are reviewing your post to make a headboard as well. Wondering where you sourced your plywood cut to size. We are finding places like Home Depot and Lowes have 4×8 pieces which will not work for our dimensions. Hope you can help. Thanks, Tega.
Sarah this looks so fantastic! It is the prettiest headboard out there. It looks so fancy and expensive. I'm going to attempt to make this.
Thanks so much Jenn! 🙂
I really like your bedding. I saw that you said that it is a duvet cover from Target. Is there also a separate piece underneath the duvet? I am wondering what the printed, kind of off white/beige piece is.
The beige floral is a coverlet from TJ Maxx, I think the brand is Bella Lux 🙂
Amazing, you have some talent!!! Great explanations and pics too. Thanks for sharing
Thanks Diane!!
Lovely. But how is it attached to the bed or frame?
Thanks for stopping by! The headboard is actually not attached the the wall or the metal frame, and simple sits between the bed and wall (the wider arms stabilize it while the bed locks it in place) We haven't had any issues with it moving. Since this isn't technically correct, I can't recommend it; however, it does work well for us. Hope this helps! You could also buy a kit to attach it to the frame or use french cleats to attach it to the wall.
Love this! How many 1X4s did you need and how did you use them? Also I saw you have 2X8s listed. What did you use them for?
Hi Arin – We used 4 1x4s to frame the back (4th image from top) and 1 2×8 + 1×8 (screwed together so they were the thickness that we wanted) for the arms.
Hello,
First of, I love the headboard! AMAZING JOB, thank you for the DIY instructions…I'm currently redoing my bedroom and will be doing my own upholstered headboard and will most likely follow your instructions.
I do have a question that has nothing to do with the headboard though…would you know the paint color for the dresser next to your bed! I sort of want to match it haha.
Again, great job and thanks in advance!
Hi Marcin – I think that it is close to SW Oyster Bay. If I'm remembering correctly SW Oyster Bay was a little too green when I first applied it, so I asked SW to make it a little more neutral. Sorry to not have exact color. Hope this helps! 🙂 sarah
Okay, sounds good! Thank you so much Sarah!
Hi Sarah,
I am wanting to tackle this project next weekend and was slightly confused on the thickness of the arms. I know that you used 2 pieces of wood at 1" and 2" thicknesses, but the other width confuses me. In some areas you state that you used a 1×6 and a 2×6, and in others it says that you used a 1×8 and a 2×8. I imagine that I could use either, but I really like the thickness that you chose to use. 🙂
Such a beautiful headboard! I love linen too, do you think that using a stabilizer would work well with the pleating?
Can't wait to give this a shot!
Thanks in advance!
-Susan
Hi Susan, I did another headboard with arms that I used 1×8,2×8, so I was mixing up the two 🙂 This one uses 1×6,2×6. I think a stabilizer would be a great option (i've never tried that). Having the fabric as stiff and straight as possible would help a lot!!
I love this amazing headboard! I am using a fabric similar to the one you used, did you wash it before you used it?
Wow, your headboard is soooo pretty! I love everything in the room, you have very good taste 🙂 I can't wait to make one for my new house… Thanks for sharing!
This is SOOOO Awesome, I just love it!! I'm going to make one for my son's room. Thanks for such a detailed tutorial!! : ) Monica
Hi Sarah! I've been eyeing your tutorial for a very long time! I moved and I finally can try it out! I'm really sorry but is there anyway you can give me a breakdown on exactly how many wood to purchase when I go to home depot? A list would be perfect…I can go to the wood specialist and tell them exactly what I need. I was confused when I was reading your list. Sorry I'm a first timer. Correct me if I'm wrong..
One of 62 1/2" x 48 1/2" plywood (1/2")
Four 1 x 4, (for back supports)
Two (60''?)1 x 6 (for side arms)
Two (60''?) 2 x 6 (for side arms)
Did it get this right?
Thanks Sarah!
-Tran Nguyen
Hi tran, that sounds correct (it's been a while, so hopefully I'm right!) Thanks! Sarah
Hi Sarah,
Your DIY headboard is AMAZING (though I guess I'm not the first to say that!!)
Do you think this would work using felted wool? I have some left over from when my couch was reupholstered. Or would that be too thick/stiff for the tufting?
Thanks so much for your help!
Maggie
Hi Maggie! Thank you 🙂 I would think felted wool would work. Since the foam isn't very deep and there aren't any folds which makes it easier with thicker fabrics.
Hi Sarah,
I'm so glad I found your blog, I've been like a dog with a bone for months now trying to find a UK supplier of a similar headboard I saw for sale on a US furniture site.
My search eventually led me here and I'm so impressed with your headboard that I'm going to give it a go. I just have a few questions regarding measurements. I'm not familiar with the terminology used to describe the plywood measurements for the supports and arms, what does 1x6s, 1x4s and 2x8s mean?
Thanks in advance
Edie
Hi Edie! Here's a page with a little more information on US lumber sizes: http://www.familyhandyman.com/carpentry/making-sense-of-lumber-dimensions/view-all
A 1×6 is actually 3/4" x 5 1/2", 1×4 is actually 3/4" x 3 3/4" and etc. Hope this helps! Good luck making your own! 🙂
would you consider making another just like this and selling? i would be interested in purchasing if so. I am just not talented enough to make this but LOVE it.
Yes, but local only (Ohio or Maryland) since shipping is so expensive! 🙂
Your tutorial inspired me so much to recreate it. The instructions were very easy to follow along with some trial and error. Thank you so much! I would love to email you pictures of my results.
I love this and the rest of your blog! I'm hoping to get a headboard made while my husband is out of town. Just wondering why you framed out your plywood with 1×4's. I understand that you need wood to screw the arms into, but is it necessary to have the 1×4's across the top/bottom? Thanks!
Hi Lindsay! Building a frame around the entire back makes it more ridged .. so it's less likely to break when moving it
So great. Thanks for the tutorial. Where did you get the nailhead? I can't find more than a 12 count box at my local craft store.
Hi! Link for the nailhead is at the bottom of the post 🙂
Hi Sarah! love your headboard! I just gathered most of my supplies today and waiting for buttons and nail heads in the mail 🙂 I have some questions for you. This is my very first DIY project ever and i am a bit intimidated. When framing the plywood, did u use a certain GLUE or did you NAIL it? Was there a certain type of batting that you used? Also how did you locate your holes (that were drilled into the Plywood) through the foam fabric and batting? Did you mark the holes on your fabric as well?? Also Will I be okay making my winged arms a little bit longer then 60"? My frame is raised so i thought i needed to make the winged arms 64".
Sorry for all the questions and thank you in advance for your response
Hi! We used screws to attach the back supports (1x4s) (screws are much more secure than nails) The batting I used is in the sources list at the bottom of the post – I like the heavier, cotton like batting, but any will work. To locate the holes through the plywood, use a chopstick (or something similar) and poke through the back – I poked through, stuck my long needle through the front and then pushed the chopstick out the back, that made finding the hole much easier. Adjust the height of the arms based on the height of your bed – 60" height works well with my bed / frame. Hope this helps! 🙂
Okay gotcha. I feel a lot better now! oh yeah, am i okay using a regular hammer on the nailheads? thank you for the additional info!
I use a normal hammer, but it can damage your nailhead .. you can find hammers with a rubber tip specifically for nailhead at upholstery shops
hello, I was wondering how many of each kind of wood do you need for the headboard?? Thanks
Hi taylor! 62 1/2" x 48 1/2" plywood (1/2") (1 sheet of plywood) // 1 x 4s (for back supports) (qty 4 – 8' boards) // 1 x 6s and 2 x 6s ( qty 2 of each) (for side arms)
Sarah, is batting basically the padding for the headboard? I am thinking about doing this for my King. Did you have any of the full size leftover….I'm wondering if I need to get a bigger size of batting.
Thanks, Morgan
Hi Morgan! The batting is placed between the foam and fabric, it helps smooth everything out. For the size, measure your bed (for the back plywood) and make it a little larger, then get extra to cover the arms as well.
I LOVE this headboard and have begun the hunt for supplies, however I am confused with what I need for the wings as far as the wood goes. Can you help me with that? I also and considering using a pegboard instead of plywood. I am wondering why you choose plywood instead. Also, I love the lampshade you have, it would match our room perfectly. Where did you get it? Thanks!
Hi Shelby!! 1 x 6s and 2 x 6s (for side arms) Screwed together to get the width that I want. Pegboard may be too thin. You need to be able to screw the arms in and support the weight of the headboard. The lampshades are from target
Thanks for your quick response. So 2 1×6's and 2 2×6's right? Yeah I am planning on securing a frame of 1×4's to the pegboard so I think that will work.
Thank you for the tutorial. I'm thinking I need to break out the power tools and do this.
Hi Sarah! I love your blog. I actually made a headboard following your instructions and it came out beautifully. Thank you so much!! 🙂
Hi! I love your blog and your design aesthetic! Bright and bold is exactly what I love. I have question. I have a charcoal grey nailhead trim headboard exactly like this one and I am in love with your bedding here. I want to do a patterned bedskirt with white duvet and pillows in grey white and green patterns but I am unsure of what to do with curtains. I looked but couldn't find a picture of what kind of curtains you had in this room. My walls are lighjt lime green. I was thinking of maybe doing them in the matching fabric as the bedskirt but is that oo matchy-matchy? Should I just leave them plain white? Should I do them in one of the grey and white patterned fabrics from my pillows? I am stumped and could use advice. Thanks!
Hi Julie! 🙂 Feel free to take a look at my design services page: http://sarahmdorseydesigns.blogspot.com/p/design-services.html
It says that you used 500 nail heads and then later says you used half of a 500 count box. How many did you actually use so I can make sure to order correctly?
Thanks!
I think the box was actually 1,000, so around 500.
Thank you! Another question: What size holes did you drill for the tufting?
I think it was around 1/4", maybe a little bigger
Lovely!! How did you hang or attach the headboard?
When you say that you used around 500 nail heads, would you say it was a little more or a little less? I would rather purchase a box of 500 if I can get by with it. I don't know what I would use the remaining nail heads for if I were to buy 1000! Thanks!
Hi Sarah,
Love the headboard! I was going through the comments and found the same question I was going to ask- but the reply shows that it was "removed by author". Anyway, if I may ask again, plywood sizes that I found were 8 ft x 4 ft from both Home Depot and Lowes. Converting the requirement from inches to feet, 5.2 feet x 4.04 feet. Unless the 8×4 ft will work, any ideas where I can get a bigger sheet of plywood? thanks so much!
Thank you so much for this tutorial it is by far the most easy to follow out of all the ones i've found. I am so excited to make my headboard this weekend! 🙂
I have all the tufting done but the leg portion I am not really understanding on the bottom half of the legs since the bottom Is by itself and not connected to the head board. do you cut it where the 90 degree angle is from the head board and the legs? thanks so much
Ginger
I have all the tufting done but the leg portion I am not really understanding on the bottom half of the legs since the bottom Is by itself and not connected to the head board. do you cut it where the 90 degree angle is from the head board and the legs? thanks so much
Ginger
I'm not following – feel free to send a photo to my email!
Did you staple the fabric on all four sides before putting the buttons on? Or do you put the buttons on first and staple afterwards? Thanks!
Buttons first, then staple. Thanks for commenting!
One question.. you said "Batting was attached with staple gun, fabric on top (attached after tufting)" SO I do NOT staple the fabric till AFTER I saw all the buttons on?
Yep, tufting before you secure fabric and batting on the back