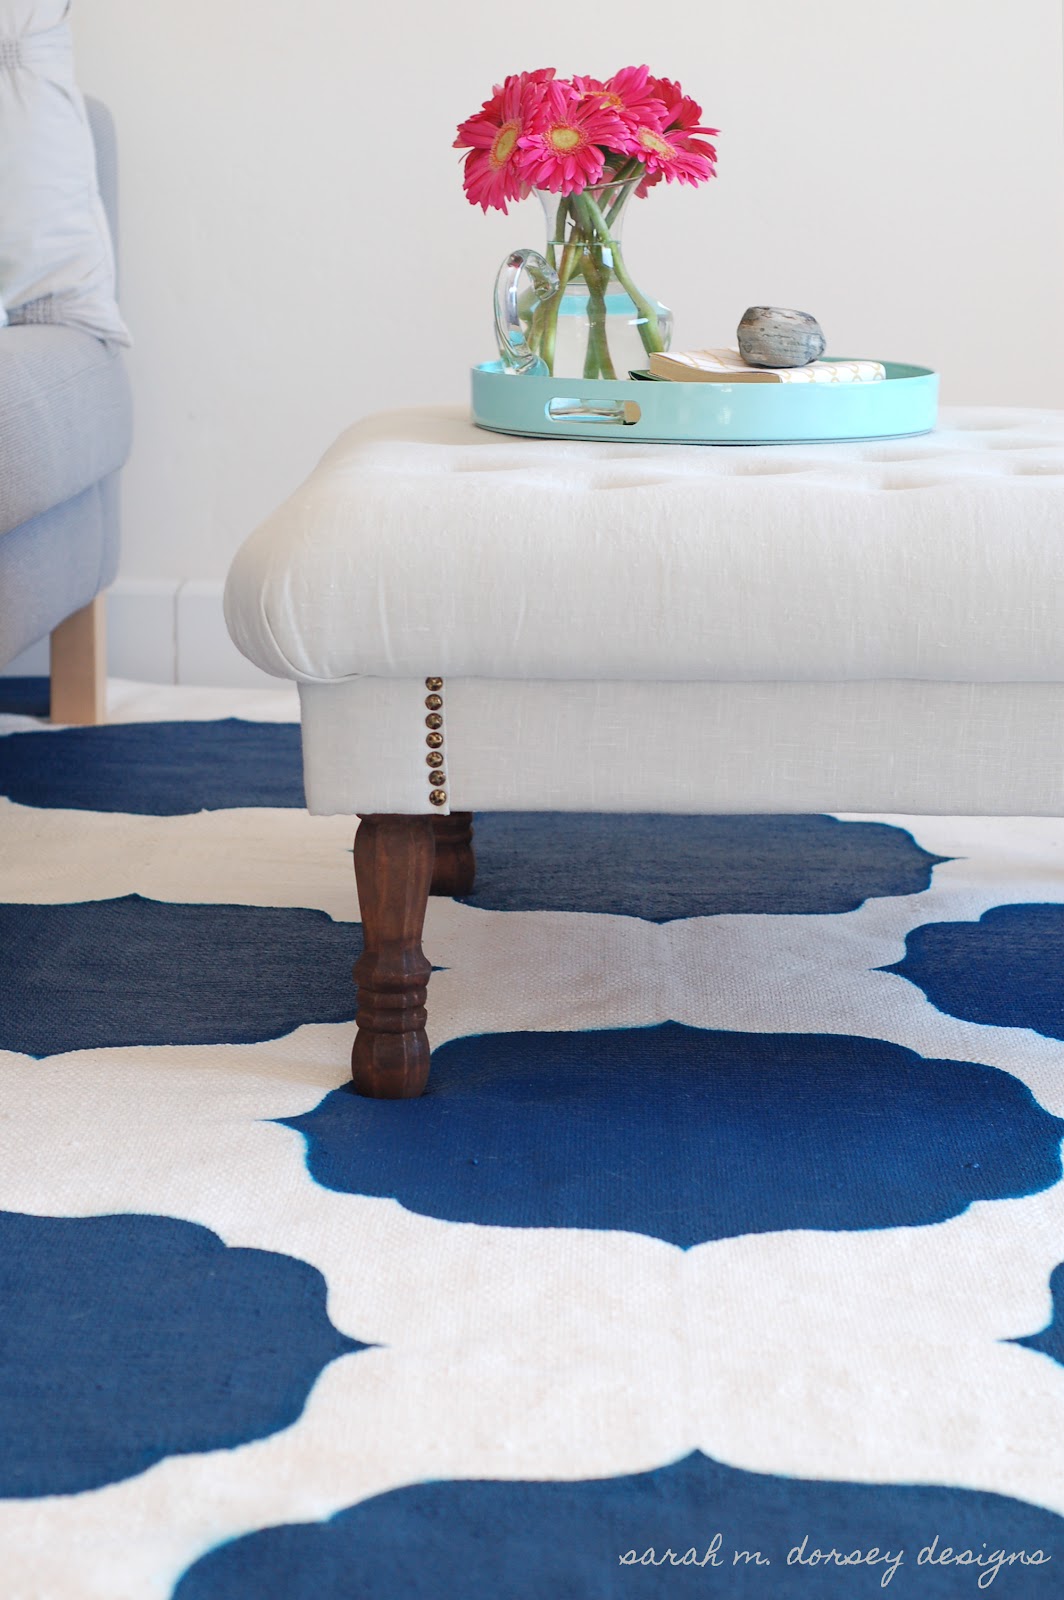
Yesterday I finished painting the rug for the living room!!

click here to read about the ottoman!
first I added the dimensions of the rug and a quick sketch of the pattern to my sketch up model

gathered supplies …

sw loyal blue, fabric medium, plywood for the stencil, and a rug (5’11” x 8’2″) from Ikea
then I created a design in illustrator – printed on several pieces of 8.5 x 11 which were taped together
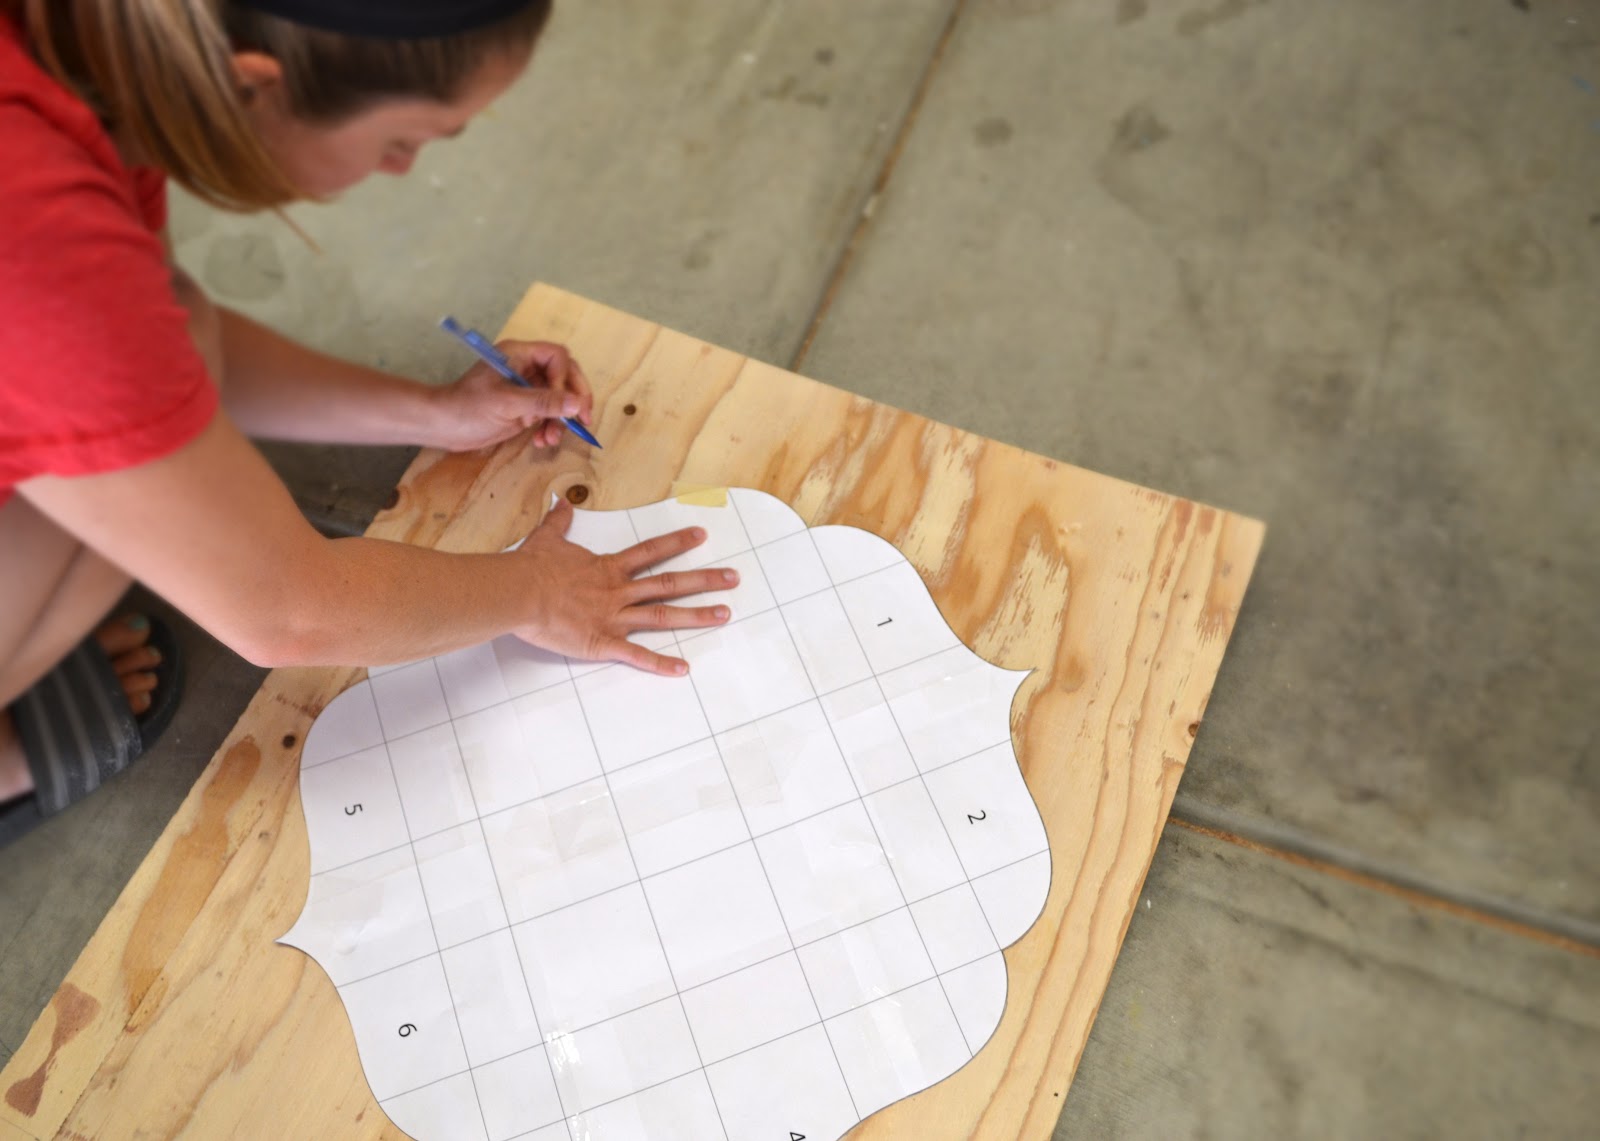
traced the pattern on a piece of 3/8 plywood – David then cut it out with a jigsaw (he is much better at precision cutting than me!)

We printed out our plan and wrote down some measurements – since the edges of the rug aren’t square we ran tape down the middle of the points of the medallion so that they would line up
Prior to painting we took the tape off of the area to be painted – pressing on the board so it wouldn’t slip! We also attached some paper bags on the outside of the stencil to prevent over spray

lined the points up on the center of the tape line

we were originally going to airbrush the whole thing … but it took WAY too long – so we airbrushed the sides to get a clean line (pressing firmly on the board)

and brushed the interior – first coat looking very smurfy …

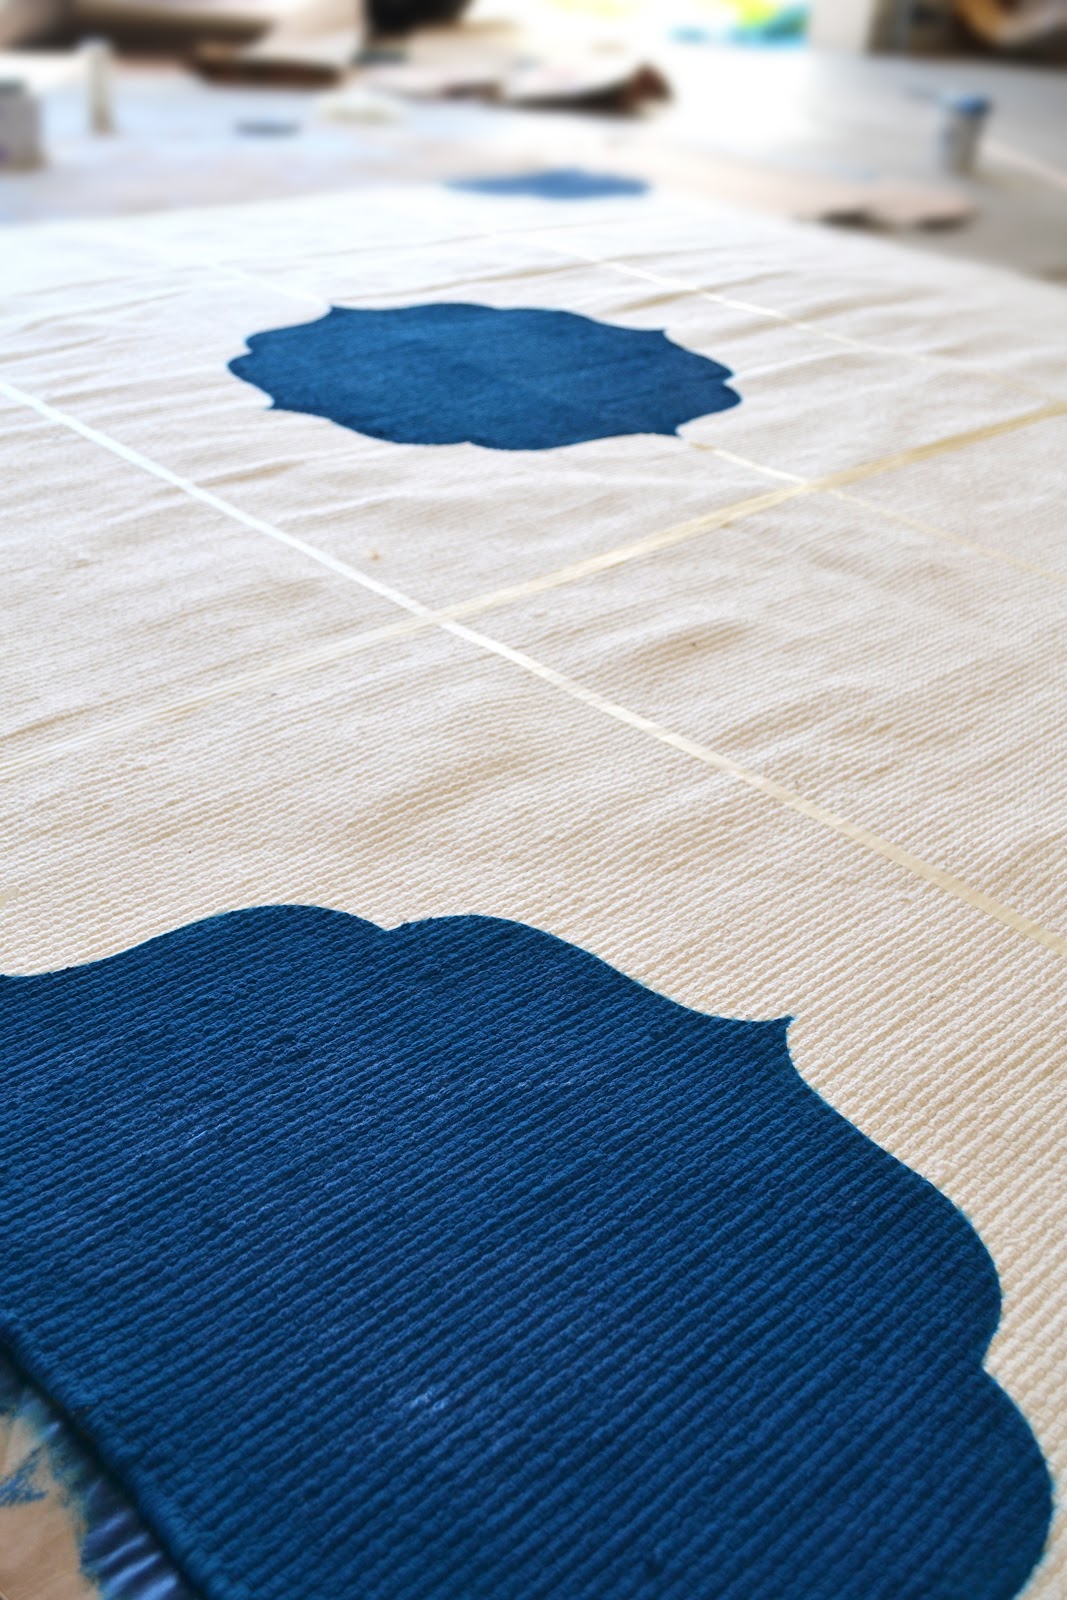

Once dry we applied a second coat – yes! loyal blue – but when it dried it had way too much sheen (some are wet in the photo)
So I applied a final coat of loyal blue in matte
Once dry, it cut the sheen down enough – and there you have it a custom Moroccan rug!

Still a lot to do in this room – but I love the instant character that the rug gives the seating area and how it grounds the ottoman


Don’t mind the desk in the background … it will be getting a major overhaul soon!
Even though it took a little longer than expected – I am in love with the end result!!
Notes:
1. Use flat paint (higher quality paints will go on easier and save some headaches too!)
2. I would recommend trying Simple Spray,
upholstery fabric paint or using a paint sprayer (I haven’t tried these so I
can’t comment on the edges or durability, but would imagine that as long
as the stencil is held tight it would work well)
3. A lighter paint color will require fewer coats – which will work best
with this method, once dry the medallion will shrink slightly making it
more difficult to line up for additional coats.
This looks absolutely incredible, Sarah! Such a smart idea to make the plywood stencil. It looks absolutely professional and is the perfect statement piece for your room. Fantastic job!
Thanks so much Jennifer! The plywood stencil took longer, but gave great edges!
It looks amazing and the edges of your stencil are so sharp! No one will even notice the carpet with such a great rug to focus on 🙂
Thanks Amelia!! and thank you for easing my nerves on the carpet underneath!
It looks great! The color you choose works great in your living space. I Really Really like it!
Thanks so much Daisy! I typically don't choose navy blues, but I am loving the change!
That looks so great. I want to try something like this for my kitchen. What an awesome job you did.
Hi Judy! Thanks so much!
Absolutely gorgeous!
Hi there! I'm new here and love this project. You did such a great job. Can you tell me where you found the rug originally?
Thank you Dawn!! The rug is the erslev rug from ikea.
Stunning! The blue in the rug and the turquoise tray are great contrasts too. I dropped by, thanks to Ms. centsational. I see why she was so impressed!
Thanks for stopping by Barbara! Nice to hear from you!
This turned out AMAZING!!! I'm sure it took you forever but it was 100% worth it. Great job- so impressed!
Katie
Wow, so beautiful!! I found an indoor/outdoor rug on Overstock with a really great patter but the color just doesn't work in my room…now with this DIY I might just paint over it! Such a great idea. And it looks fantastic.
Sounds like that would be a good solution! Keep me posted!
You are a genius!!! please let me know what kind of paint is that, I'm going to start this project tomorrow
Thank you for stopping by!! The top coat is sw duration matte in loyal blue. I would recommend either flat or matte. Good luck!
It looks fantastic! I have been wanting to do something like this for a long time and now I see how "easy" it is. I just have to get my husband of board.
Would you mind sharing what program you used to create the 3D sketch/rendering? Thanks.
Megan
Hi Megan! Thanks for stopping by! If you do try it make sure to use my notes above (will save you some of my headaches!) I do my 3D models in sketchup, you can download a version for free. I finished in Photoshop to adjust the colors and add a filter. Let me know if you try the rug!
Thank you for sharing the program. I will check it out.
Hi Sarah! I love, love your tutorial! I tried my own rug last week and with a few changes to the process, I LOVE how it came out! I blogged about it over on my blog, but gave you giant props for coming up with the inspiration. Your blog is amazing…one of my favs! Keep up the amazing work!
http://www.whitenestshop.com/blog/diy-painted-rug
So cute! Sarah, do you mind providing the dimensions of the stencil?
Thanks,
Makala
Hi Makala! Thank you! The stencil measures tip to tip, 21.5" x 21.5"
This is amazing! Your blog is giving me so many ideas! My husband I just moved into our house 2 months ago so we have a LOT of projects going on! I would love to recreate something like this. How did you come up with that specific stencil shape? Can you recommend a site or something where I can view some other shapes to give me some ideas? I like Chevron but I know it's super popular so I want something a little different but I can't think of anything off the top of my head!
Thank you!
Thank you! There are tons of ideas on pinterest, search for DIY rugs or rug pattern and you should find a lot! Good luck!
the rug is amazing. Where did you buy the rug?
It's the Erslev from Ikea
This is such a great idea, it looks awesome! I recently just got a great shaggy rug for my livingroom, but I might try this project for another room in the house 🙂
I love this! Would you mind posting a PDF of the stencil you used with the same dimensions etc that I could print and use? I love it!
This is such a pretty rug, I love this idea!
I love your rug! Would it be washable with that type of paint on it?
Thanks! 🙂 Adding the fabric medium and then heat setting it with an iron makes it washable.
i have read that painting a more plush rug can make it very stiff and not very comfortable. i really wanted to paint a plush ikea rug but i am very hesitant because of the things i have been reading. do you have any advice for a first time rug painter for making it still soft?
Painting will always change the feel of the rug. Adding fabric medium will soften it a little, but not much. Dyeing would be the best option to retain the texture of the rug .. though I've never tried that, I would imagine that it would be very difficult to keep it from bleeding. Hope this helps a little! 🙂
This is amazing. I had no idea you could paint a rug. Yours is gorgeous. Thank you so much for you tips! I am thinking of trying this out for my foyer. Any comments on the durability?
The durability is great! We've painted three rugs like this and haven't had any issues with it wearing 🙂
Hi Sarah.. I just came across your diy painted moroccon rug. I see that you used fabric paints and it came out wonderful I also saw a lot of other posts by other people who have used latex paint. But most of these were for stenciled patterns. I would like to paint my rug a bright solid color and then add patterns on top of it. I was wondering what paint I should use? Does painting the whole rug make it stiff? Which is better for my needs? Please let me know. Thanks!
I used latex paint mixed with fabric medium. Any paint will make the rug slightly stiffer, depends on your preference. The durability is great, but not super soft. Hope this helps!
Thanks, Sarah! I am gonna try that soon 🙂
Amazing! Thanks so much for sharing, this is a fantastic DIY for Rugs
what sofware is that one ?..
I recently found a plain light gray rug on H&M home, check there if you can't find one at Ikea!
Can you provide a template for your Moroccan pattern?