• Home
  • About
  • Services
  • Shop
    • Bloglovin
    • Email
    • Facebook
    • Instagram
    • Pinterest
    • Twitter

Dorsey Designs

DIY and Interiors by Sarah + David

  • Home Tour
  • DIY TUTORIALS
  • friday favorites
  • design + build
  • art

get the latest straight to your inbox

DIY Parsons Desk | Tutorial

Hey! First, I want to say thanks SO much for your kind words on my where we’re living post last week, your support means so much!!

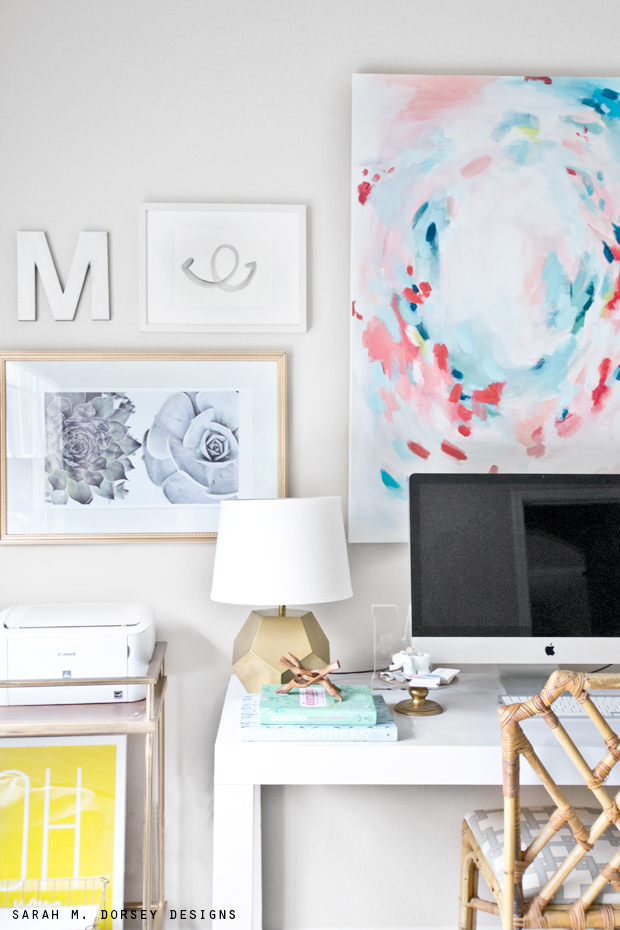
Did you have a good weekend? I hope so! I worked on the gallery wall in my office. Still more to do, but I’m loving this side!

I painted a large canvas, inspired by this painting. I photographed a few succulents over the summer and made the print this weekend (frame was thrifted for $4, I just spray painted the mat white and the frame gold). Swoosh watercolor was painted by me, inspired by Sarah Swanson. M was thrifted (old aluminum letter from a sign). Oh You print is from Pottery Barn, I love the color and font!   
Last week, I shared our new Parsons desk, I love love love it!! Today, I’m sharing a tutorial (it’s actually more of a guideline, since the desk (with the drawers) is fairly detailed and the post would be long .. So, good if you just need the general gist, but not if you need a full tutorial. This desk without the drawers would be a much easier project, so consider that if you’re looking for a simpler version. 
— 
For the top: 
We cut a piece of 3/4″ birch plywood and surrounded it with poplar. The front edge (a piece of poplar) was cut at a 45 so that the drawer sits flush (the drawers are cut at a 45 too) 
The poplar side pieces were attached with hidden pocket screws, created with the Kreg Jig (one of our favorite recent purchases!!) 
The poplar 45 was glued in place. 
On the drawers, for the center to work, the outer edge has to overhand to allow for the face to align over the slide in the middle. 

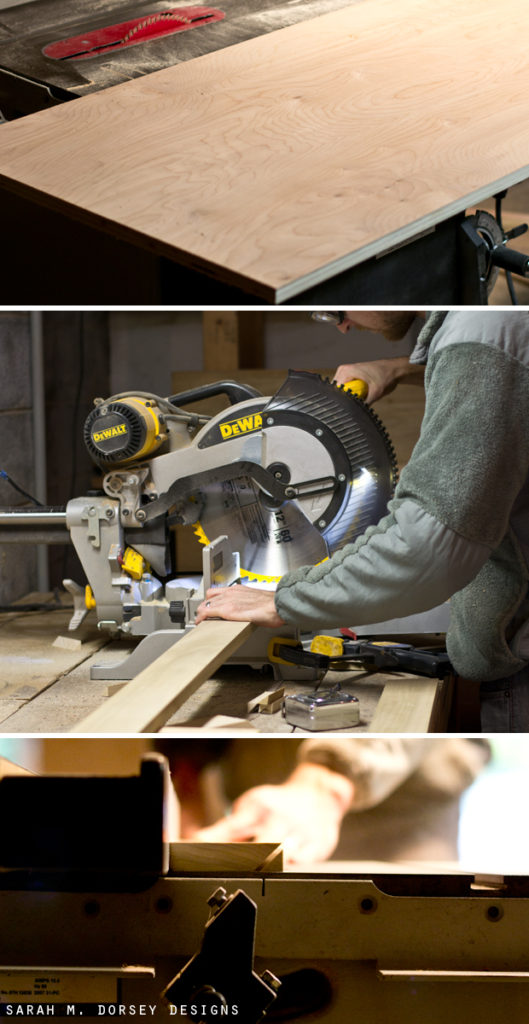
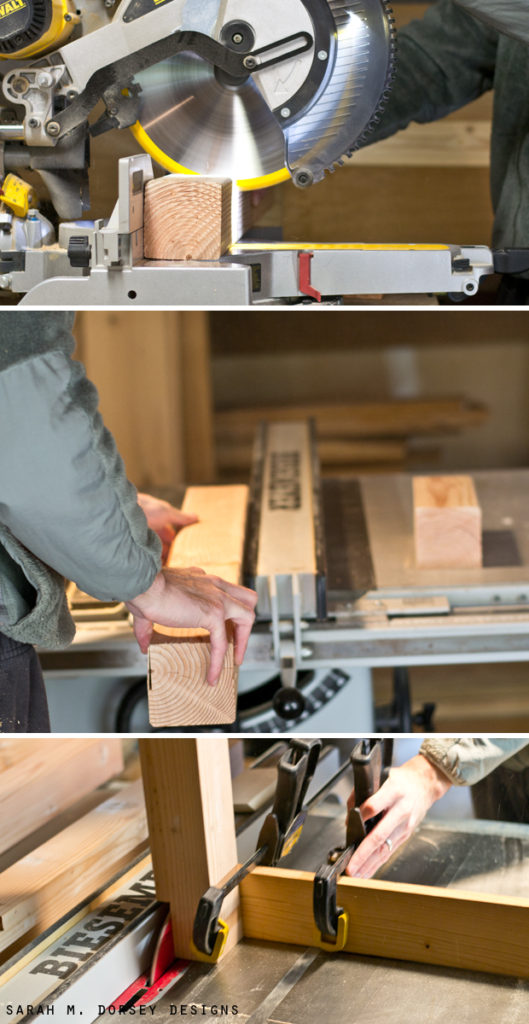
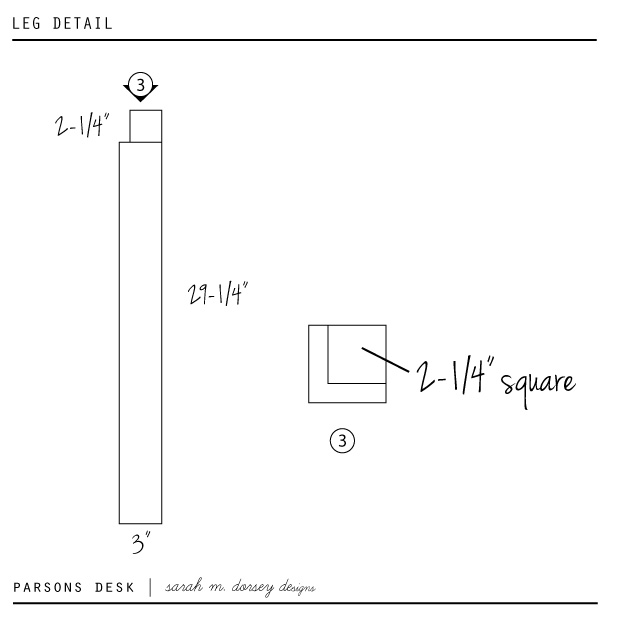
For the legs, we purchased 4×4 pieces of pine and cut to size. Then we ripped all four sides down so that it was exactly 3″x3″(this also removed the rough surface) (our table saw blade wasn’t tall enough so we did two passes on each side. Then we notched the top (on the table saw) so that the leg would lock inside the support. (Table legs are typically expensive, so this was an affordable solution. Each 8′ 4×4 was around $8 at Home Depot, so each leg ended up being about $4.)

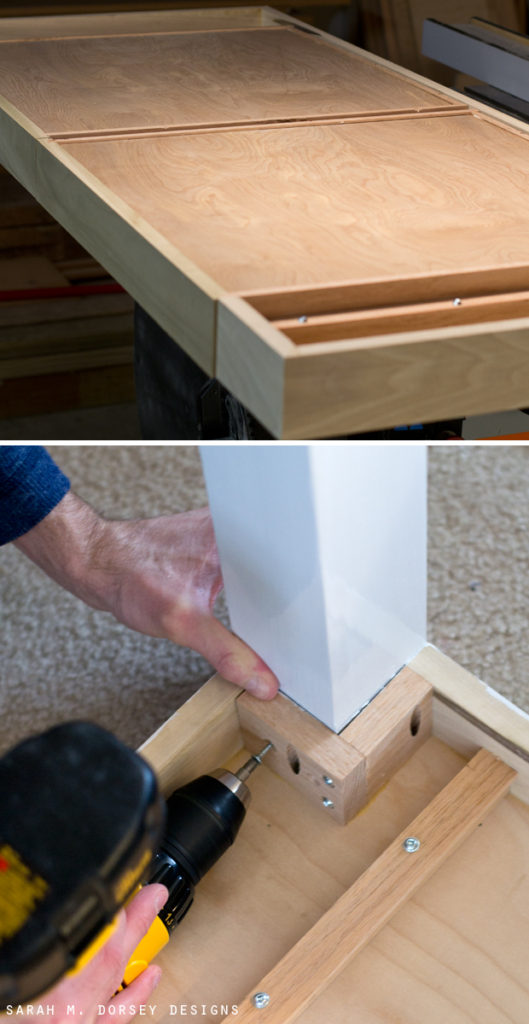
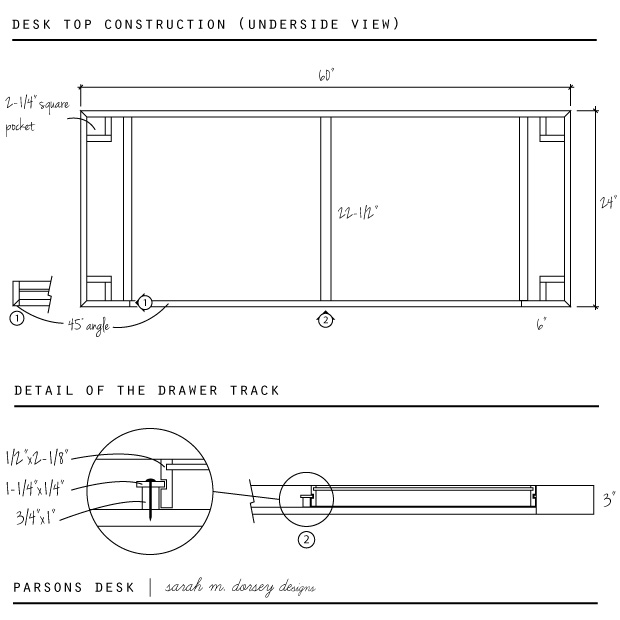
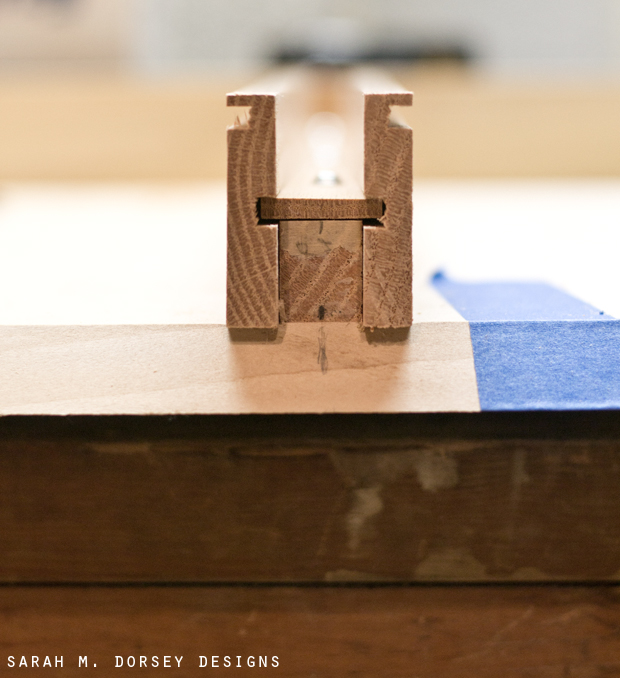
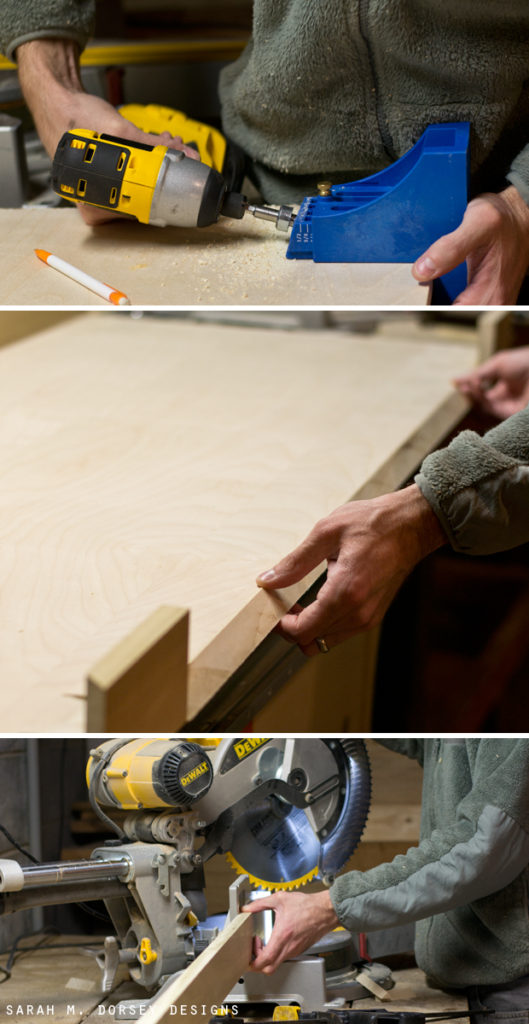
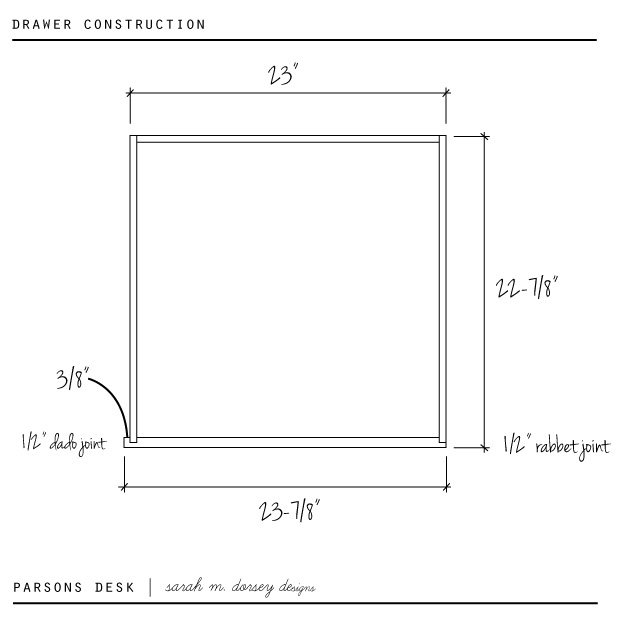
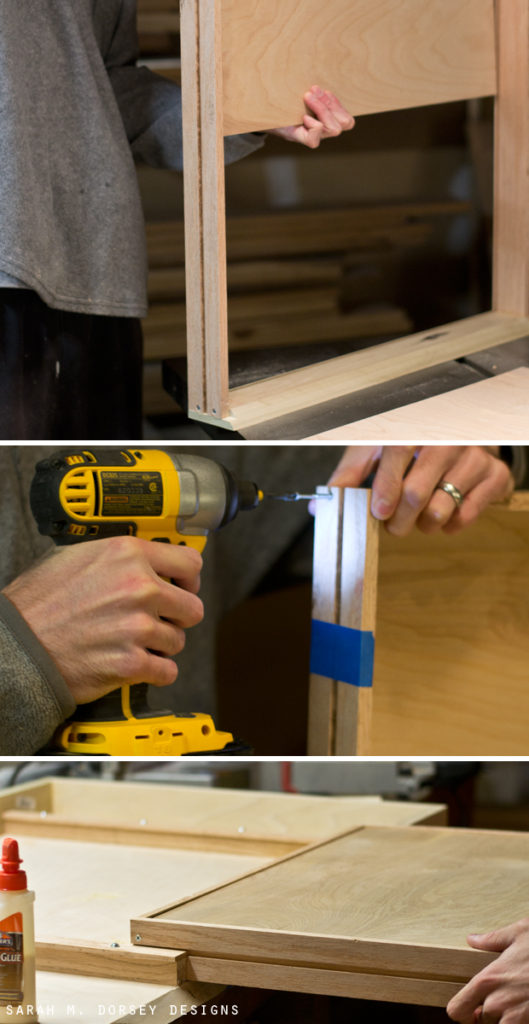
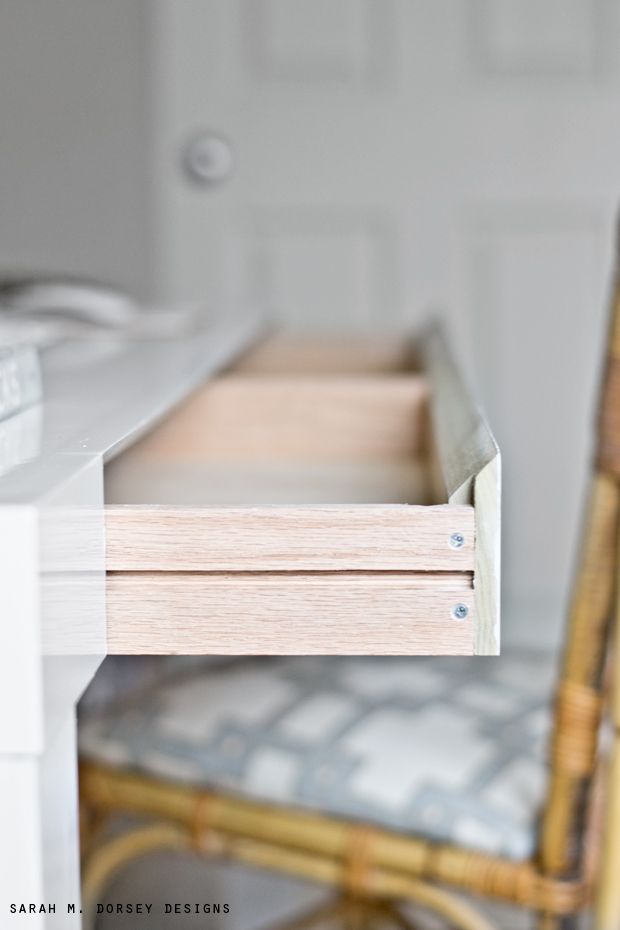
If you’re interested in making your own, I hope that the photos and diagrams help a little! Note: our drawers took a little sanding adjusting since our 45 (for the drawers and the front of the base) wasn’t precise. The plate for a our table saw wasn’t wide enough for the blade to be adjusted to a 45, so we cut it without. I’d highly recommend having the correct tools (especially for precise areas) to avoid frustration!

My TN office is almost done, just a few more finishing touches! Can’t wait 🙂

—

Thrifting and/or Craigslist lacking in your area?? (or if you just like deals in general) Make sure to stop by tomorrow for a new to me site, can’t wait to share!

design + build// DIY TUTORIALS// office// Uncategorized// Uncategorized5 Comments

Subscribe

get the latest straight to your inbox

« Friday Five | 11.20.14
Everything But The House | Online Estate and Consignment Sale + Giveaway »

Comments

  1. For My Love Of says

    November 24, 2014 at 7:22 pm

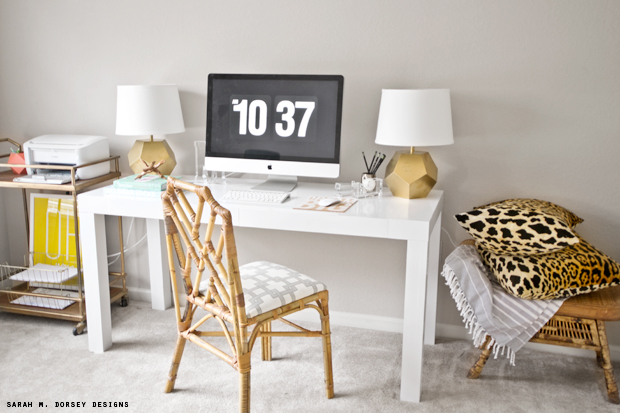
    I had no clue a parson's desk was so involved. I've never built anything, but the guide here is great! It turned out beautifully!

    Reply
  2. Julia Konya says

    November 25, 2014 at 1:44 am

    Mind blown once again here! These are the types of posts I can't show to my husband 😉

    Reply
  3. Sarah says

    November 30, 2014 at 5:44 pm

    I love your painting! Can you please post a tutorial? !? Or at least share the colors you used?

    Reply
    • Sarah says

      December 2, 2014 at 10:31 pm

      Thanks! 🙂 I just posted one, here's the link http://sarahmdorseydesigns.blogspot.com/2014/12/diy-abstract-painting.html

      Reply
  4. Mekenzie @ interiorsbykenz.com says

    December 1, 2014 at 5:45 pm

    That's really beautiful! And it looks really sturdy!

    Reply

Leave a Reply Cancel reply

Your email address will not be published. Required fields are marked *

Contact Me

sarahmdorseydesigns{@}gmail{.}com

Stay Updated!

Get all the latest goods straight to your inbox!

This error message is only visible to WordPress admins

Error: No connected account.

Please go to the Instagram Feed settings page to connect an account.

Must Reads

Custom Peg Board + DIY Circle Art | FrogTape

Custom Peg Board + DIY Circle Art | FrogTape

Main Level Refresh with The Home Depot

Main Level Refresh with The Home Depot

Sponsor

2016 Daily Simplified Planner

Popular Projects

Eames Chairs FINISHED (finally + for now)

Eames Chairs FINISHED (finally + for now)

July 8, 2013 By Sarah 20 Comments

Plain Rattan Chair to Chinese Chippendale Chair

Plain Rattan Chair to Chinese Chippendale Chair

April 9, 2015 By Sarah 55 Comments

Black and White Chair | My Process + What NOT to do

Black and White Chair | My Process + What NOT to do

January 24, 2014 By Sarah 21 Comments

DIY Tufted Ottoman Price Breakdown

DIY Tufted Ottoman Price Breakdown

March 27, 2012 By Sarah 2 Comments

Rattan Chair Makeover

Rattan Chair Makeover

April 14, 2014 By Sarah 13 Comments

  • DIY TUTORIALS
    • design + build
    • furniture redo
    • diy in 1 hour or less
  • free printable
  • friday favorites

Disclosure

Occasionally, affiliate links are used when they are available. I do earn a small commission when items are purchased using those links. As always, I only link to things that I truly love. I also link to items that I love when an affiliate link is not available. Thanks so much!

  • Home
  • About
  • Services
  • Shop

Copyright © 2025 Dorsey Designs

MENU
  • Home
  • About
  • Services
  • Shop