Hey everyone! Today I’m sharing our DIY wire railing – originally shown on our Home Depot Patio Style Challenge reveal.
We wanted something 1. More modern 2. Less obtrusive (before photo at the bottom) 3. Something that our puppies couldn’t fit through – Annabelle has scared us a few times jumping down to the lower roof!

Our total cost was approximately $130, a kit would have cost around $300 – $500 – so the savings was pretty good! This tutorial requires a good understanding of the tools required to make it work for your deck. But, overall, once you understand the concept, it is very easy!
You will need:
(buying in large quantities or whole sale is cheapest for the wire, bolts, and nuts!)
1/8″ stainless cable
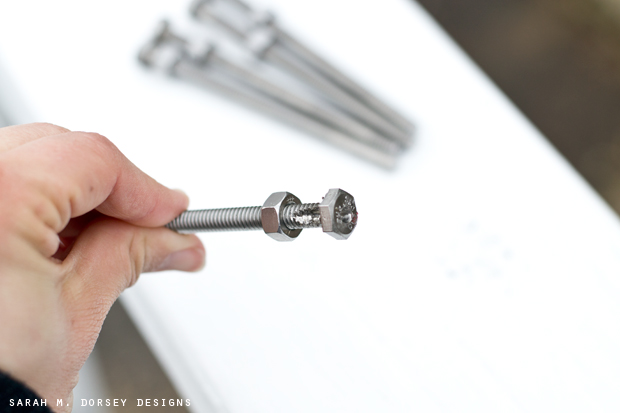
4 1/2″ stainless 1/4-20 bolts
1/4-20 nuts and washers
drill and 9/64″ 1/4″ and 1/2″ bits
vice or drill press
wrench
driver or socket set for lag bolts
cable cutter
angle grinder
Here is our process:
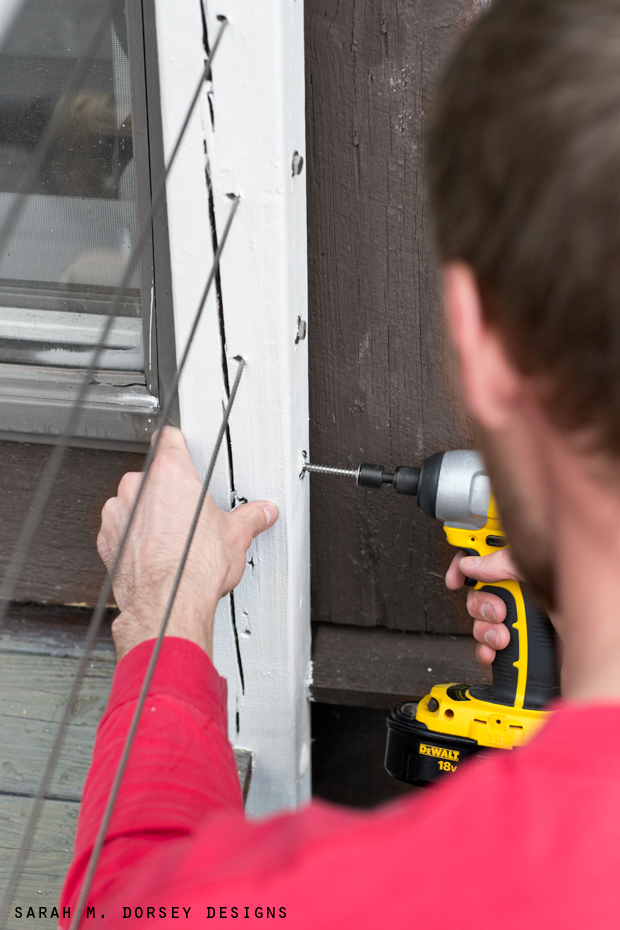
We decided to use 6 strands of 1/8″ stainless cable in our railing so we created a template by drilling the holes in a 1×4 that was cut to fit under the top rail. Using the template we marked the hole locations on all of the posts. (prior to painting)

All of the holes were first drilled with a 1/4″ drill bit to allow the 1/8″ cable to easily pass through.
Here’s the specific directions for drilling holes on the three types of posts:
1) Posts against house – holes were drilled at a 45 degree angle from the center of the side parallel to the house to the side exterior to the deck.
2) Line Posts – Holes are drilled straight through side to side
3) Corner posts – Holes were drilled straight through on one side and the the second side was drilled at an offset to allow the bolt cable ends to pass each other inside the post.
Next we prepared the bolt cable ends that would be used to tension the cables. We used 4.5″ stainless bolts and drilled a 9/64″ hole starting at the center of the head at an angle to exit from the threads as close as possible to the head. (the angle through the bolt is approximate). To drill the hole, the bolt was held in a vice (a drill press would have been easier). Then we put on a nut that would later be used to crimp and attach the bolt to the cable once positioned.
We started the cable installation with fixed ends on the post that was against the house (later we did caulk that big crack!). We fed the cable through all of the line posts leading to this end and then fed the cable through the end post until 2 inches or so was exiting the post. We then inserted the cable end back into the hole creating a loop and pulled the cable back to tighten the loop to a 1/2″ diameter.

With the loop held against the post it was stapled 3 time to lock it in place.

We installed a stainless 2″ lag bolt in the center of the loop to ensure everything was held tightly in place and provide a finished look covering the cable and staples.

We cut the cable about 1″ past the face of the corner post and slid the bolt cable end onto the cable.

The nut was tightened crimping the bolt to the cable with the head 1/2″ away from the face of the post as shown below.
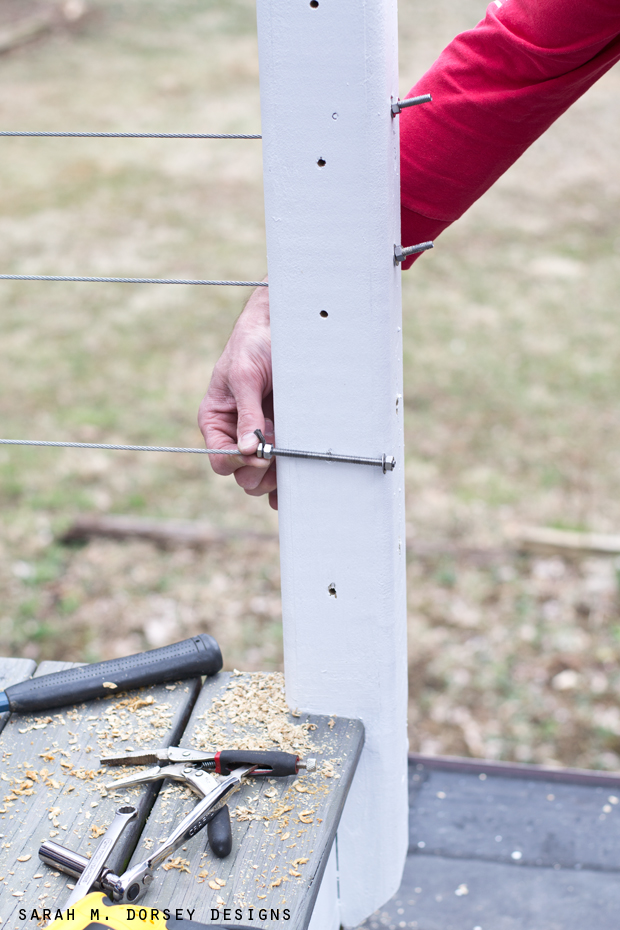
Once the bolt cable end is attached, the bolt can be inserted in the post and a washer and nut put on from the back. The nut can be then tightened to tension the cable making it tight throughout the whole section.

For the long span across the front of our deck, we used the bolt cable ends on both sides to allow more ability to tension the cable.
After everything was installed, we tensioned all the cable to make sure they were all even and cut the bolts off behind the nuts on the exterior of the corner posts with an angle grinder.

I love the new look! Our puppies can’t fit through and it doesn’t obstruct the view!
BEFORE:

This space has come a long way!! For the full reveal after, visit Home Depot’s blog, The Apron!

You guys are DIY superstars!
i love this look.
b
You guys never stop amazing me! Looks awesome and I would have guessed that it would have cost 10x what you spent! So good.
Love the clean look of this. So clever, figuring it out yourselves 🙂
Such a beautiful solution!! LOVE IT!!
This looks like a perfect solution for our decks–such a great book & much easier to maintain than our painted railings. Well done! It looks as if you installed some time ago (snow on the ground). Is there anything you would change?
Hi Dawn! We completed the railing about two months ago (we had a few late snow showers!) For process, there isn't anything I'd change. Since we were using the existing railing, the remaining wood is a little old/worn, so ideally I would have switched that out for something thinner and new. But, using what we had was a good way to save money and materials.
What did you use to finish by the deck? It looks great. How did it hold up over the winter? We have a deck in similar shape and are planning a similar refinish.
Hi- your deck looks great. We have one in similar shape currently. Which product did you use on the deck? How did it hold up over the winter? Thanks.
We used defy stain – I can't rennet the exact name. It did well over the winter – but a few spots to reapply stain this spring.
Do you have a link to purchase the stainless cable and other items you used? Love this project and want to do it this summer! Thanks!
I love this! Currently building a deck and totally going to do this! One question. What did you do when you got to the corners? Was it a continuous run or did you start a new run ?
Hi Sarah, this is a wonderful tutorial. I'm in the process of updating the balcony rail in my loft with cable, and am curious if you could provide more insight into how exactly you crimped your wire to the bolt, and what the resulting force test rating is
Looks great.
Thank you!
I’ve used this on 3 different projects now 🙂
Thanks!
Thank you Chris!!
Hi Sarah, researching alternative deck rail I found yours (great tutorial) and I am wondering since it has been a few years how you are liking the cable and if you have any tensioning issues? We have to replace all of ours and after the price we got last night on metal maintenance free, I’d prefer not to have to sell my soul for new railing, so have to find something more affordable that also looks nice.
We love it! The cables have held up so well – we haven’t had to adjust the tension. We are going to redo our deck (with all non wood materials for less maintenance) soon and plan to reinstall the cable railing!
Hi Sarah, I was wondering how far apart you’re wood posts were? We’re the middle posts all just intermediated that the wired went thru?
Hi! They are about 50″ apart. Not sure I understand the second part of your question. Feel free to send me another message either here, email or Instagram 🙂
How tall are your posts? I love this look
Hi! I’m not sure, it was built with our house. I’d recommend looking for the code for your state