Did you notice the wood slice wreath in our Home Depot Holiday Style Challenge? Today, I’m sharing the tutorial! It’s fairly easy and can be done in just a few hours! Read on to see how we did it.

To get started, you will need:
– Wood branches (dried out – let them sit in the garage, uncovered for a few months, various widths, from about 3″ to finger width)
– Chop saw and Jig saw
– Thin wood rings, 12″ in diameter (we cut ours out of 1/4″ luan plywood)
– Black matte spray paint
– Liquid Nails adhesive
– Ribbon, fabric, Christmas balls (any other decorations you’d like to include)
First, on our chop saw, we clamped a piece of pine to the right of our chop saw to set the width of the wood slices. To get slices that were the same thickness, we just slide the branch till it hit the pine and then cut. A super easy and quick way to get slices that are the same thickness.
Remove any side branches before starting and hold the wood tightly against the back and bottom of the chop saw, this will give you maximum control – use extra caution since you are cutting something round and irregular instead of square – it is more likely to fly! Always keep a safe distance from the blade and stop cutting the branch once it is too short and you can no longer hold it safely. Remember to always wear eye and ear protection!!

To cut our rings for the backing, we used a pencil and string. Holding the string at the center of our circle, we drew a 12″ circle (2″ thick) (so the string was 6″ for the outer line and 4″ for the inner line). Then we cut the shape out with a jigsaw.
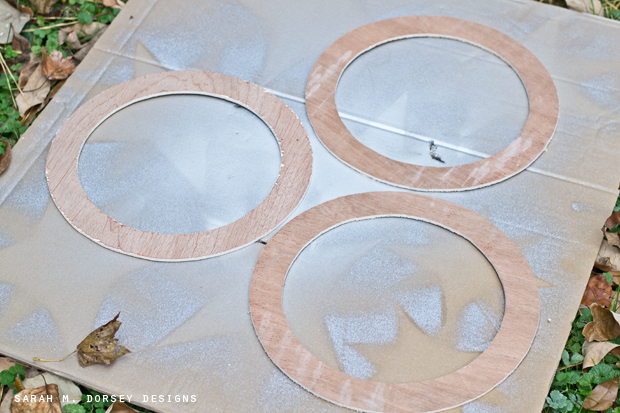
We spray painted the fronts matte black (so that the gaps between the wood would be less noticeable). Once dry, the wood rings were randomly attached with liquid nails adhesive. Since the adhesive doesn’t dry clear, try not to use too much so it doesn’t seep out the sides.

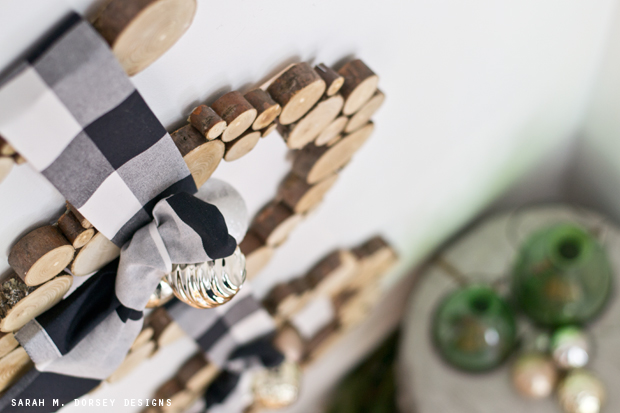
Once the adhesive has dried (about 24 hours), connect the rings with loops of fabric or ribbon. We used a large black and white buffalo check fabric from Ikea (we also include a thin strip of poster board inside the fabric (stapled to the back of the wreath) to help support the weight). We finished off each wreath with a simple bow and cluster of Christmas balls. Super easy!
I hope you’ll give it a try!

Carved stool tutorial here
I’ll be back a little later to share a few more Christmas decorating (and DIY gift) ideas!!
P.S. the winner of last week’s giveaway has been announced!! Did you win? Click here to find out! Also, I’m SO excited that Everything But The House is coming to D.C., check out this article to see if they are coming your way!
Love this!! So unexpected & fun! Love the black white tie in too! Xx
So cute and unique! I might have to try this one!
i did notice them and i wondered! i might have to do this! love the look and i hink i could do it! i need a table saw or chop saw!
So cute! Where did you get the white stars on your tree? I am in love.
Now this is cool christmas decor! I love it!
This was my favorite thing from your Home Depot post. 🙂
However, when I look at your finished product, I don't see any black at all as the background color from the ring you attached the wood to. Did you trim the ring after the fact?
Hi Katie! I actually forgot to mention that the process shots were from a second wreath – my mom liked it and wanted one, so we made a second one. Ours is attached with staples on the back, which worked well, but it is less sturdy, so we came up with a second, more durable solution for the backing.