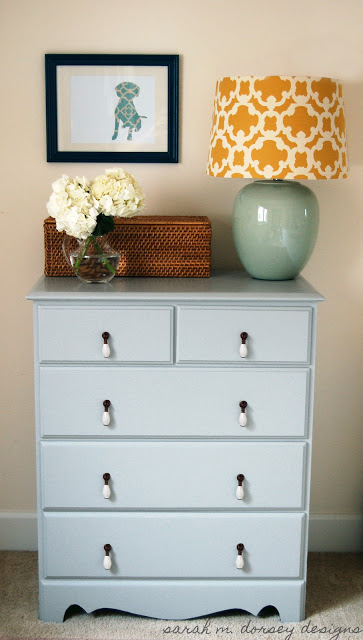
Before we moved to CA we sold a good bit of our furniture, so we are now in the process of figuring out what we need and purchasing as we find it.
Our new place is larger than the last, but we traded our closet space for a second bedroom. Moving from a walk in closet to small wall closet left me lacking storage space
… a few weeks ago I found this great find on craigslist for $20!!!
Storage … check
Solid wood and construction … check
Small size (my bedroom is tiny) … check
Dual purpose for my night stand … check
After removing hardware, sanding, filling in dimples and original holes for hardware with wood filler
New holes for hardware were drilled, a diluted coat of primer applied, and a quick sanding were done. I used two coats of Sherwin Williams Pro Classic paint, which is a super durable latex paint that dries like a oil based enamel. Since the paint is THICK I added XIM extender to reduce brush strokes.
I decided on a custom mix between Sherwin Williams Silverplate and Ellie Gray. I also swapped the original hardware for this from anthropologie. Lamp shade from Target available in stores, basket on clearance at Target, art made by me
What I learned:
1. using quality materials will save time and prevent you from pulling out your hair – for paint brushes I used Purdy Clearcut glide 2.5″ and 1.5″. Paying a little more upfront is worth it, it results in smoother brush strokes and if taken care of will last. After using a paint and primer in one I knew that I would never do that again … so I used this primer and paint more expensive but worth it because it is super durable.
2. Selecting a gray can be tricky: make sure to look at the paint chip in the room that it will be used in and hold it up with other grays to compare. I selected one that was way too green at first even after looking at it in the room because I didn’t compare it to other paint chips!
3. Make sure that the paint isn’t too thick, or it will leave brush marks. Using a paint extender will extend the drying time and level out brush marks.
Overall, I am pretty happy with the finished product and looking forward to finishing the room!


Love it!
Beautiful, Sarah!
Thanks for the kind comments!
Sarah! Beautiful work! Looks like we've both been busy with similar ventures. I'm working on painting my kitchen cabinets and am using SW pro-classic enamel as well. So far so good! I was wondering if XIM extender is the same as Floetrol? I've been using that to reduce the brush strokes and it works pretty well. Would love to know about the XIM if it's something different? There's nothing like that nice spray finish though, but hubby won't let me spray in the kitchen for some reason 😉 Keep up the amazing work! (Noelle)
Noelle – Thanks for the comment! So far I love the SW pro classic, it goes on well and it is durable! When I was in SW I asked which they would recommend between Floetrol and XIM and they recommended XIM. As far as I know they both extend the drying time and reduce brush strokes. We originally bought a sprayer, but had issues getting the paint to go through evenly (maybe we needed a higher power one for heavier paint?) Keep my updated on your kitchen, I would love to see your progress!
Take Care, Sarah
You are one busy bee! I just came from Danielle Oakey blog and read through your entire blog!
I am a new follower of yours and would love it if you returned the favor!
Annie
House on Rene
Hi Annie! Just added you to my blog list!
Just finished the entire blog! I love your sense of style. I'm pretty much going to copy your entire bedroom in our color scheme. Love it!
Hi Candace! Thanks so much!! Let me know if you try any of my diy projects, I'd love to see pics!
Where is this in your room? Next to the bed? Used as a nightstand?
Hi Melissa – It is next to the bed, used as a nightstand. You can see it in some of the later Master Bedroom posts 🙂
Just found your blog and i am immersed!! really enjoying reading about all of your projects and home improvements. i am in the process of redoing my living room and thought the awesome yellow and white lampshade(s) you have would look good in my LR as yellow is my accent color. i thought i'd never find it on Target.com but alas – it was the first one that came up! i just ordered it and can't wait to replace the plain white one on my floor lamp! thanks for the inspiration and can't wait to keep reading! 🙂