• Home
  • About
  • Services
  • Shop
    • Bloglovin
    • Email
    • Facebook
    • Instagram
    • Pinterest
    • Twitter

Dorsey Designs

DIY and Interiors by Sarah + David

  • Home Tour
  • DIY TUTORIALS
  • friday favorites
  • design + build
  • art

get the latest straight to your inbox

Driftwood Tiled Tabletop | Tutorial

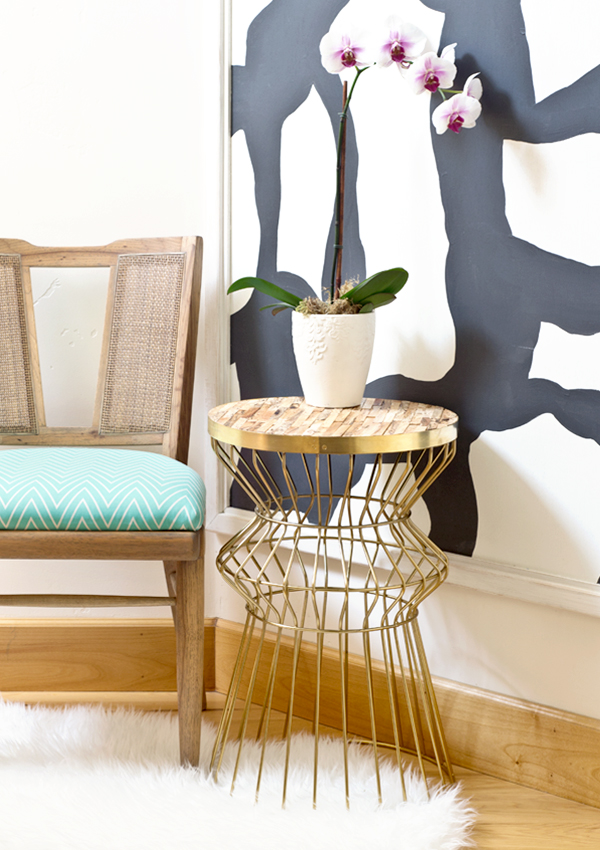
Today I’m sharing our last project from our CA rental! In case you missed it at Infarrantly Creative, check out the tutorial below for adding wood tiling to a table top. This is our last project with CA driftwood (I still have the driftwood frames to finish and I’ll be selling a few)

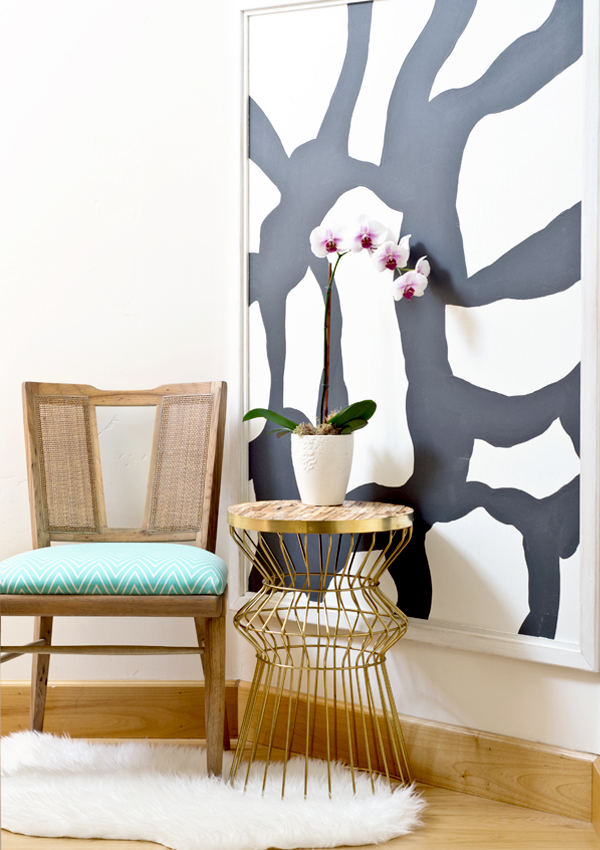
Adding wood instantly adds texture and warmth to contrast the shine of the metal. I love it!!

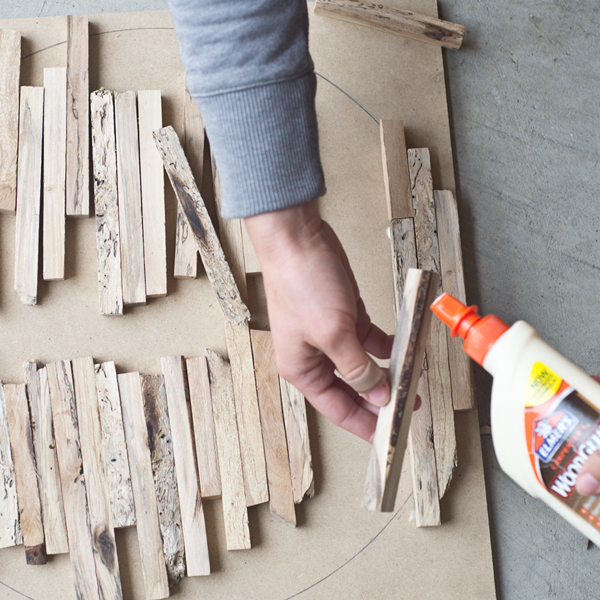
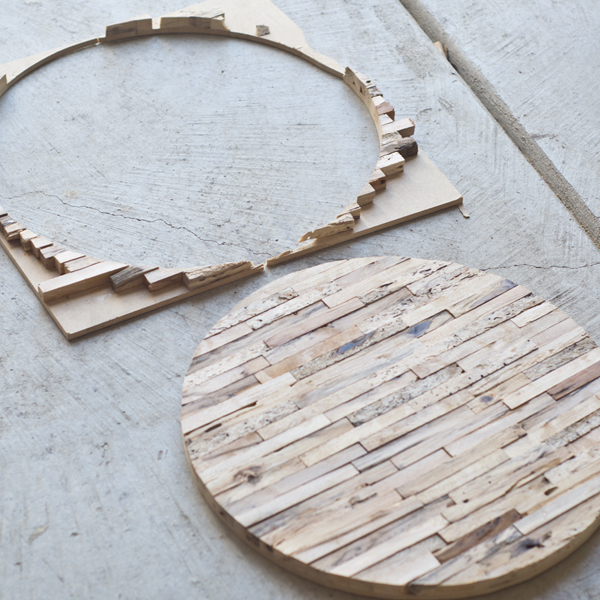
I used driftwood left over from our herringbone driftwood table, but for something a lot less involved, try thin hobby board.

Supplies:

1/4 MDF
Wood strips
Wood glue
Brass edging
Brass screws
Table base
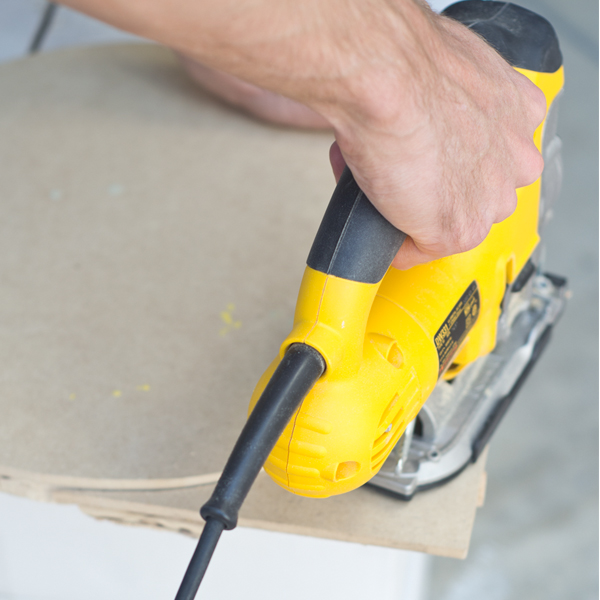
Jigsaw with metal and slow cut wood blades
Polyurethane

The other weekend I picked up this gold metal accent table from Target. 
Amazing as is, but what if we made a removable top so that it could either be metal OR wood!? That way if/when I change my mind, I can swap the top. Perfect! 
Our original plan was to leave the metal top intact, but since we couldn’t find brass trim wide enough to cover the wood and the metal top, we decided to remove the existing top and make them interchangeable. 
Here’s how we did it!
We traced the tabletop on a piece of MDF. **Note: If you would like your top to fit over the existing top without removing it, make sure that it is slightly bigger so that it will fit. 
Next, cut your wood into thin strips (varying lengths works well), or use precut, strips of hobby board (Home Depot has a good selection). 
Start at one end of your board, if your top is a circle, make sure that the wood goes slightly over the edge so you have a little wiggle room. 
Alternate the number used in each row to give a more staggered appearance. Apply wood glue on the bottom of all sides that touch, so that there is a strong bond. 
Let the wood glue dry overnight. Retrace your table top. If you tracing it from underneath, make sure to carefully check that the wood is lined up on the other side. 
Use a jigsaw blade designed for slow cutting for extra control to cut out the top. 
We liked the slightly uneven top, but feel free to sand down any imperfections too. 

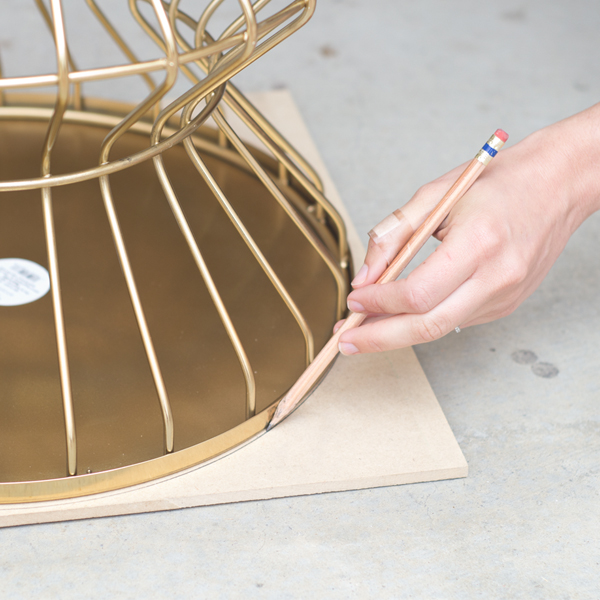
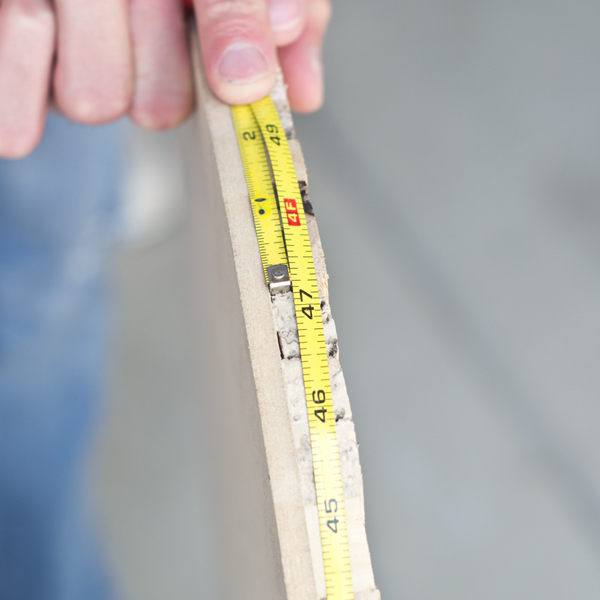
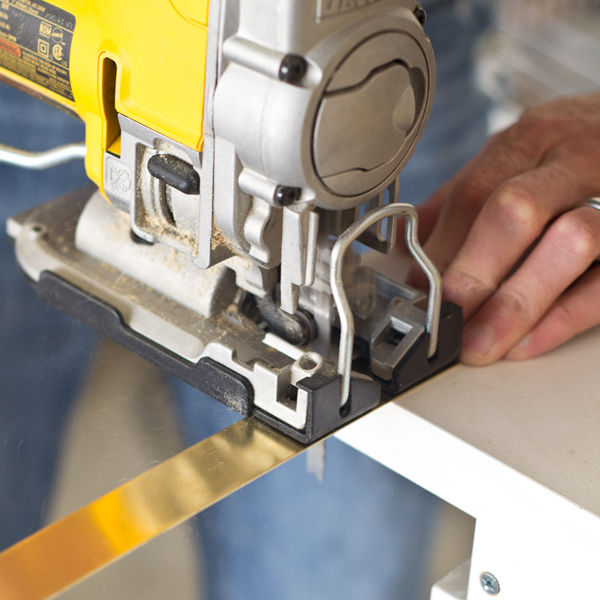
Next, we moved onto the edging. We picked up 2 – 1″ x 36″ bendable brass strips from Ace Hardware. Since we needed about 47″, we cut two 23.5″ strips using a jigsaw blade designed to cut metal.

We measured and countersunk a few holes, so that the screws would sit flush once attached to the top.

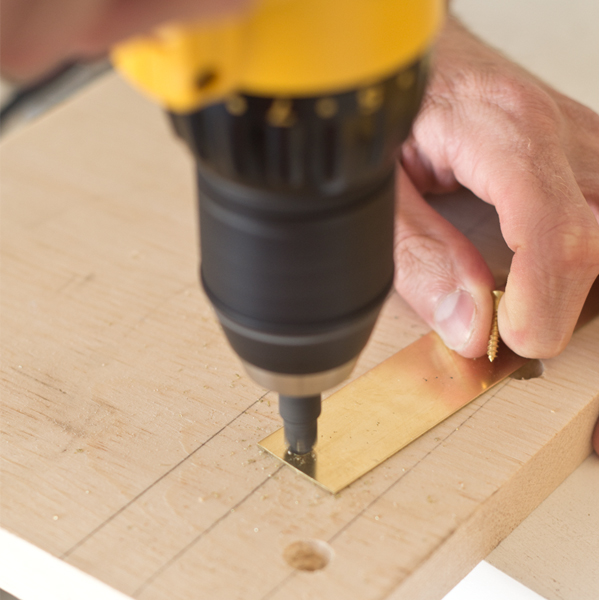
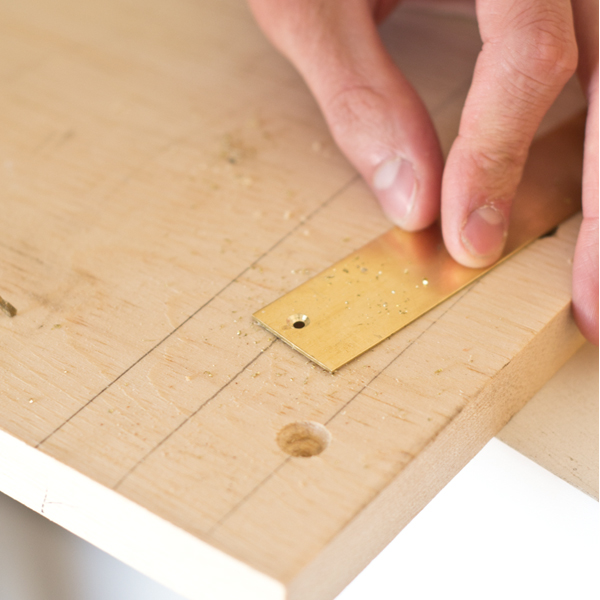
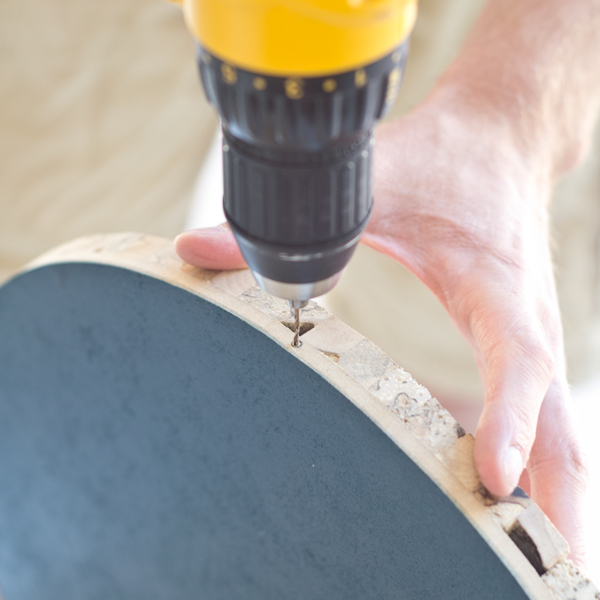
Next we predrilled holes in the wood top to avoid the wood splitting when the screws were attached.

We used small brass screws to secure the trim, leaving an overhang so that it wouldn’t slide once on the base.

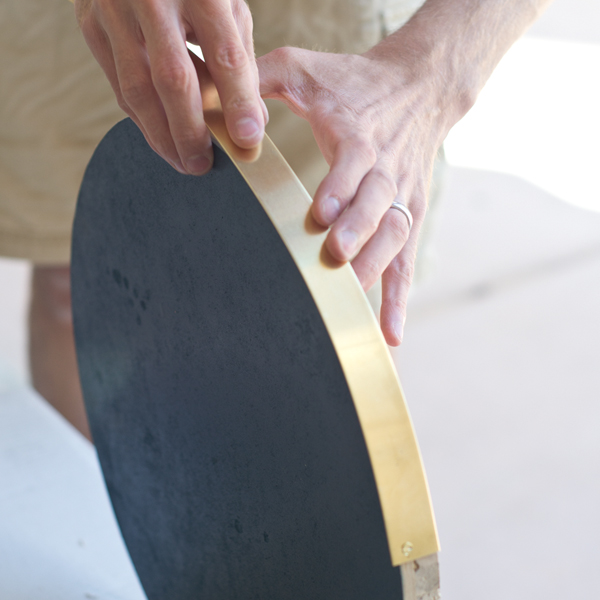
We guided the trim along the edge and secured the remaining screws, using three per side, six total for both pieces of trim.

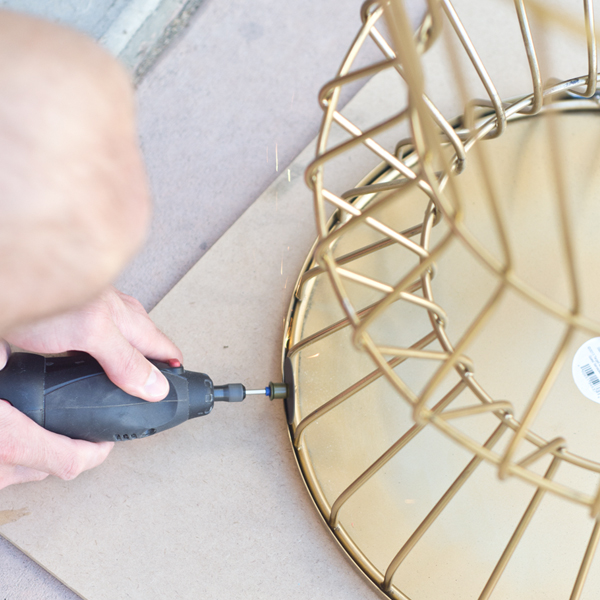
Since the 1″ trim wouldn’t cover both the original top and the new top, we decided to remove the top by cutting the welds with the dremel.

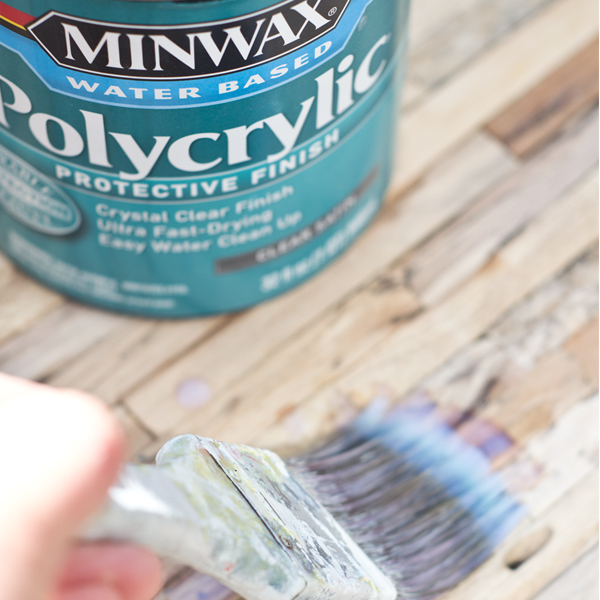
Finally, we sealed the top with a few coats of polyurethane.

and that’s it!

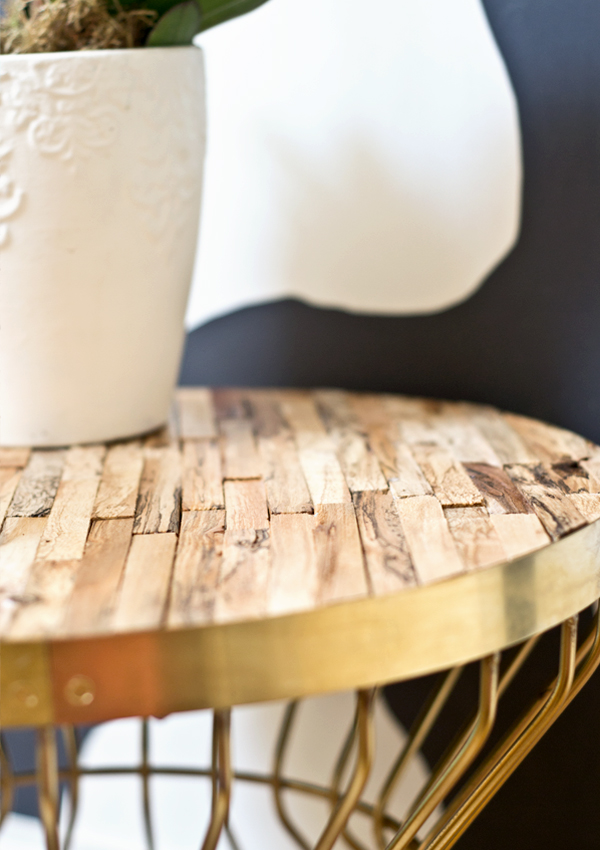
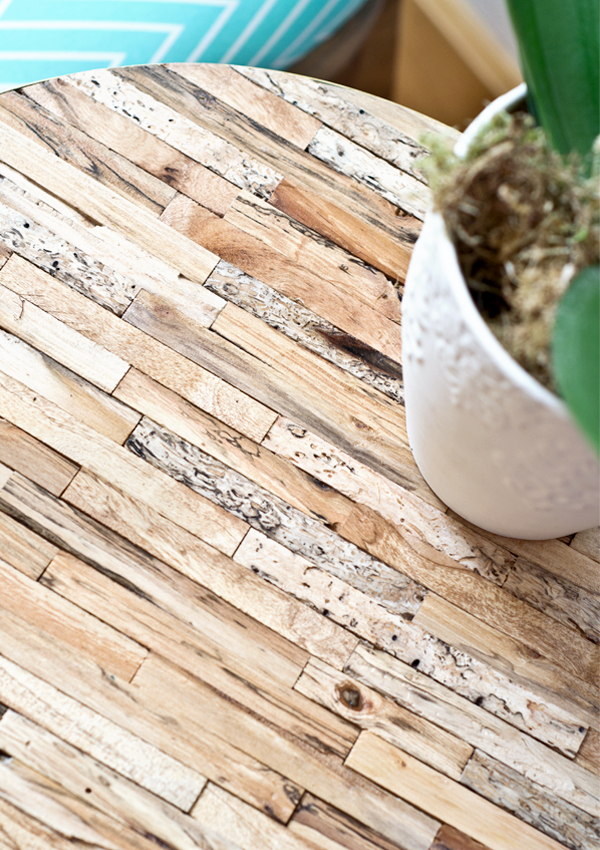
I LOVE the variety of wood grain!

I’m crazy about our new custom side table! It’s a great mix of rustic and glam. I also LOVE the price. I picked up the side table for $17.99, it was mis marked on the display, so my Target honored the price. The brass edging was $15 for two pieces and the rest of the materials, I had on hand! One of the advantages to having multiple projects going on at the same time 🙂

Click here and here to learn more about our refinished mid-century modern chairs and our DIY abstract black and white art.

DIY TUTORIALS// furniture redo// Uncategorized// Uncategorized14 Comments

Subscribe

get the latest straight to your inbox

« Weekend Recap + Project Updates
Panel Paintings to Chalkboard | Contributing Post at Infarrantly Creative »

Comments

  1. Cara @ ChicMeetsHealthy says

    December 17, 2013 at 2:51 pm

    LOVE this! Rustic and glam all rolled into one pretty package!

    Reply
  2. Cassie @ Primitive & Proper says

    December 17, 2013 at 3:01 pm

    holy awesomeness!!!!! i hope when you live near me your awesomeness permeates into my brain.

    Reply
  3. Gwen, The Makerista says

    December 17, 2013 at 3:25 pm

    This looks so good, Sarah! I love that you took a popular table and made it our own. It looks even more expensive now!

    Reply
  4. Vanessa @ Love This Crazy Life says

    December 17, 2013 at 5:35 pm

    LOVE this idea! My Target also had this table mis-marked for $17.99 so I grabbed the last two they had… the manager was pretty annoyed about the mis-mark but fair is fair 😉 Can't wait to play around with a similar idea for the one I put in my daughter's reading corner

    Reply
  5. Brit [House Updated] says

    December 17, 2013 at 6:08 pm

    This looks awesome. Totally takes a target table up a notch (or up a hundred). Nice Sarah!

    Reply
  6. Gabbi @ Retro Ranch Reno says

    December 17, 2013 at 6:56 pm

    So CRAZY cute! I love this little side table…just like everything else you do! 🙂

    Reply
  7. emily says

    December 17, 2013 at 7:36 pm

    gorgeous and clever.

    Reply
  8. Elizabeth @ The Little Black Door says

    December 17, 2013 at 10:11 pm

    I hope that Target is taking notes because I love your top way better!! 🙂

    Reply
  9. Sara Lorton says

    December 17, 2013 at 11:14 pm

    It looks great! I love the mix of metal and wood 🙂

    Reply
  10. hope @ hopefulgardner.com says

    December 18, 2013 at 2:20 am

    I LOVE IT! You could sell that girl!

    Reply
  11. Bethany DeVore says

    December 18, 2013 at 11:37 am

    I'm so jealous of your skills with the power tools! I really love the texture of the wood and variation in color paired with the gold base!

    Reply
  12. Jennifer Jones says

    December 19, 2013 at 7:49 am

    Incredible! Love the outcome! And totally wish I could get my hands on some driftwood! So pretty!

    Reply
  13. phoebe canakis says

    September 18, 2019 at 1:18 pm

    Hi! Where did you source the pieces of flat driftwood?

    Reply
    • Sarah Dorsey says

      September 18, 2019 at 7:33 pm

      Hi! We sourced from a local beach

      Reply

Leave a Reply Cancel reply

Your email address will not be published. Required fields are marked *

Contact Me

sarahmdorseydesigns{@}gmail{.}com

Stay Updated!

Get all the latest goods straight to your inbox!

This error message is only visible to WordPress admins

Error: No connected account.

Please go to the Instagram Feed settings page to connect an account.

Must Reads

Custom Peg Board + DIY Circle Art | FrogTape

Custom Peg Board + DIY Circle Art | FrogTape

Main Level Refresh with The Home Depot

Main Level Refresh with The Home Depot

Sponsor

2016 Daily Simplified Planner

Popular Projects

Breakfast for dinner and Free printables

Breakfast for dinner and Free printables

September 6, 2012 By Sarah 7 Comments

DIY statment art + frame | tutorial

DIY statment art + frame | tutorial

August 6, 2013 By Sarah 13 Comments

Large Black and White Abstract Art for the Office

Large Black and White Abstract Art for the Office

August 5, 2013 By Sarah 30 Comments

Art for Above the Headboard – Take 1

Art for Above the Headboard – Take 1

May 7, 2012 By Sarah 3 Comments

Anthropologie Inspired Draperies Complete!

Anthropologie Inspired Draperies Complete!

March 19, 2012 By Sarah 27 Comments

  • DIY TUTORIALS
    • design + build
    • furniture redo
    • diy in 1 hour or less
  • free printable
  • friday favorites

Disclosure

Occasionally, affiliate links are used when they are available. I do earn a small commission when items are purchased using those links. As always, I only link to things that I truly love. I also link to items that I love when an affiliate link is not available. Thanks so much!

  • Home
  • About
  • Services
  • Shop

Copyright © 2025 Dorsey Designs

MENU
  • Home
  • About
  • Services
  • Shop