• Home
  • About
  • Services
  • Shop
    • Bloglovin
    • Email
    • Facebook
    • Instagram
    • Pinterest
    • Twitter

Dorsey Designs

DIY and Interiors by Sarah + David

  • Home Tour
  • DIY TUTORIALS
  • friday favorites
  • design + build
  • art

get the latest straight to your inbox

How to install a drum shade over a chandelier

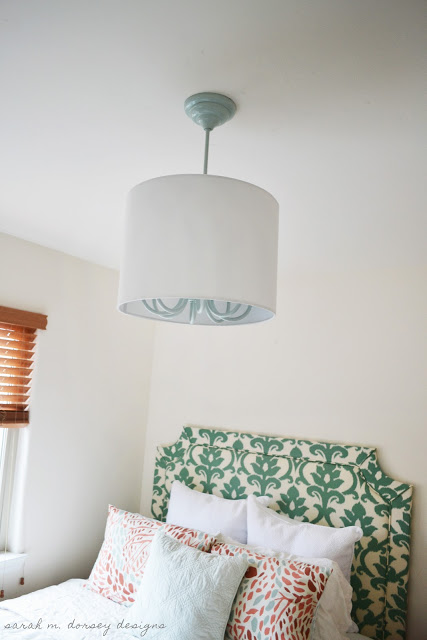
Today I thought I would share with you how we made the drum shade chandelier. We started with a massive chandelier with a glass shade. One advantage of a HUGE light fixture is that there are lots of parts! We were able to get everything (but one little part) out of the this fixture – hooray for not having to buy extra parts!

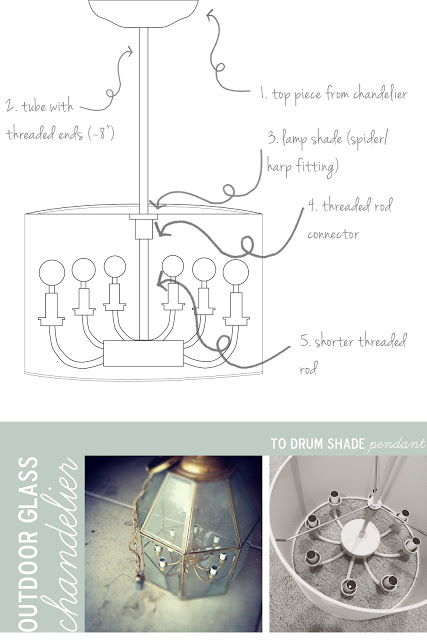
Below I drew a section (drawing cutting through the fixture) to explain how we put it together.

Here’s how we did it:

1. The piece that covers the electrical housing was taken from the top of the chandelier (ours was just big enough to cover the hole)

2. The long rod with treaded ends was the main brass tube that the chandelier hung from. It was simply screwed into the existing housing at the top. This piece was about 8″ long.

3. A lampshade with a spider/harp fitting was held in place

4. and a small threaded rod connector (~.5″) was screwed into place holding the lampshade. I purchased a threaded rod kit from Home Depot for the folded rope dome light and had this piece left over …

5. A shorter rod with threaded ends was taken from the top of the fixture (inside the top rounded piece to connect the chandelier to the very top of the fixture) This piece was about 5″

We then installed it in the existing electrical housing. It was a little awkward to install, so I held it in place while David connected all of the wires.

and that’s it! a definite upgrade!
lamps// Uncategorized// Uncategorized8 Comments

Subscribe

get the latest straight to your inbox

« 80s Chandelier to Glass Mirror | How To
What’s in my Cabinets »

Comments

  1. Jenna at Homeslice says

    September 18, 2012 at 10:24 pm

    I've always wondered about this.. thanks for sharing!!

    Reply
  2. Annie @ House on Rene says

    September 19, 2012 at 12:46 am

    I recently did this too with my dining table fixture. It is a nice budget fix that looks great!

    Reply
  3. Krista Sloup says

    September 26, 2012 at 8:17 pm

    So I found your blog while trying to find a drum shade. Where did you get the shade did you make it? I can't find any decently priced ones that I like that are big enough to fit over the chandelier, which is probably the same size as yours. I need a 18" or bigger and I'm having no luck. I thought about making one but I'm debating over materials.

    Reply
    • Sarah says

      September 26, 2012 at 8:51 pm

      Hi Krista! I purchased mine here: http://www.lampsplus.com/products/white-hardback-drum-lamp-shade-14x14x11-spider__u0946.html a few years ago, I think it was $30 then. In my experience, 18" is hard to find at a cheap price. You may want to check local lamp stores, they might have imperfect ones at a discounted price that you could repair? Hope this helps 🙂

      Reply
  4. Jenn Markwardt says

    September 28, 2012 at 3:24 pm

    Great post Sarah! I'm working on a DIY fixture right now and your post gave me some great inspiration 🙂

    Jenn

    http://julymooninspirations.com

    Reply
    • Sarah says

      September 28, 2012 at 3:48 pm

      Hi Jenn! Thank you! I'll keep a lookout for what you come up with!

      Reply
  5. Jennifer @ Dimples and Tangles says

    February 12, 2013 at 4:03 pm

    This is such a great update! Last year I made a drum shade from scratch to cover a chandelier and figuring out how to attach it was the hardest part. Good job!

    Reply
    • Sarah says

      February 12, 2013 at 6:05 pm

      Thanks Jennifer! Large drum shades can be so costly, I'll have to find your tutorial! We got lucky that we had a lot of parts to choose from to make it work! 🙂

      Reply

Leave a Reply Cancel reply

Your email address will not be published. Required fields are marked *

Contact Me

sarahmdorseydesigns{@}gmail{.}com

Stay Updated!

Get all the latest goods straight to your inbox!

This error message is only visible to WordPress admins

Error: No connected account.

Please go to the Instagram Feed settings page to connect an account.

Must Reads

Custom Peg Board + DIY Circle Art | FrogTape

Custom Peg Board + DIY Circle Art | FrogTape

Main Level Refresh with The Home Depot

Main Level Refresh with The Home Depot

Sponsor

2016 Daily Simplified Planner

Popular Projects

DIY Rope Art | Tutorial

DIY Rope Art | Tutorial

May 16, 2016 By Sarah 8 Comments

Black and White Chair | My Process + What NOT to do

Black and White Chair | My Process + What NOT to do

January 24, 2014 By Sarah 21 Comments

Its going to be a painting weekend!

Its going to be a painting weekend!

May 18, 2012 By Sarah Leave a Comment

Guest Bedroom Headboard Progress

Guest Bedroom Headboard Progress

June 7, 2012 By Sarah 2 Comments

Bookcase Renovation

Bookcase Renovation

March 5, 2012 By Sarah 6 Comments

  • DIY TUTORIALS
    • design + build
    • furniture redo
    • diy in 1 hour or less
  • free printable
  • friday favorites

Disclosure

Occasionally, affiliate links are used when they are available. I do earn a small commission when items are purchased using those links. As always, I only link to things that I truly love. I also link to items that I love when an affiliate link is not available. Thanks so much!

  • Home
  • About
  • Services
  • Shop

Copyright © 2025 Dorsey Designs

MENU
  • Home
  • About
  • Services
  • Shop