
This weekend I finished the draperies for the bedroom!
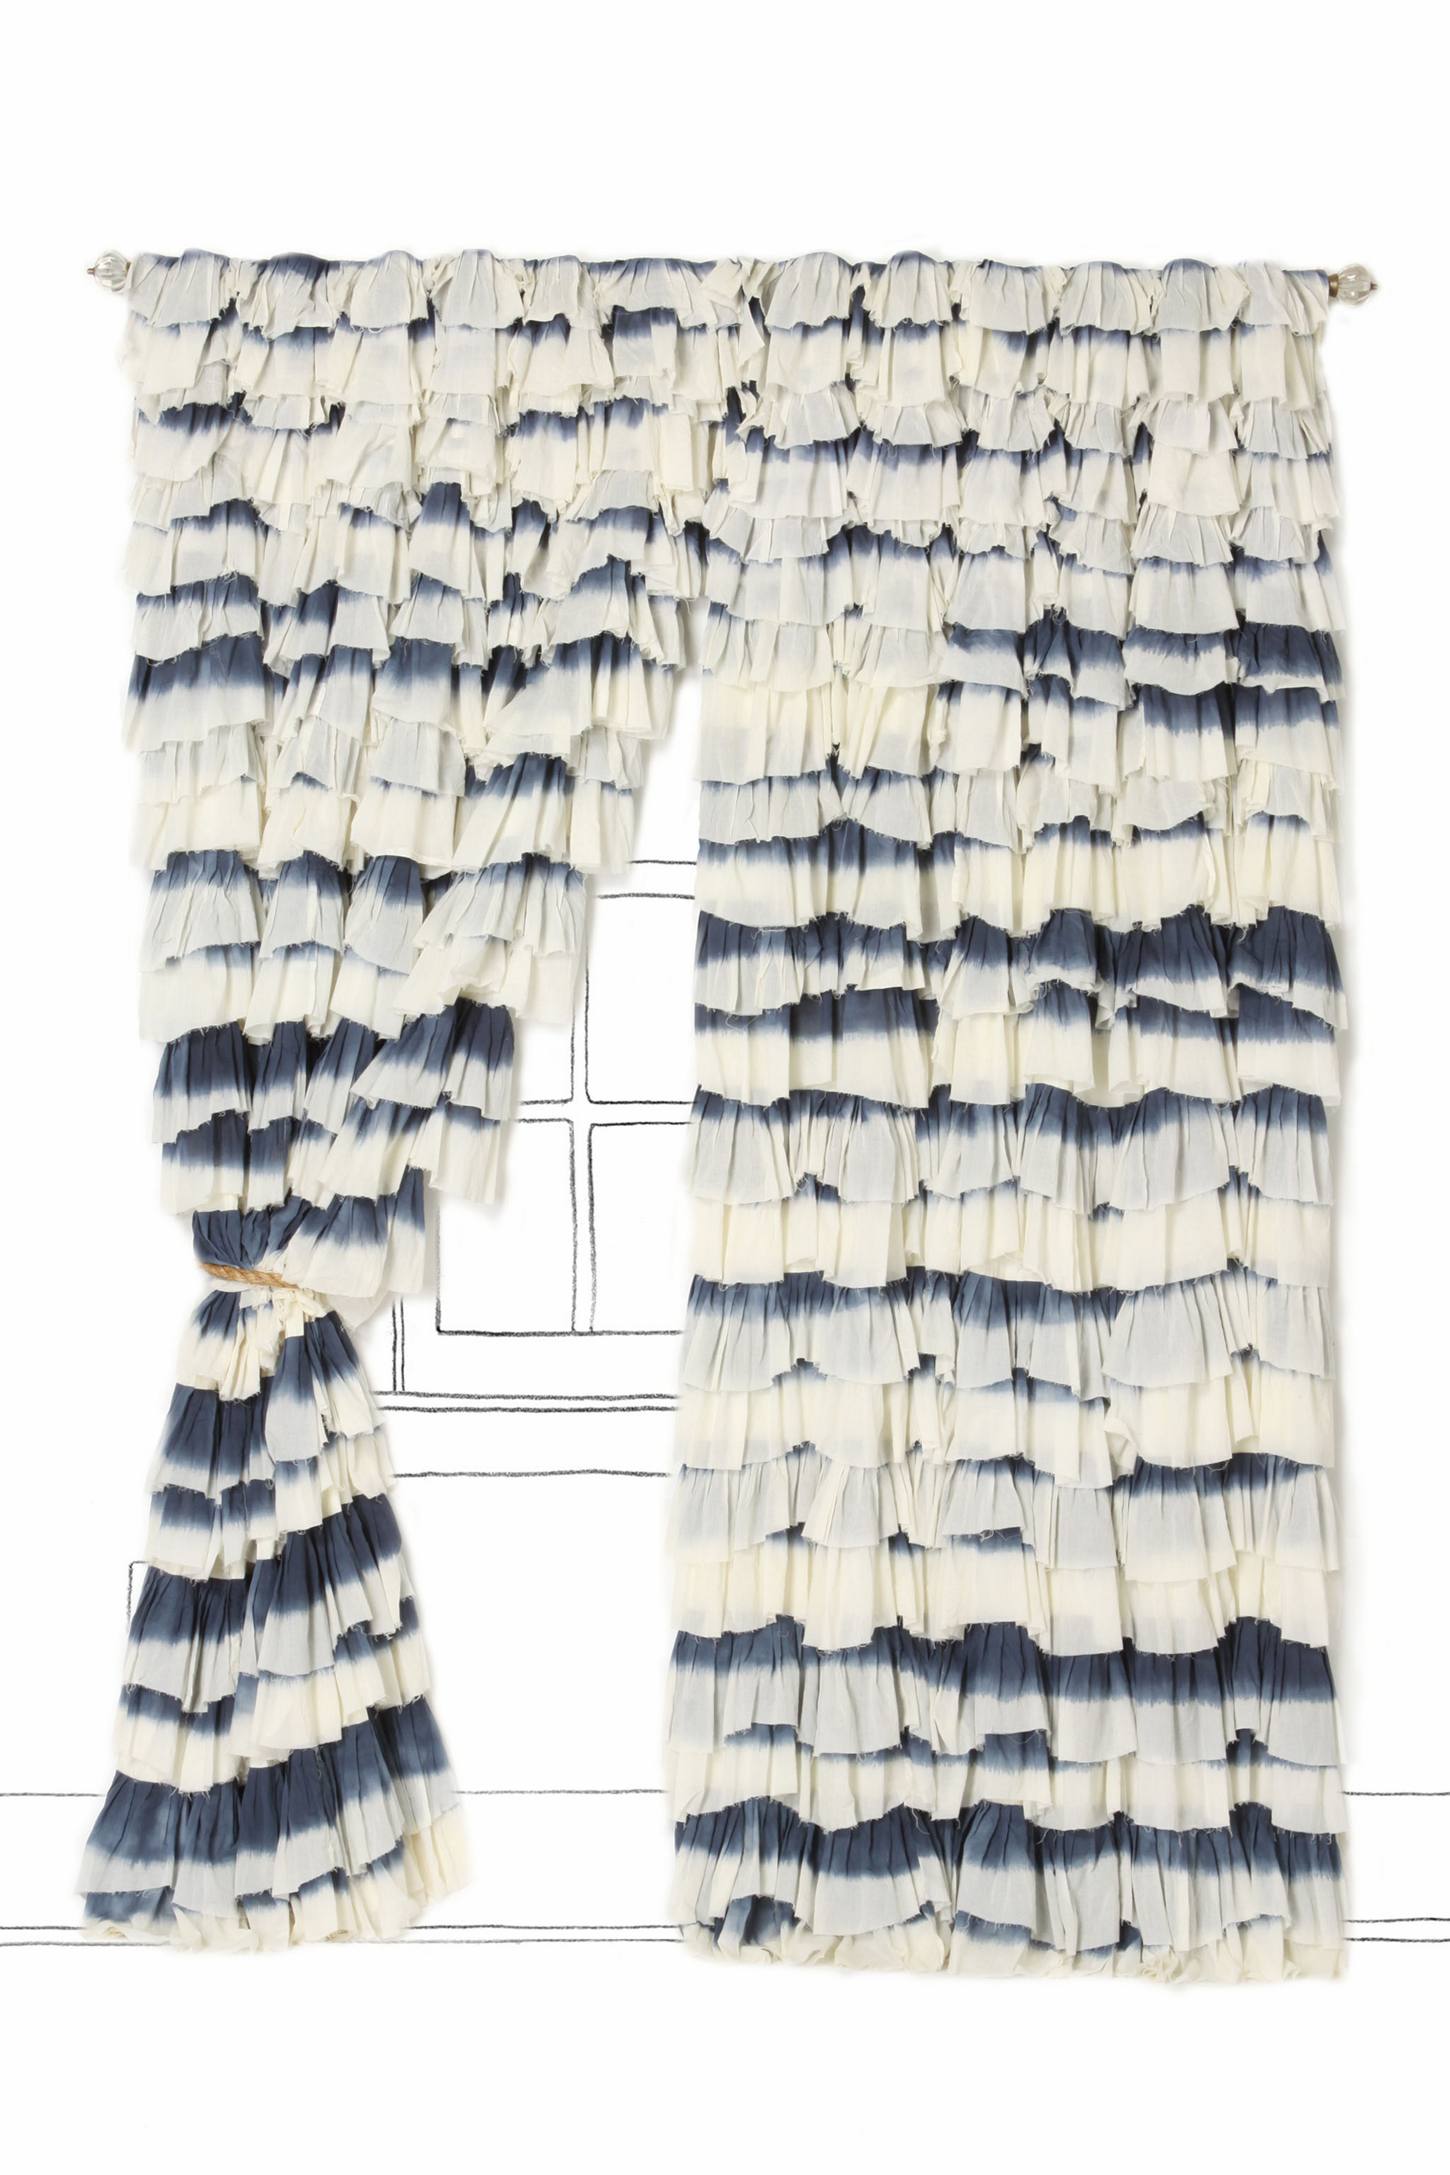
Ever since I saw this shower curtain at Anthropologie, I knew I wanted something like it
 |
| via |
 |
| via |
$118 (shower curtain) $208-$268 (per drapery, depending on length) was more than I wanted to spend especially since I would need two so I decided to test my sew skills and make my own
This post and this post discuss the progression to get where I am today – I originally started out with a set of white california king sheets and dyed them “gray” when they turned out blue, I had to rethink what I was going to do … Taking a few days, I decided to remake them after a visit to Target!
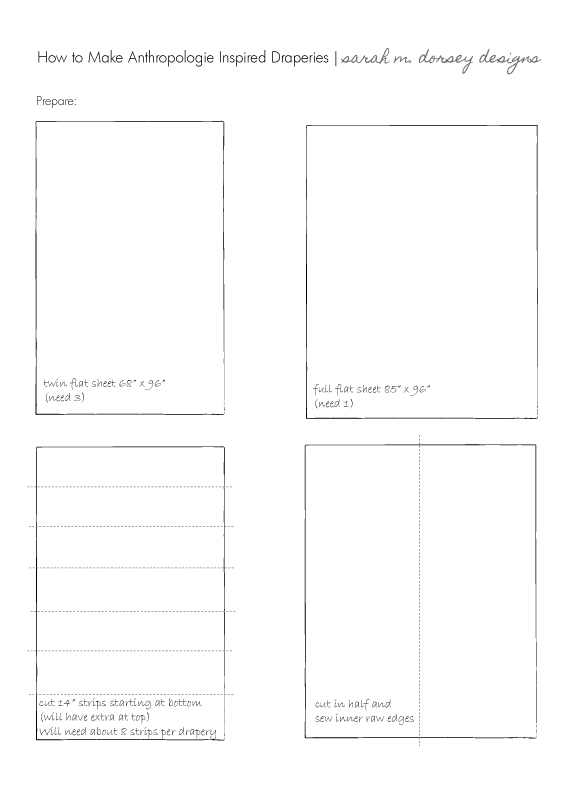
Thank goodness for Target! They have a lot of great products at affordable price points. I purchased 3 gray flat twin sheets (which was the width needed for the ruffles, less cutting and less hemming!!) 3 twin flat sheets gave me enough (with some left over for all of the ruffles for two 90″ drapes), I also purchased 1 gray full flat sheet. I cut that in half for the back of the draperies and it was the exact length and width that I needed!!
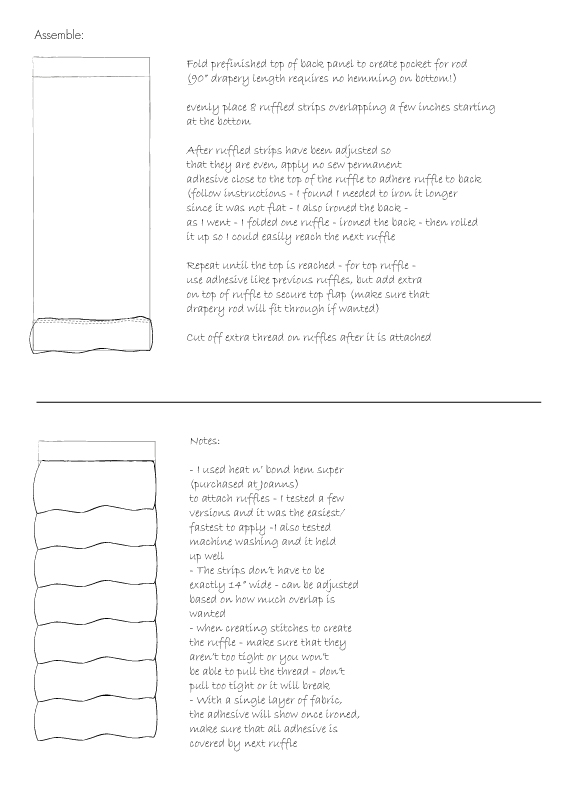
Here is how I made them with minimal sewing:
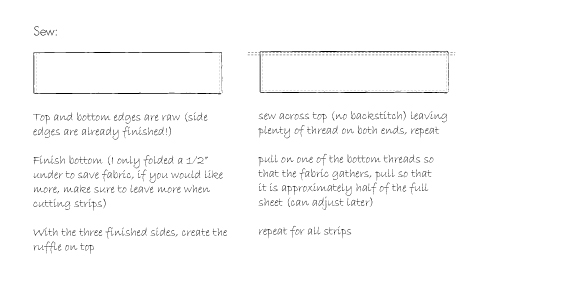
I found a video on youtube explaining how to make ruffles, I highly recommend making as i described above – it saves time and can be adjusted before attached to the back sheet
The nice thing about making these draperies is that they don’t require exact precision – the width of the panel can be adjusted based on how full you would like the ruffle – the length of the ruffle can be adjusted based on how much overlap is wanted
I decided not to sew the entire piece because:
1. a time saver
2. there was too much fabric on either side of the sewing machine, I had issues getting it through machine and sewing it properly
3. the test for the adhesive in the washing machine went well

I am including a before picture, because next to paint, I think that draperies can make a big impact on a room


Price breakdown:
Twin flat sheet: $11.99 x 3
Full flat sheet: $12.99
$48.96 / 2 = $24.48 per panel
Pretty good compared to $118 – $268!!
Over the weekend we wall mounted our tv in the bedroom – I originally wanted to build a stand for it, but after a trip to home depot and realizing that the wood alone would cost over $100, I decided to rethink –
Last week I found a table for $30 that I will be modifying to fit the space (but not enough to support the tv, hence the wall mount)
Check back for updates!
Thanks for the great tutorial! I have looked at dozens of these online but will be using yours as the basis for my curtains.
Thanks!
Beautiful curtain, just what I had in mind for my bedroom. I actually saw these in a sheer white in my granddaughter's nursery and loved them. Thanks for sharing your ideas.
Hi Janet! So glad that you found this post helpful! If you try them, let me know how they go!
I love this. I am going to make them for closet curtains for my girls's room. I have read the instructions a few times but I am wondering how to make the top, final ruffle look good. The one closest to the rod. It looks so nice in your pictures. I may just need to start the project and it will come to me as i go, but did you do anything special? I'm imagining the heat n' bond will show thru on the top one, no?
The final ruffle, is actually really easy! Hopefully this will make more sense 🙂 The top of the sheet (with the 4 – 5" finished edge) will create the pocket at the top. Since it is already double lined, that will hide the heat n' bond strip (if your sheets are different, you may want to test it first). Once you apply your last ruffle, fold the top over itself for the pocket, making sure to cover the top of the ruffle. I applied a little extra heat n' bond since it is holding more weight. Make sure to tug at it once done ironing to make sure that it is secure, if not iron a little more. Hope this helps!
Thanks Sarah! Can't wait to do this…my girls will love it!
OK..i have to ask..did you buy the flat sheets as part of a set? I've been searching everywhere for just flat sheets but everything comes as a set. I dont' need 3 fitten twin sheets and pillow cases! I searched my Target but couldn't find just flat sheets sold alone.
Here is the link to the ones that I purchased: http://www.target.com/p/target-home-300-thread-count-flat-sheet/-/A-13819242 Hope this helps!
I am freaking OBSESSED with the Lake Superior curtains – I have been thinking about buying the white Urban Outfitters ones and hand-dyeing the blue ombre into the ruffles. Sounds crazy right? 😉 Thanks for the DIY!
I LOVE THESE! i made some for my living room! now im contemplating making a set for my bedroom…. maybe in sheer white? or a yellow? I featured you and your amazing tutorial on my blog. Thank you so much for sharing this tutorial! http://aslocumstory.blogspot.com/2012/11/ruffled-drapes-diy-sort-of.html
I just want to say how much I LOVE these and can't wait to try them! I love your website and everything on it!
I LOVE THESE! I wanna make a bright colored rainbow one for my 3 year old daughters bedroom! Thanks for the tutorial 🙂
Thx for this tutorial, will have to try this for my daughters room.
It's like you doubled the size of that window!
I've been wanting to make one of these for a while and appreciate the great tutorial!…now I just need to decide which windows to put them on.
Hi Annalia – I agree that it makes the window appear much bigger! Let me know if you try it 🙂
Your tutorial breaks this down so well that it seems so much more doable and easy than any I've found! thank you so much!!! I am really going to try this now:)
I just made these and they are great! I love them! I loved how a lot of the edges were already finished too. Great idea. I was a little confused with how to top was supposed to go but as I was putting them together, I understood it. You fold over the top of the FULL size sheet (that's cut in half) over the top ruffle. I kept thinking that I had to save the top part of the TWIN size sheets when I was cutting those into strips but you don't need that part for the curtains at all.
Thank you so much for the tutorial!
Hi Brianne, So glad that you gave it a try! 🙂
almost finished with my first two curtains, and have a total of 7 more to go! yup, im doin' the whole house! thanks so much for the tutorial, it works fantastically!
So glad that it worked well for you!! 🙂
Your curtains look amazing! I think I may change the original color scheme of my bedroom to incorporate the simple gray sheets (or another simple color). This looks easy and much more simple than finding curtains to match a bedspread!
Thanks Holly! Let me know if you try them, I'd love to see!
I am not much of a sewer but I think I can do this!!! I am going to give it a try very soon!
Just a thought…I bet your blind was expensive..any way you could spray paint it to lighten it up??? Dianntha
Hi Dianntha – You should try it! We are currently renting, so painting the blinds isn't an option. Looking forward to owning a home in the future!
I love your work and really appreciate that you are so good at sharing information and how tos. can you tell me where you got the leafy floral stitched coverlet that is on the bed under the duvet in this post. it too is gorgeous.
Thanks so much! The floral coverlet was from Marshalls (about a year ago)
This post was so easy to understand and the curtains came out just as you described!! I found my sheets at Fred's for merely $5.50 twin and $8.50 full. So $12.00 a panel was worth the afternoons worth of work. Walmart carries a basic flat sheet for $4.97.each. the fabric on them however is a little coarse, But that made them very easy to sew. I just prefered the thinner sheer look, that I got from the Freds purchase. I also wanted to mention the dial or tension on your sewing machine is for gathering. 9 being very tightly gathered and 1 being very loose. I used the 5 setting and the ruffles came out perfectly. I just ran each ruffle through on a loose stitch and then it was ready to iron on. Easy peasy lemon squeezy. I am loving this project! I chose white. Thank you so much for the effort to get it right and make it easy for us to understand!! I am officially a fan!! God Bless, Dawn.. ps. I Would like to post a photo of my room but it's not an option��