• Home
  • About
  • Services
  • Shop
    • Bloglovin
    • Email
    • Facebook
    • Instagram
    • Pinterest
    • Twitter

Dorsey Designs

DIY and Interiors by Sarah + David

  • Home Tour
  • DIY TUTORIALS
  • friday favorites
  • design + build
  • art

get the latest straight to your inbox

Plain Rattan Chair to Chinese Chippendale Chair

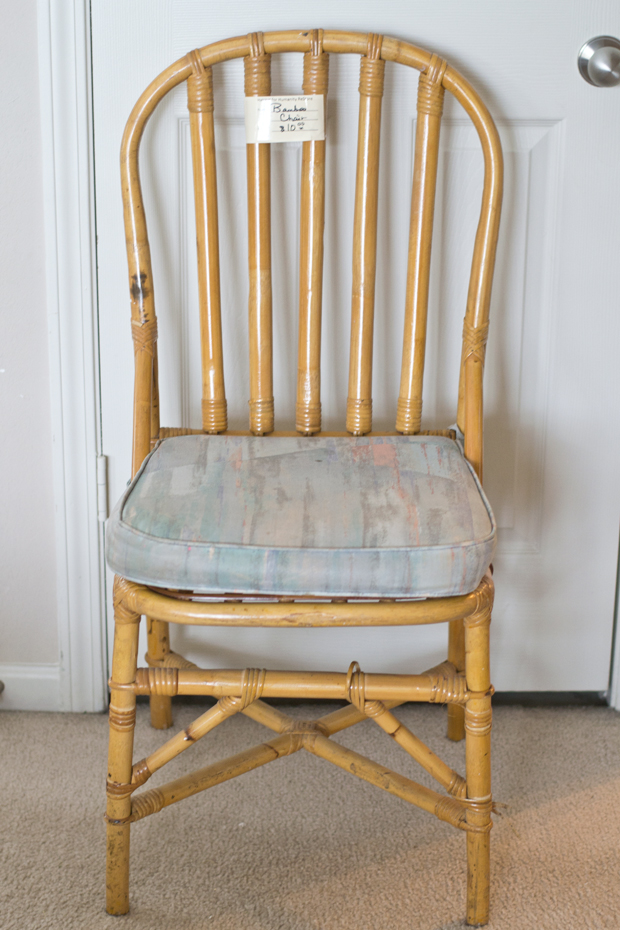
A few week’s ago I sent David a picture of this rattan chair while I was out thrifting. I said, $10, but not really a fan of the back .. he instantly thought of transforming the back into a Chinese Chippendale style (isn’t he a keeper?!) I loved the idea (obviously) and thought it was definitely worth a shot for just $10.

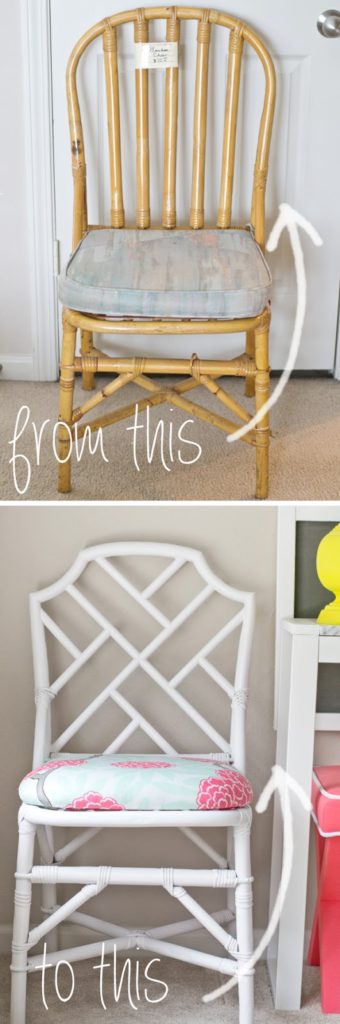
Ah, isn’t it wonderful? I love how it turned out! Our original plan was to reuse the existing rattan back rods, but the scale was a little larger than we wanted, so we picked up a few thinner dowel rods from Home Depot.

To get started, David measured and cut the corners on the back, inverted them (taping them in place temporarily).

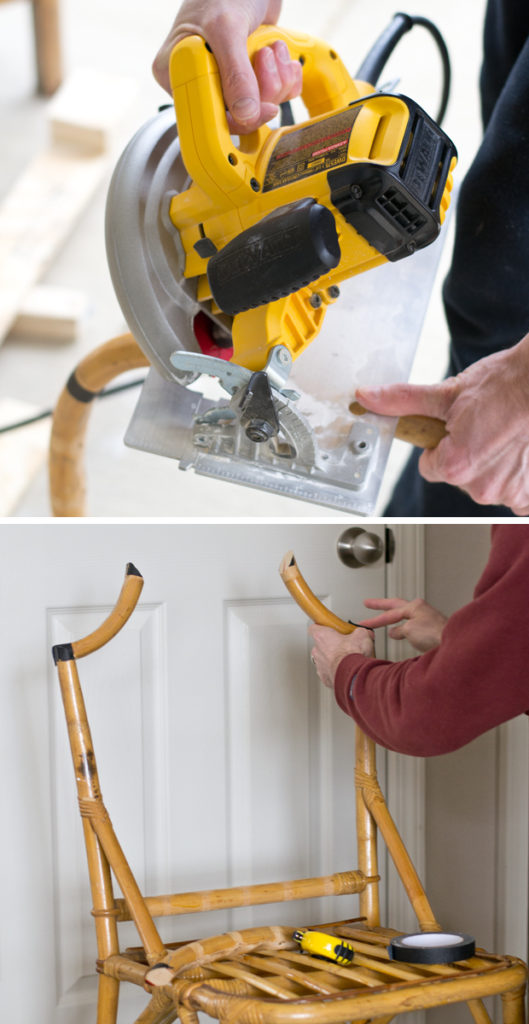
Glued and stapled in place. Next, we got started on the back. We measured and cut the dowel rods to fit.

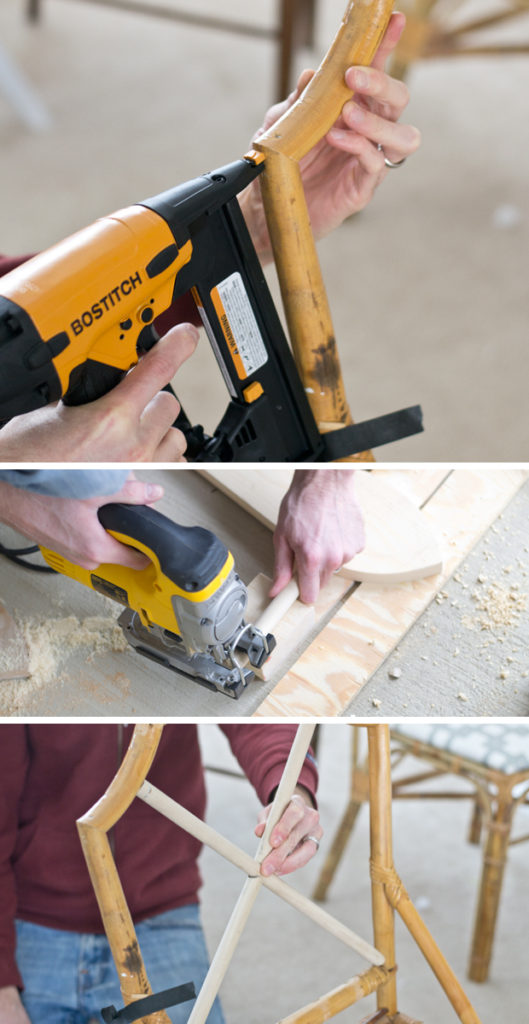
To contour the edges, we used a Dremel with the sanding attachment, so that they would fit fairly flush.

We continued to measure, cut to fit and attach the dowel rods in place. 

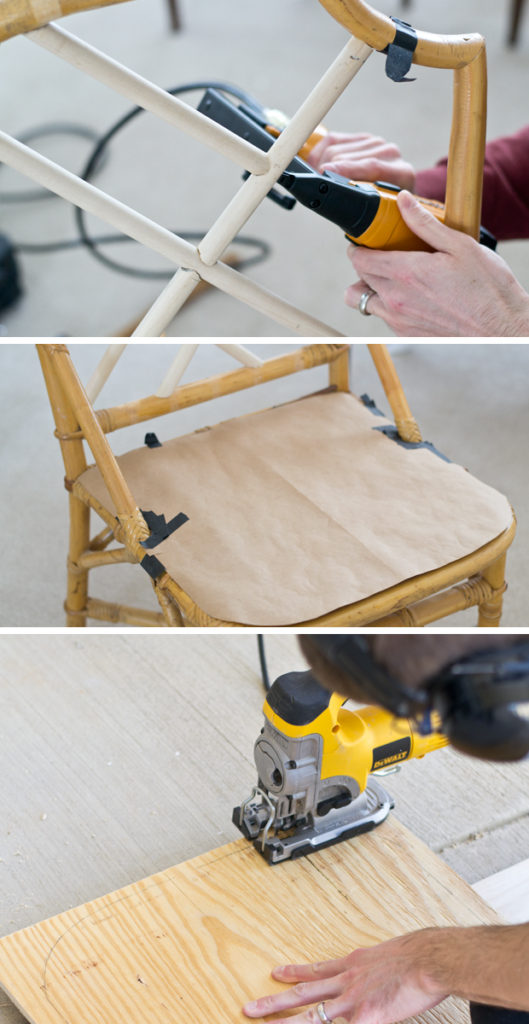
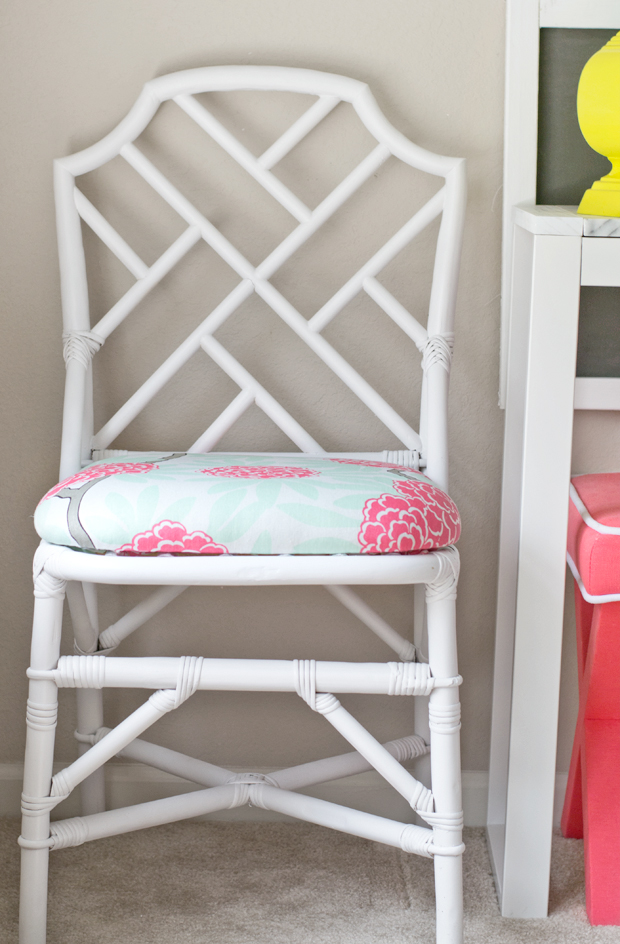
For the seat, we made a template out of paper, then traced on a piece of plywood, and cut out with the jigsaw. We attached the seat underneath, with two thin strips of plywood and screws.

To finish the frame, we applied wood filler to the seams, sanded and painted with Zinsser Cover Stain Primer and Rustoleum Enamel Satin. I like this combo for durability and a smooth finish. Satin is a great choice to hide any flaws.

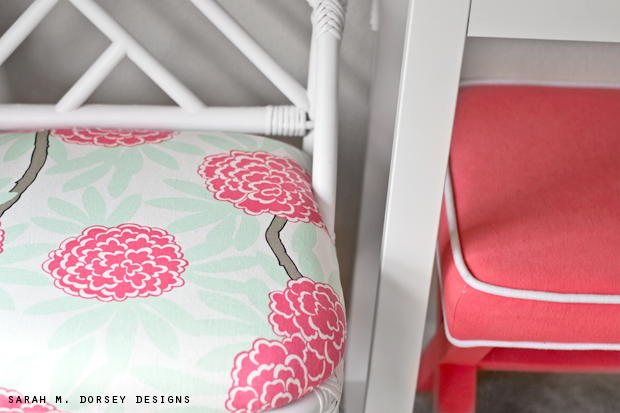
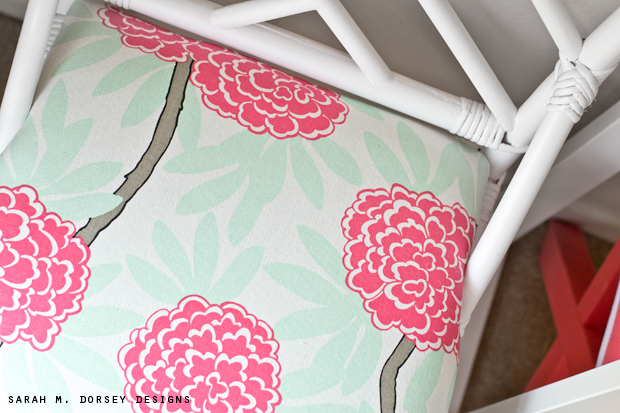
I cut a new piece of 2″ foam (about 1/2″ – 1″ larger than the plywood so the edges are smooth) and upholstered the seat in Caitlin Wilson’s Mint Fleur Chinoise. LOVE all of Caitlin Wilson’s fabrics!! I’ve used both the cotton canvas and linen cotton from her line and they are both a favorite to upholster with – they are a nice weight and easy to work with!

One last before

and after.

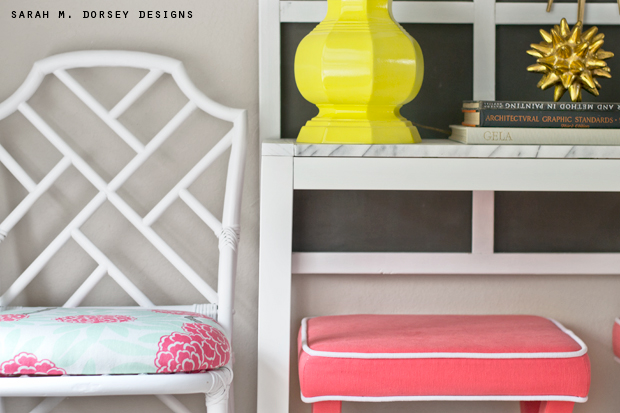
I love love love how it turned out!!

I’ve passed by a few similar chairs at the thrift store, maybe you have too? Next time, think about what you can do to make them your own!

DIY TUTORIALS// furniture// thrifting// Uncategorized// Uncategorized55 Comments

Subscribe

get the latest straight to your inbox

« It’s been quiet ..
Friday Five | 04.10.15 »

Comments

  1. Amanda says

    April 9, 2015 at 7:00 pm

    Amazing! As always. And the CW fabric is icing on top.

    Reply
    • Sarah says

      April 10, 2015 at 6:13 pm

      Thank you Amanda!! 🙂 Love all of CW fabrics!

      Reply
  2. gina says

    April 9, 2015 at 7:19 pm

    That is amazing!

    Reply
    • Sarah says

      April 10, 2015 at 6:13 pm

      Thank you Gina!! 🙂

      Reply
  3. Cassie @ Primitive & Proper says

    April 9, 2015 at 7:27 pm

    HOLY WOW! you are amazing.

    Reply
    • Sarah says

      April 10, 2015 at 6:13 pm

      Thanks Cassie!! 🙂 We have 48 chairs (yes, David keeps a running list) so we need to start selling some in the future, maybe this one will make it's way to the barn!

      Reply
  4. Elisa @ What the Vita says

    April 9, 2015 at 7:28 pm

    That is IT, you guys are one of the best DIYers I have ever seen.

    Reply
    • Sarah says

      April 10, 2015 at 6:12 pm

      That is so sweet, thanks SO much Elisa!! 🙂

      Reply
  5. Cocktails at 6 says

    April 9, 2015 at 7:56 pm

    Stunning! Job well done!

    Reply
    • Sarah says

      April 10, 2015 at 6:11 pm

      Thanks SO Much!! 🙂

      Reply
  6. Catherine Bixler says

    April 9, 2015 at 10:57 pm

    You both are so creative and talented! It's really amazing to see your transformations!

    Reply
    • Sarah says

      April 10, 2015 at 6:11 pm

      Thank you Catherine!! 🙂

      Reply
  7. Jen @ RamblingRenovators says

    April 9, 2015 at 11:22 pm

    A brilliant transformation! It takes a good eye to see that potential in a chair 😉

    Reply
    • Sarah says

      April 10, 2015 at 6:11 pm

      Thanks so much Jen!! 🙂 David knows my love for Chippendale furniture and he thought of it right away!

      Reply
  8. Jennifer@The Chronicles of Home says

    April 9, 2015 at 11:31 pm

    What?! This is such a smart update. I love that David's reply was "Maybe we can turn the back into a Chippendale style." Scott's reply to a similar text from me would probably be, "We don't need any more chairs 🙂 "

    Reply
    • Gwen, The Makerista says

      April 10, 2015 at 2:47 pm

      Ha! Exactly! I definitely would not look at that chair and think to do that…I mean I wouldn't think it would be possible, but I don't have mad skills like Sarah and David either. 😉

      Reply
    • Sarah says

      April 10, 2015 at 6:10 pm

      You are too sweet! 🙂 Thanks SO much!

      Reply
    • Unknown says

      July 13, 2015 at 7:22 pm

      One of the most brilliant diy makeovers.,,,and one of the most brilliant comments by a commenter @jennifer the chronicles of home… 🙂 🙂 exactly what most husbands would say 🙂

      Reply
  9. Robin @ designbyrobinsnest.blogspot.com says

    April 10, 2015 at 12:54 am

    1st-He's a keeper for sure! 2nd-Yall should become furniture designers! I love seeing how you create and remake pieces!

    Reply
    • Sarah says

      April 10, 2015 at 6:10 pm

      We'd love to come out with our own furniture line someday!! Thanks so much Robin!! 🙂

      Reply
  10. Julia Konya says

    April 10, 2015 at 1:34 am

    Stop it!!!! Seriously! I had to keep scrolling back up, over and over again. Ridiculous!
    And my husband would have said the same thing as Jennifer's but he also wouldn't have known what a chippendale is. I'm jealous in so many ways.

    Reply
    • Sarah says

      April 10, 2015 at 6:09 pm

      That's so sweet, thank so much Julia!! 🙂

      Reply
  11. Michelle @ AM Dolce Vita says

    April 10, 2015 at 1:40 am

    Incredible transformation! You are a genius!

    Reply
    • Sarah says

      April 10, 2015 at 6:09 pm

      Thanks SO much Michelle! 🙂

      Reply
  12. pam {simple details} says

    April 10, 2015 at 2:28 am

    Definitely a keeper!! 🙂 So awesome!

    Reply
    • Sarah says

      April 10, 2015 at 6:09 pm

      yes he is!! 🙂 Thanks SO much Pam! 🙂

      Reply
  13. Brynne Delerson says

    April 10, 2015 at 4:05 am

    Sarah, you guys are such geniuses! This makeover is incredible!

    Reply
    • Sarah says

      April 10, 2015 at 6:08 pm

      Thank YOU Brynne! 🙂

      Reply
  14. Mekenzie @ interiorsbykenz.com says

    April 10, 2015 at 4:25 am

    This transformation blows me away! You guys need to be chair engineers.

    Reply
    • Sarah says

      April 10, 2015 at 6:08 pm

      Thanks Mekenzie! 🙂 We'd love to design our own line someday!

      Reply
  15. Jennifer Jones says

    April 10, 2015 at 4:50 am

    I am not sure how you do it but I am blown away more and more with each visit to your site. THIS my friend, is about the most incredible transformation I have seen.

    Reply
    • Sarah says

      April 10, 2015 at 6:08 pm

      Thanks so much Jen! That is such a big compliment coming from you!! 🙂 Thank YOU!

      Reply
  16. Kristin@bliss-athome.com says

    April 10, 2015 at 1:02 pm

    He's definitely a keeper! So smart and it turned out lovely! xo

    Reply
    • Sarah says

      April 10, 2015 at 6:07 pm

      He really is a keeper 🙂 Thanks Kristin!! 🙂

      Reply
  17. Elaine says

    April 10, 2015 at 4:08 pm

    Wow! This looks awesome! Great transformation. What vision! 🙂

    Reply
    • Sarah says

      April 10, 2015 at 6:07 pm

      Thanks Elaine!! 🙂

      Reply
  18. Sarah AKA The Thriftress says

    April 10, 2015 at 4:12 pm

    Genius! I love it!

    Reply
    • Sarah says

      April 10, 2015 at 6:06 pm

      Thank you Sarah!! 🙂

      Reply
  19. Morgan Beauregard says

    April 10, 2015 at 4:23 pm

    Amazing! Your creativity and execution of projects never ceases to amaze me. What a gorgeous chair!

    Reply
    • Sarah says

      April 10, 2015 at 6:06 pm

      That's such a compliment! Thanks so much Morgan!! 🙂

      Reply
  20. Lori Bowen says

    April 10, 2015 at 5:20 pm

    Possibly the most creative thing ever.

    Reply
    • Sarah says

      April 10, 2015 at 6:06 pm

      That is so sweet, thanks SO much Lori!! 🙂

      Reply
  21. Allison {HousLoveDogBlog} says

    April 10, 2015 at 6:43 pm

    You guys are so clever! That is an amazing before and after!

    Reply
    • Sarah says

      April 16, 2015 at 1:44 am

      Thanks Allison!! 🙂

      Reply
  22. Karen @ a house full of sunshine says

    April 10, 2015 at 9:53 pm

    Unbelievable!! I seriously can't believe it!! Is there anything you guys can't do? Amazing! xo

    Reply
    • Sarah says

      April 16, 2015 at 1:44 am

      Thanks SO much Karen!! 🙂

      Reply
  23. Gabbi @ Retro Ranch Reno says

    April 13, 2015 at 2:15 pm

    SERIOUSLY!?!?!?! How ridiculously talented are the two of you?!?! You guys are uh-mazing!!

    Reply
    • Sarah says

      April 16, 2015 at 1:44 am

      Thanks Gabbi!! 🙂

      Reply
  24. Suzanne says

    April 13, 2015 at 8:13 pm

    This post got me so excited!!! I've been wanting one of these chairs for years and I love that now its way more accessible than I thought, of coarse getting my husband on board will be a little harder:)

    Reply
    • Sarah says

      April 16, 2015 at 1:43 am

      Thanks Suzanne! Perfect for those that can't find a Chippendale!!

      Reply
  25. Amber Wills says

    April 14, 2015 at 3:36 am

    Absolutely incredible! Mind blown Sarah!!

    Reply
    • Sarah says

      April 16, 2015 at 1:42 am

      Thanks Amber! 🙂

      Reply
  26. Stella Telleria says

    April 16, 2015 at 1:23 am

    This is so awesome but I'm really worried about the strength of the chair. Is it sturdy to have a man lounge back in it? Great idea!

    Reply
    • Sarah says

      April 16, 2015 at 1:43 am

      Hi Stella- Thanks! 🙂 The back seems as sturdy as it was, the long staples and glue make it pretty strong. I wouldn't recommend kids bouncing on it or a heavy man (who's rough on furniture) sitting on it, but for average use, I'd say it's ok.

      Reply
  27. sade studio says

    April 26, 2015 at 7:49 pm

    This is fantastic Sarah! Amazing stuff. I want to go thrifting with you next time you're back in the area 😉
    – Sabrina

    Reply

Leave a Reply Cancel reply

Your email address will not be published. Required fields are marked *

Contact Me

sarahmdorseydesigns{@}gmail{.}com

Stay Updated!

Get all the latest goods straight to your inbox!

This error message is only visible to WordPress admins

Error: No connected account.

Please go to the Instagram Feed settings page to connect an account.

Must Reads

Custom Peg Board + DIY Circle Art | FrogTape

Custom Peg Board + DIY Circle Art | FrogTape

Main Level Refresh with The Home Depot

Main Level Refresh with The Home Depot

Sponsor

2016 Daily Simplified Planner

Popular Projects

Nailhead Metallic Linen Headboard | Tutorial

Nailhead Metallic Linen Headboard | Tutorial

February 17, 2015 By Sarah 38 Comments

DIY Tufted Headboard with Nailhead and Wings | Bob Vila Thumbs Up Competition

DIY Tufted Headboard with Nailhead and Wings | Bob Vila Thumbs Up Competition

September 3, 2014 By Sarah 14 Comments

Its going to be a painting weekend!

Its going to be a painting weekend!

May 18, 2012 By Sarah Leave a Comment

Anthropologie Inspired Ruffled Draperies + Master Bedroom Update

Anthropologie Inspired Ruffled Draperies + Master Bedroom Update

March 9, 2012 By Sarah 1 Comment

Painted Puffy Paint Design Canvas – Headboard Art Take 2 In Process

Painted Puffy Paint Design Canvas – Headboard Art Take 2 In Process

May 14, 2012 By Sarah 2 Comments

  • DIY TUTORIALS
    • design + build
    • furniture redo
    • diy in 1 hour or less
  • free printable
  • friday favorites

Disclosure

Occasionally, affiliate links are used when they are available. I do earn a small commission when items are purchased using those links. As always, I only link to things that I truly love. I also link to items that I love when an affiliate link is not available. Thanks so much!

  • Home
  • About
  • Services
  • Shop

Copyright © 2025 Dorsey Designs

MENU
  • Home
  • About
  • Services
  • Shop