• Home
  • About
  • Services
  • Shop
    • Bloglovin
    • Email
    • Facebook
    • Instagram
    • Pinterest
    • Twitter

Dorsey Designs

DIY and Interiors by Sarah + David

  • Home Tour
  • DIY TUTORIALS
  • friday favorites
  • design + build
  • art

get the latest straight to your inbox

The Easy Way to Apply Greek Key Trim

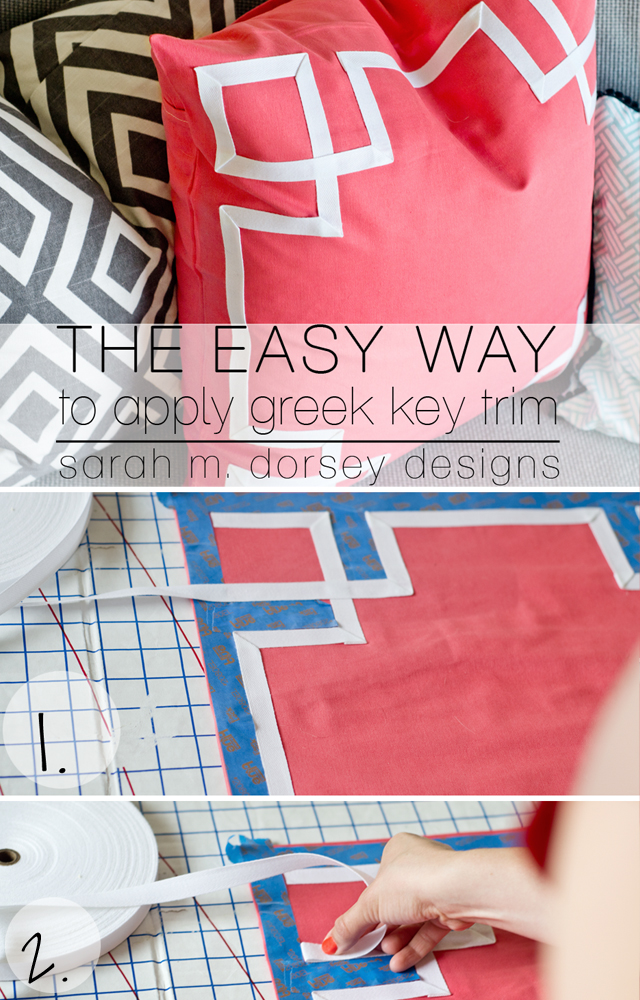
I adore Caitlin Wilson’s pillows! They are all perfection! Here is my version of the Coral Deco Pillow.

My twill tape arrived in the mail Saturday (all 72 yards of it! The best thing I could find at the time …) It sounds plasticy, but it’s actually cotton so it adheres well.

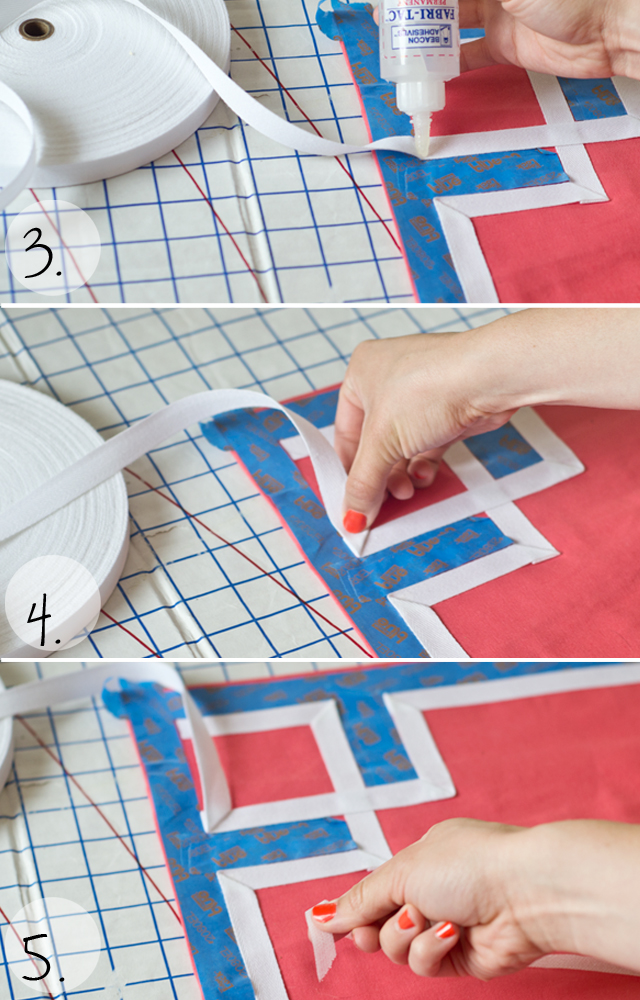
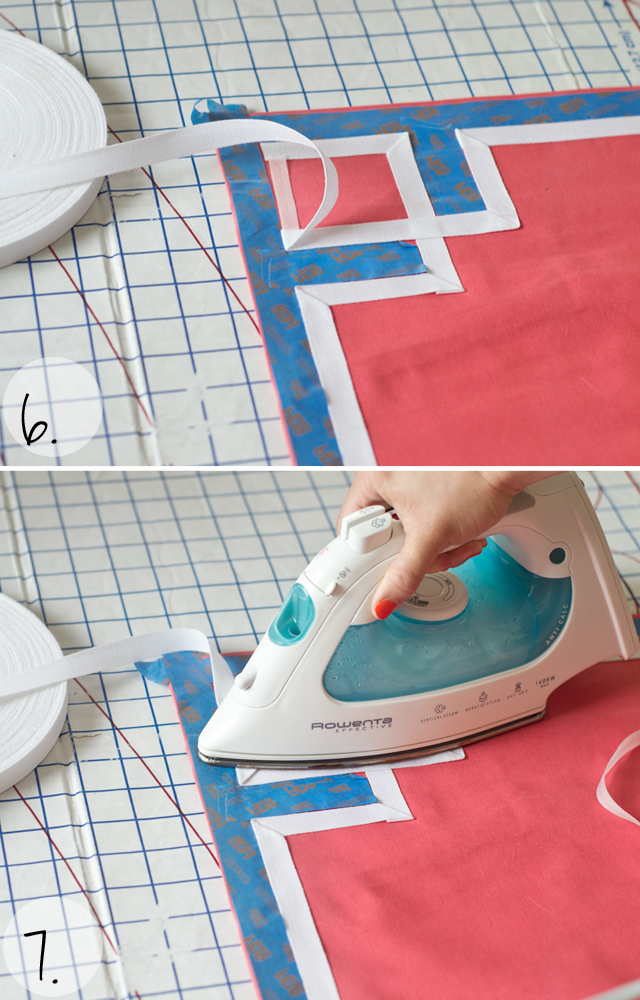
That evening I got straight to work! After finishing my last greek key project, I realized that there must be some way to fold the tape so you can do it consistently, without cutting each piece individually. At first I thought it would just give weird edges, but by folding it twice for one corner you are able to get square edges and 45 angles for the folds. Sometimes you don’t get everything on the first (or second) try! 🙂

Here’s how I did it for my 20″x20″ pillow sham. First I made a sham using this method. I ironed it flat and laid out a painters tape guide line as shown in the diagram below (left image). 

I created a border around the pillow using painters tape. I inset it a little and it ended up at about 1″ from the edge of the sham. The keys were 3.5″x3.5″, and I made the inner painter’s tape 1.25″ thick (the distance of two of my 5/8″ twill tape).
You can start anywhere, but you want to start the ribbon with a straight edge (slightly inset from where the tape will join it at the end, so that it gets covered) and then head either counter clockwise or clockwise. I found counter clockwise to be easiest for me.

Below I created a few picture diagrams to show you exactly how I did the fold. The directions pick up after you have laid down the first straight part and you need to make the first corner.

1. The ribbon will be perpendicular to the direction that you want to go. 
2. Fold the ribbon straight back on itself. I also pressed with an iron at this point so it would be creased, but it’s not necessary.

3. I put a little permanent adhesive for fabrics at the crease to help hold it down. 
4. Then I folded the piece back over on itself (like step 2) and then folded it up at a 45 angle. I played with it till it was straight (once you do a few you get the hang of it!) 
5. I ripped of the corner of my no sew adhesive (I like heat n’ bond) to make a 45 degree angle. 
6. I placed the no sew adhesive along the track and ripped it at the end. 
7. Then I ironed till it was secure. You want to make sure that you don’t iron too long because the adhesive will melt away, check after a few seconds, you want the adhesive to be melted, but still tacky, place it down and it will fully adhere once it dries. I’d also recommend placing a piece of plain white paper underneath the iron (no print otherwise it ends up on your fabric or iron) to help protect the fabric. **note: before applying your no sew adhesive, make sure to test it on a scrap piece of ribbon and fabric to make sure that it doesn’t show through.
To finish, where the ribbon meets the end, cut it straight across and fold at a 45 degree angle and adhere with no sew adhesive. 
I also went back and stuck a little no sew adhesive under the corners that were loose and secured with the iron.
I love how it brings in white, since all of the other pillows have white in them, it makes them more cohesive.
Meanwhile, this was going on at the other end…
How can you say no to that face? 🙂 Except when she rolls in bird poo at the beach (yep happened this weekend and yes she did go for a mandatory swim which she hates!) 
It took about 30 minutes to layout the tape, but a lot of that was figuring about how to do it, so now it would probably take about 15 minutes. and about 1 hour to apply the twill tape. 
So total time spent ~ 1.25 – 1.5 hours 
Total cost: 
Heat n’ Bond now sew adhesive $2 (joanns or walmart)
Twill Tape: $10 but I only used about 3.5-4 yards, so about $2
If anyone needs white 5/8″ twill tape, let me know, I have plenty. ha! .50/yard and probably $1 shipping (unless you need a lot). 
So is this easier? Do yo think it’s worth the time?
—
By the way, anyone notice that my nails are painted? I hardly ever paint my nails, but found a product recommendation at A. Liz Adventures to make it last forever!! Check out April’s second tip here. Now I’ll be painting them more often! Thanks April!

DIY TUTORIALS// Sewing// Uncategorized// Uncategorized28 Comments

Subscribe

get the latest straight to your inbox

« My go to project + lounge wear
Weekend in Photos »

Comments

  1. Mandy DeTurk says

    April 29, 2013 at 4:48 pm

    Love it!

    Reply
    • Sarah says

      April 30, 2013 at 3:02 pm

      Thanks Mandy! 🙂

      Reply
  2. Auralee says

    April 29, 2013 at 6:47 pm

    You did a great job! I just bought the gray grosgrain ribbon to make the greek key trim for some bedroom pillow shams but now I see this and I may try this greek key tutorial first on some other pillows I'm making. Thanks Sarah!

    Reply
    • Sarah says

      April 30, 2013 at 3:03 pm

      Thanks so much Auralee! I found it pretty easy, hopefully you will too! 🙂

      Reply
  3. Julia Konya says

    April 29, 2013 at 7:01 pm

    Your photos and tutorials are always amazing! So pretty!
    I couldn't say no to Annabelle's face even with bird poop 😉

    Reply
    • Sarah says

      April 30, 2013 at 3:05 pm

      Thanks Julia! I've been trying to make my instructions easier to understand, so I definitely appreciate hearing that! 🙂 Thank you! Most of the time it is really hard to say no, but that put me over the edge (it was everywhere!!) ha!

      Reply
  4. Nicole says

    April 29, 2013 at 7:39 pm

    Sarah, everything you make is gorgeous! I love seeing all of your projects!

    Reply
    • Sarah says

      April 30, 2013 at 3:06 pm

      aww thanks so much Nicole! That's so sweet 🙂

      Reply
  5. Leslie Stewart says

    April 29, 2013 at 7:40 pm

    Love it! Thanks so much for the great tutorial. Your pillow is gorgeous!
    Leslie
    House on the Way

    Reply
    • Sarah says

      April 30, 2013 at 2:56 pm

      Thanks so much Leslie! Glad that you found the tutorial helpful (I'm trying to make them more clear 🙂 So I appreciate that!!

      Reply
  6. Jennifer@The Chronicles of Home says

    April 30, 2013 at 12:44 am

    So funny because I totally noticed your nails were painted! Mine are never painted because it lasts about 20 minutes for me usually. Will have to head over and check out that tip. Absolutely adore these pillows, I'm pinning your tutorial for future reference!

    Reply
    • Sarah says

      April 30, 2013 at 2:58 pm

      I know me too … I hate painting them because it chips so quickly! I think the top coat is called Seche Vite, and it works so well! It lasted several days through projects and cleaning! Thanks for the pin! 🙂

      Reply
  7. kyasdesign says

    April 30, 2013 at 4:23 am

    ooh, if you're selling trim, i'd like to buy enough to make 4 pillows – I really only plan on making one, but I need enough for trial and error. 🙂

    kansai5456@gmail.com

    Thanks
    Kelli

    Reply
    • Sarah says

      April 30, 2013 at 3:06 pm

      Just emailed you 🙂

      Reply
  8. erin says

    May 1, 2013 at 4:46 am

    I am so excited to have found your blog! I have been greedily consuming all of your posts, and I love your style! I too love Caitlin Wilson's designs and you did a fantastic job on these!!! I do have a question about the other pillow…the black & white one that looks like a David Hicks design. Would you mind sharing your fabric source? (I haven't made it through all your old posts, so maybe this even another design you re-created yourself!) Thanks!

    Reply
    • Sarah says

      May 1, 2013 at 2:39 pm

      Hi Erin, Thanks so much for stopping by! 🙂 It is Richloom Dixon Slub Graphite: http://www.fabric.com/ProductDetail.aspx?ProductID=557fba61-059d-4a58-b8d4-245b348dfe1b&CategoryID=34d1298e-482b-4854-a63d-c102f1fda817 (It is currently out of stock)

      The pattern is very similar to the David Hick's fabric, just a little more elongated. Keep in touch!

      Reply
    • Erin says

      May 1, 2013 at 8:21 pm

      Thanks! This one is a bit more compatible with my price range! 🙂

      Reply
  9. Katie says

    May 6, 2013 at 5:13 pm

    I just discovered your blog via the West Elm feature. (What a beautiful bedroom!) After browsing your blog, I had to share, our puppies look so similar! Meet Hobbes: http://twinstripe.com/blog/coffee-table-book/ and http://instagram.com/p/YDLb_io4Iz/. They look like they could be siblings, very similar markings.

    Have a great week!

    Reply
    • Sarah says

      May 6, 2013 at 6:11 pm

      Hi katie! oh my gosh, they are almost like twins! Do you know what mix? We think Annabelle is a beagle/long hair jack russell mix 🙂 Thanks so much for stopping by! Have a great week too!

      Reply
    • Katie says

      May 8, 2013 at 12:27 am

      They have never been as detailed, but the think he is a terrier/spaniel mix. I just can't get over some of the similarities!

      Reply
  10. creativepinkbutterfly says

    May 13, 2013 at 6:25 pm

    This is such a great project! It would be so fun to try something like this! I could also imagine using this tutorial with different patterns 🙂 Pinning 😉

    Reply
  11. Josephine says

    August 20, 2013 at 9:16 pm

    Thank you for posting this tutorial. I finished my own greek key pillow today and I love how it turned out! It took me nearly four hours to get all the ribbon on (my heat and bond took a lot of ironing), but I think it was worth it. I had to figure out that the inside parts of the template should extend 2 and seven-eighths inches past the border. Not that hard to figure out, but I thought you might want to add the length of those pieces to the diagram (unless you've left them off to make it easier to tweak for different widths of tape/ribbon?). Once again, thank you!

    Reply
  12. Anna says

    October 26, 2013 at 4:18 pm

    Love these pillows!! I'm dying to make 3 for my new bed. Do you still have any tape available? If so id love to purchase enoug

    Reply
    • Sarah says

      October 30, 2013 at 12:44 am

      Hi Anna – we recently moved and it's still packed in a box .. I should find it shortly though!

      Reply
  13. Laura Oyler says

    January 2, 2014 at 8:37 pm

    Hi Sarah, first off let me say I love your blog! I want to use this tutorial to make two 14 inch sized pillows, but I'm not sure how to find the measurements to lay out my painters tape since my pillows are smaller. Could you help me out? Also, since my pillows are smaller do you think I should use twill tape that is 1/2 inch wide instead of the 5/8 inch?

    Reply
    • Sarah says

      January 16, 2014 at 7:54 pm

      Hi Laura! Thank you! I think 1/2 or 5/8 would work fine for a smaller pillow. For a smaller pillow I'd probably recommend this style: http://www.caitlinwilsontextiles.com/?p=product&sku=76&d=3&pre=p!category|c!pillowcovers|patt!|s!|fabric!

      With a smaller pillow, I'd be concerned that the design above would be too cramped. Hope this helps! 🙂

      Reply
  14. Sariah Lunsford says

    February 14, 2015 at 3:34 pm

    Do you remember the exact name of the coral fabric on fabric.com? I love these pillows and want to get just the right coral with a little pink one in it as well:)

    Reply
    • Sarah says

      February 16, 2015 at 8:22 pm

      It's Michael Miller – I can't remember the exact name. Good luck hunting!

      Reply

Leave a Reply Cancel reply

Your email address will not be published. Required fields are marked *

Contact Me

sarahmdorseydesigns{@}gmail{.}com

Stay Updated!

Get all the latest goods straight to your inbox!

This error message is only visible to WordPress admins

Error: No connected account.

Please go to the Instagram Feed settings page to connect an account.

Must Reads

Custom Peg Board + DIY Circle Art | FrogTape

Custom Peg Board + DIY Circle Art | FrogTape

Main Level Refresh with The Home Depot

Main Level Refresh with The Home Depot

Sponsor

2016 Daily Simplified Planner

Popular Projects

Nailhead Metallic Linen Headboard | Tutorial

Nailhead Metallic Linen Headboard | Tutorial

February 17, 2015 By Sarah 38 Comments

MBR Headboard Update

MBR Headboard Update

April 10, 2012 By Sarah 2 Comments

Damage Free Renter Friendly Draperies with Black Tassel Trim

Damage Free Renter Friendly Draperies with Black Tassel Trim

May 20, 2014 By Sarah 11 Comments

Print Giveaway from My Etsy Shop at: At Home When I’m With You

Print Giveaway from My Etsy Shop at: At Home When I’m With You

May 29, 2012 By Sarah Leave a Comment

Breakfast for dinner and Free printables

Breakfast for dinner and Free printables

September 6, 2012 By Sarah 7 Comments

  • DIY TUTORIALS
    • design + build
    • furniture redo
    • diy in 1 hour or less
  • free printable
  • friday favorites

Disclosure

Occasionally, affiliate links are used when they are available. I do earn a small commission when items are purchased using those links. As always, I only link to things that I truly love. I also link to items that I love when an affiliate link is not available. Thanks so much!

  • Home
  • About
  • Services
  • Shop

Copyright © 2025 Dorsey Designs

MENU
  • Home
  • About
  • Services
  • Shop